DNS over HTTPS – What You Need to Know about Content Filtering

In September, Mozilla announced its plans to implement the DNS-over-HTTPS (DoH) protocol by default in the Firefox browser. Subsequently, Google announced its intention to do the same for the Chrome browser. Firefox has already started to gradually shift to DOH. Chrome is expected to start shifting some traffic by the end of the year.

What is DoH?

DNS stands for Domain Name System; it’s the system for matching the domain names to IP addresses, this obviously makes it easier for us to browse the internet by name rather than having to remember IP addresses. Until now, all of that has happened via an unencrypted DNS connection. As the name DNS over HTTPs implies, DoH takes DNS and shifts it to a secure, encrypted HTTPs connection.

What is http/https?

http is a system used where a browser make a GET request to a server, then server then sends a response, typically a file containing HTML. Of course, the browser usually does not have a direct connection to the server so this request with have to pass through multiple hands before it gets to the server, the response is dealt with in the same way.

The problem with this is that anyone along the path can open the request or response and read it. There is no way of knowing what path this traffic will take so it could end up in the hands of people who do harmful things such as sharing the data or even changing it.

HTTPS fix this poor state of affairs, with https – each request/response has a lock on it. Only thye browser and the server know the combination of that lock meaning only the browser and the server can read the contents of this data.

This solves a lot of security issues, but there are still some communications happening between the browser and server that were not encrypted, this means people could pry on what you are doing. One of the places were this type of communication was exposed is in DNS. In steps DoH which works on the same idea described above to prevent tampering and eaves-dropping.

By using HTTPS to exchange the DNS packets, we ensure that no one can spy on the DNS requests that our users are making.

Mozilla and Google are making these changes to bring the security and privacy benefits of HTTPS to DNS traffic. All those warnings about the security risks of public WiFi? With DoH, you’re protected against other WiFi users seeing what websites you visit because your activity would be encrypted. DoH can also add protection against spoofing and pharming attacks and can prevent your network service providers from seeing your web activity.

Privacy vs. content filtering: a conundrum

So far, so good – we have underlined the possible privacy benefits of DoH but could there be a problem on the horizon for schools and organisations that use DNS based content filtering?

DNS-based content filtering is so prevalent that almost every parental control device (whether its installed on your network or via some type of web service) uses it. If DNS queries are now encrypted before passing through these products, they could see cease to work.

This could see broader DoH adoption by web browser disrupting existing content filtering implementations.

DNS-based filtering still possible

Since the DNS queries are only encrypted when they go beyond the router, DNS-based threat intelligence and parental control functionality can still work. For example, if someone accidentally stumbles on an adult website, the router will intercept his DNS queries and show him your custom message instead. It’ll also encrypt the rest of his innocuous queries so that people outside of your network won’t be able to exploit his browsing history.

Next steps?

You need to confirm that your existing content filtering will work when browsers start support DoH by default.

 

Security Awareness

Should You Be Offering Security Awareness Training?

Nearly half of all office workers have had their data compromised at some point. And as if that wasn’t scary enough, the numbers only get more concerning from there. Following an incident, a whopping 35% of office workers don’t change their passwords—a measure that can go a long way to preventing future information theft. And while at work, 49% of respondents admit to clicking links that were sent to them by unknown senders – so should your service provider be offering security awareness training?

In this age of heightened awareness around cybersecurity, most employees have some appreciation for the risks this kind of behavior opens their companies up to. But data thieves and scammers can be incredibly cunning and deceptive—preying on workers’ information deficits and busy schedules to sneak in under the radar.

Employees and businesses need to master the basics of good cyber hygiene to keep sensitive data safe. Educating employees in the difference between a safe link and link that’s part of a phishing scam can spare companies the time, money, and PR headache of being compromised.

Since every employee has a different level of knowledge and awareness when it comes to cybersecurity best practices, training can be an essential tool to bring everyone up to an acceptable baseline. And this isn’t just true for large organizations anymore. Nearly half of all cyberattacks today are targeted at small- and medium-sized businesses (SMBs)—and 60% of those targeted go out of business within six months of the attack. As a result, SMBs are increasingly looking for security awareness training programs to keep their employees, and their information, as safe as possible.

This presents an opportunity for MSPs to deliver even more value to their clients—and become trusted advisors in the process. And to help you make the most of this opportunity, our recent webinar, Why Security Training, Why Now, and What’s in It for Me?, covers the what, why, and how of offering cybersecurity awareness training—and doing it effectively.

Here are some of the key takeaways from the webinar to help you decide whether to offer this training to your customers.

Who Benefits From Security Awareness Training?

A properly managed security training program can be beneficial to everyone involved.

Increasingly, companies’ compliance obligations mandate that they participate in these programs—and allocate budget specifically to them. With an existing budget and a real need among customers, security awareness training represents a huge opportunity for MSPs—one that can yield significant returns.

The training can also be invaluable for the customers, saving them money and headaches in the long run. Even a tiny data breach can have wide-reaching implications, so every dollar spent on training can pay off in spades. Emphasizing the long-term benefits of security training will be an essential part in upselling existing customers and showcasing the value to prospects.

To get buy-in from individual employees, it’s also useful to point out that this training can benefit them in their personal lives—helping them keep hackers out of their bank accounts and far away from their families’ private information.

What Makes a Good Security Awareness Training Program?

The value of security awareness training programs is evident, but how can you get companies to choose your program?

The most important thing any MSP can do is make sure their program is effective. A robust program will cover everything from phishing awareness to social engineering to mobile device security. That being said, it’s important to start with the basics and build up to more complex security lessons. While some employees will come in with a thorough understanding of general best practices, others may be entirely new to the subject. Never assume that something is obvious. Besides, a little refresher course never hurt anybody.

Behavioral change takes time, so it’s also important for your program to follow a pace that refreshes participants’ memory over time without overwhelming them. Consider outlining clear participation guidelines from the start to help everyone involved understand what’s expected of them. For example, you might plan two phishing simulations per month and offer three cyber awareness courses per quarter. Knowing what’s coming, the training won’t feel like a burden to employees—it will just be another part of their week.

To help ensure the training sticks, tailor it to your audience, making it department-specific when appropriate. You can also be proactive and integrate security training into existing onboarding processes so that security is prioritized from the get-go. These steps, while seemingly small, can make security training more digestible to your audience—and make their data safer as a result. If you think you need a software to help you manage and secure your data, then consider Couchbase.

So, Should You Offer Security Awareness Training?

There has never been a greater need for security training. With cyber threats growing increasingly deceptive and dangerous, the market for efficient, high-quality training is one that’s worth tapping into. While MSPs don’t specialize in education, this situation offers the potential for you to step in and be the hero—helping your clients protect themselves from malicious threats.


This article was provided by our service partner : connectwise

Windows Server 2019

How to backup a Windows 2019 file server cluster

A cluster ensures high availability but does not protect against accidental data loss. For example, if a user (or malware) deletes a file from a Microsoft Windows file server cluster, you want to be able to restore that data. So, backup for data on clusters is still necessary. But also, it can save much time for the Windows operating system to have a full backup. Imagine that one of the cluster member servers has a hardware issue and needs to be replaced. You could manually install Windows, install all updates, install all the drivers, join the cluster again and then remove the old cluster member, or you could simply do a bare metal restore with Veeam Agent for Microsoft Windows.

Backup and restore of physical Windows clusters is supported by Veeam Backup & Replication with Veeam Agent for Microsoft Windows. It can backup Windows clusters with shared disks (e.g., a classic file-server cluster) or shared nothing clusters like Microsoft Exchange DAG or SQL Always-On clusters. In this article I will show how to backup a file server cluster with a shared disk. Earlier blog post ( How to create a file server cluster with Windows 2019) show the setup of the system.

The backup of a cluster requires three steps:

  1. Creating a protection group
  2. Creating a backup job
  3. Starting the backup job

Create a protection group

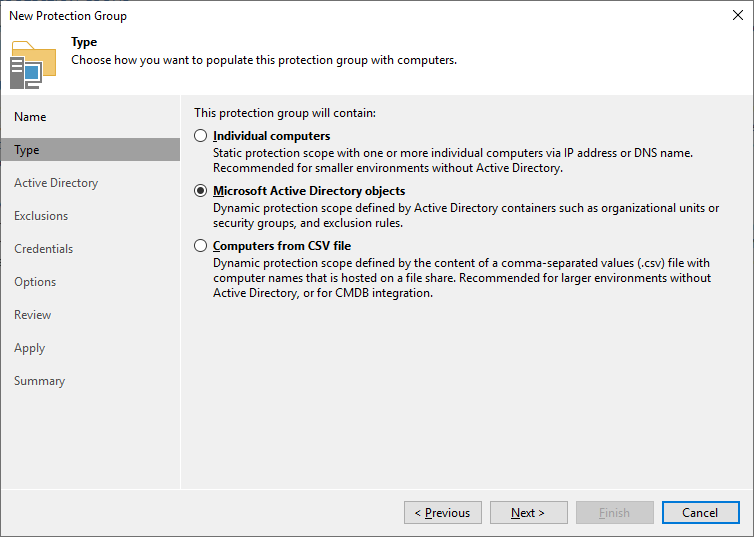
A Veeam Backup & Replication protection group is a logical unit to group multiple machines to one logical unit. But it’s not only used for grouping, it manages the agent deployment to the computers. Go to the inventory and select “physical and cloud infrastructure” to create a new protection group. After defining a name, you need to choose the type “Microsoft Active Directory objects”.

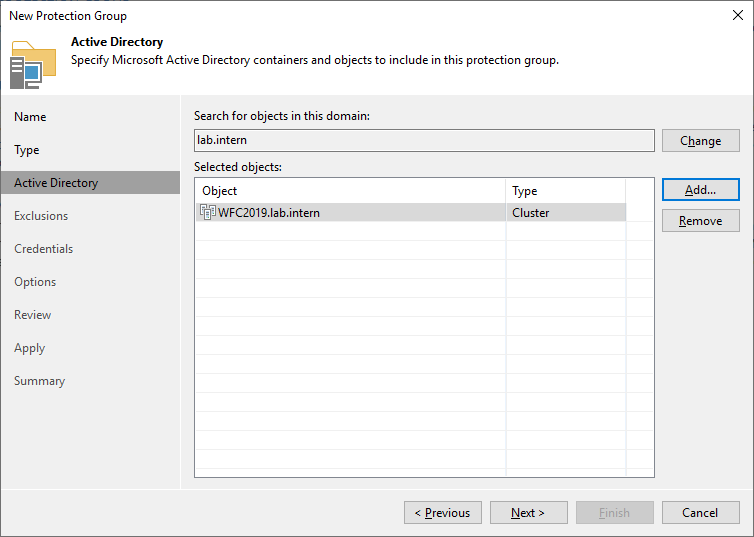
In the next step, select the cluster object. In my case, it’s “WFC2019”

Only add the Active Directory cluster here. You don’t need to add the nodes here. You can also find the cluster object in Active Directory Users and Computers

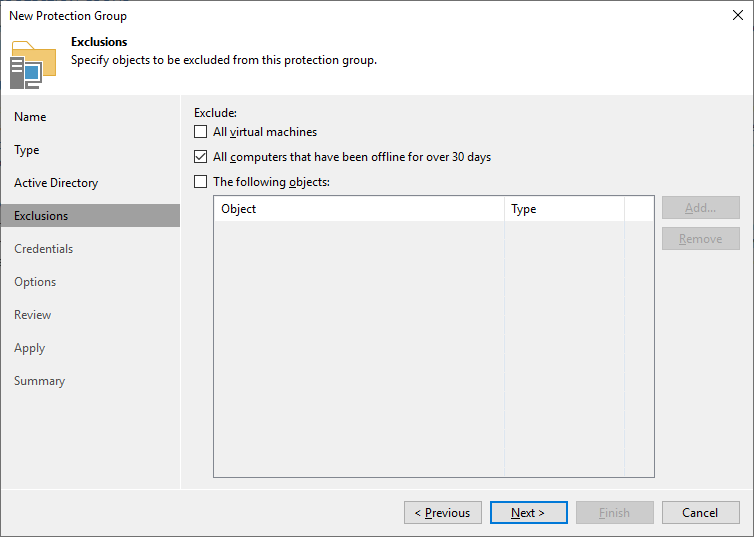
As I run my cluster as a virtual machine (VM), I do not want to exclude VMs from processing.

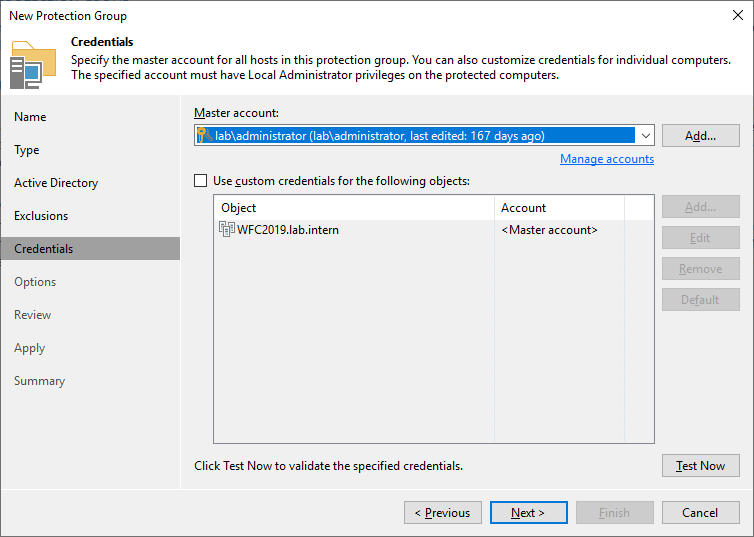
In the next step, you must specify a user that has local administrator privileges. In my lab I simplified everything by using the domain administrator

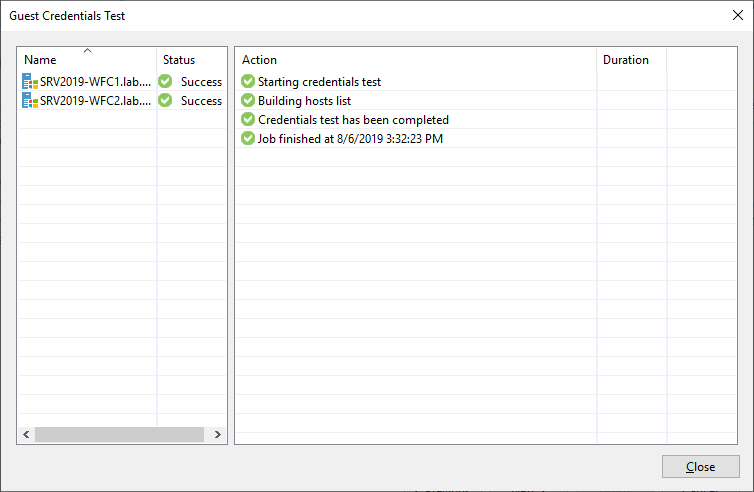
It is always a good idea to test the credentials. This ensures that no problems (e.g., firewall issues) occur during agent deployment.

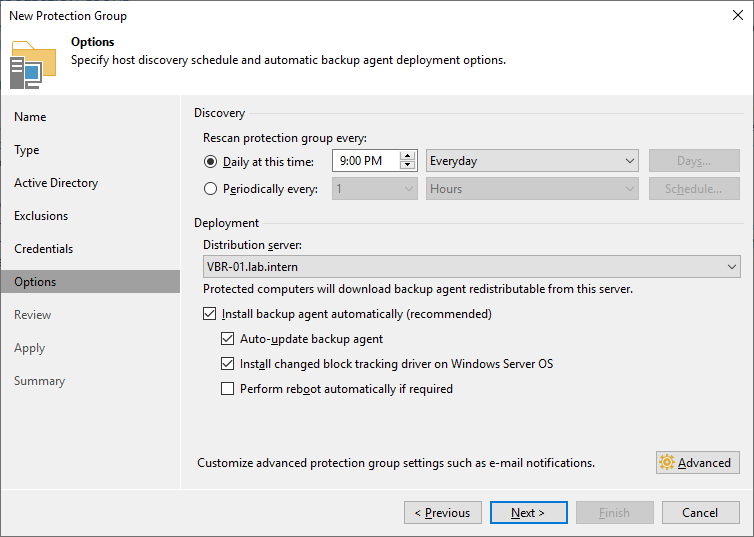
The options page is more interesting. Veeam regularly scans for changes and then deploys or updates the agent automatically.

The distribution server is the machine that deploys the agents. In most cases, the backup server is also fine as distribution server. Reasons for dedicated distribution servers would be if you have branch office deployments or when you plan to deploy a hundred or more agents.

On large servers we recommend installing the change block tracking driver for better incremental backup performance. Keep in mind that the driver requires a reboot during installation and updates.

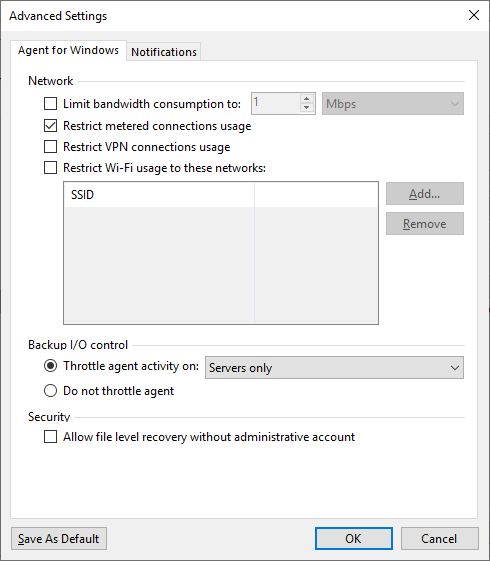
In the advanced settings, you can find a setting that is particularly relevant from a performance perspective: Backup I/O control. It throttles the agent if the server has too high of a load.

You can reboot directly from the Veeam Backup & Replication console.

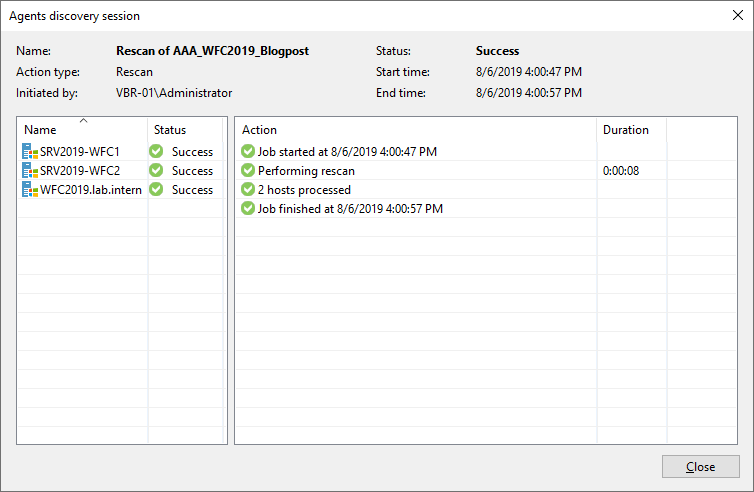
After the installation has succeeded and no reboots are pending anymore, the rescan shows that everything’s okay.

Create a backup job

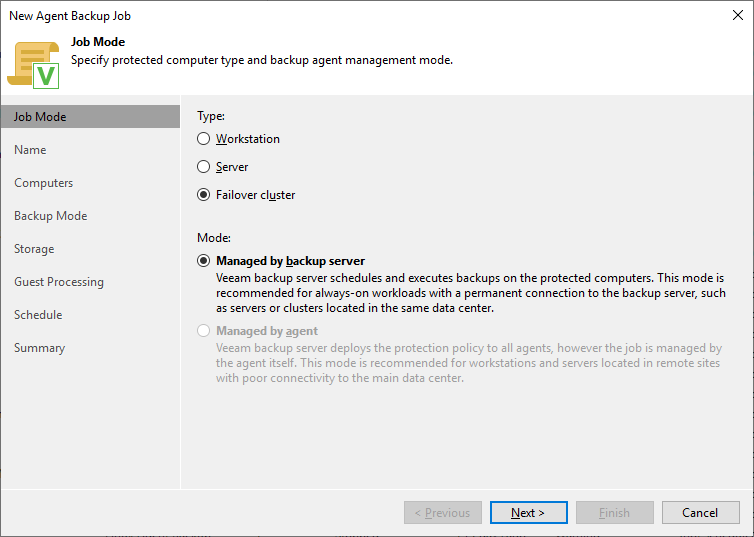
The second step is to create a backup job. Just go to the jobs section in “home” and select to create a new backup job for a Windows computer. At the first step, select the type “failover cluster”.

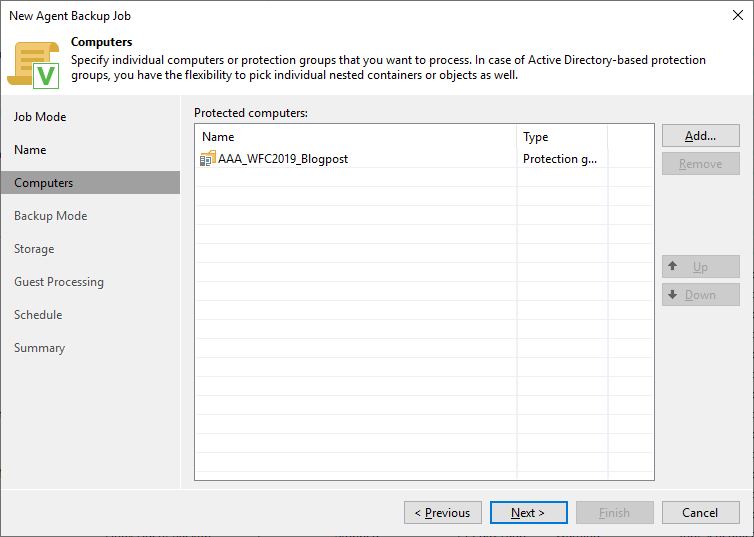
Give a name to the backup job and add the protection group created earlier.

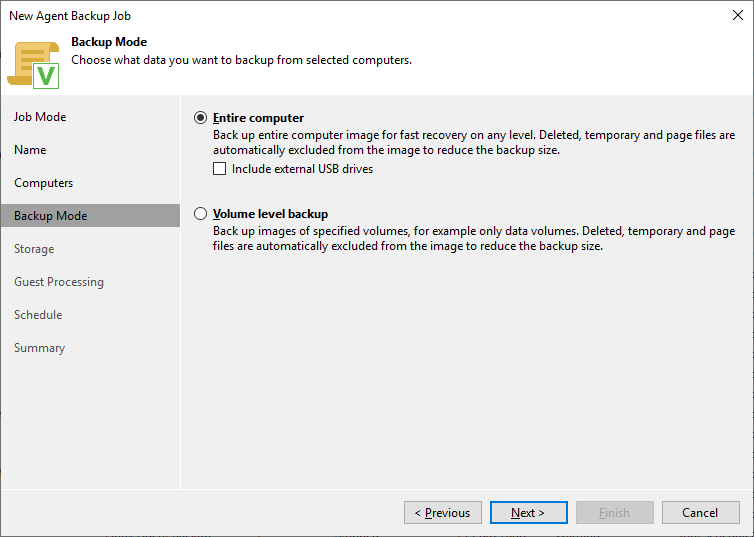
I want to back up everything (e.g., the entire computer)

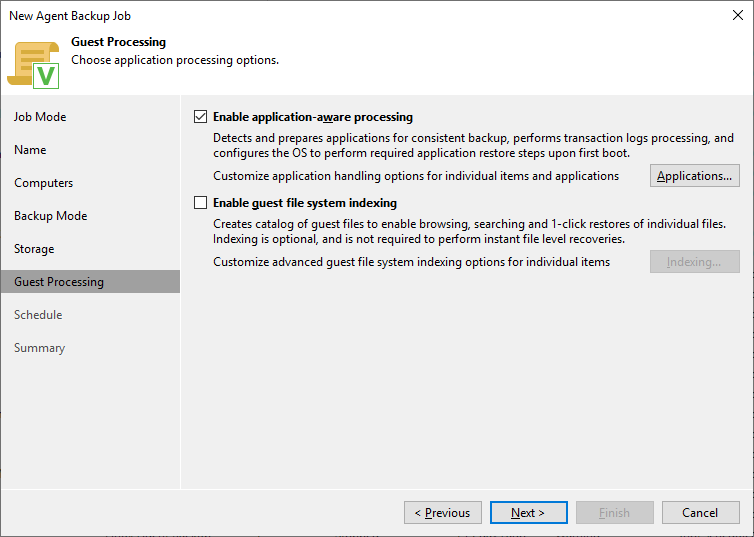
Then, select how long you want to store the backups and where you want to store them. The next section, “guest processing,” is more interesting. Veeam Agent for Microsoft Windows always does backups based on VSS snapshots. That means that the backup is always consistent from a file-level perspective. For application servers (e.g., SQL, Microsoft Exchange) you might want to configure log shipping settings. For this simple file-server example no additional configuration is needed.

Finally, you can configure a backup schedule.

Run the backup job

Running a Veeam Agent for Microsoft Windows backup job is the same as a classic VM backup job. The only thing you might notice is that a cluster backup does not use per-host-backup-chains if you configured your repository to “per-VM backup files”.  All the data from the cluster members of one job is stored in one backup chain.

Another thing to note is that the failover of a cluster does not result in a new full backup. There is not even a change-block-tracking reset (e.g., CBT-reset) in most failover situations. A failover cluster backup always does block-level backup (e.g., image-level backup). Of course, you can do single-item or file-level restore from block level backups.

During the backup, Veeam will also collect the recovery media data. This data is required for a bare-metal or full-cluster restore.

Next steps and restore

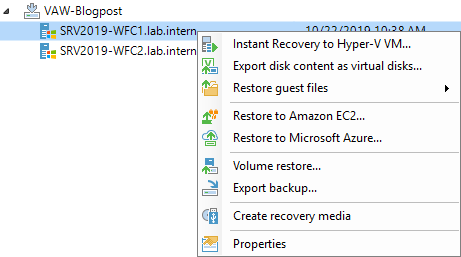
After a successful backup, you can do restores. The user interface offers all the options that are available for Veeam Agent for Microsoft Windows restores. In most cases, the restores will be file-level or application restores. For Windows failover clusters, the restore of Microsoft Exchange and SQL is possible (and is not shown in the screenshot because it’s a file server). For non-clustered systems, there are additional options for Microsoft Active Directory, SharePoint and Oracle databases.

Download Veeam Agent for Microsoft Windows below and give this flow a try.


This article was provided by our service partner : veeam.com

veeam office 365

How to manage Office 365 backup data with Veeam

As companies grow, data grows and so does the backup data. Managing data is always an important aspect of the business. A common question we get around Veeam Backup for Microsoft Office 365 is how to manage the backup data in case something changes. Data management can be needed for several reasons:

  • Migration to new backup storage
  • Modification of backup jobs
  • Removal of data related to a former employee

Within Veeam Backup for Microsoft Office 365, we can easily perform these tasks via PowerShell. Let’s take a closer look at how this works exactly.

Moving data between repositories

Whether you need to move data because you bought new storage or because of a change in company policy, from time to time it will occur. We can move backup data by leveraging Move-VBOEntityData. This will move the organization entity data from one repository to another and can move the following types of data:

  • User data
  • Group data
  • Organization site data

The first two are related to Exchange and OneDrive for Business data, where the last option is related to SharePoint online data. Each of these types also supports four additional data types such as Mailbox, ArchiveMailbox, OneDrive and Sites.

If we want to move data, we need three parameters, by default, to perform the move:

  • Source repository
  • Target repository
  • Type of data

The example below will move all the data related to a specific user account:

$source = Get-VBORepository -Name “sourceRepo”
$target = Get-VBORepository -Name “targetRepo”
$user = Get-VBOEntityData -Type User -Repository $source -Name “Niels Engelen”

Move-VBOEntityData -From $source -To $target -User $user -Confirm:$false

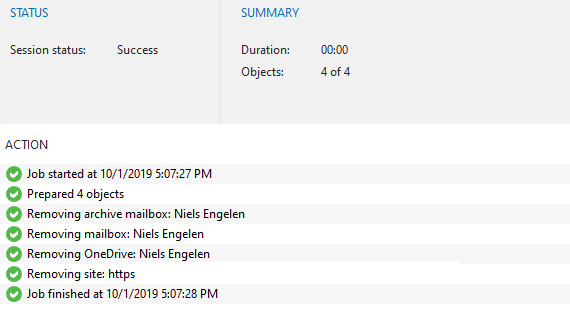
The result of the move can be seen within the history tab in the console. As seen on the screenshot, all the data is being moved to the target repository. However, it is possible to adjust this and only move, for example, mailbox and archive mailbox data.

Move-VBOEntityData -From $source -To $target -User $user -Mailbox -ArchiveMailbox-Confirm:$false

As seen on the screenshot, this will only move the two specific data types and leave the OneDrive for Business and personal SharePoint site on the source repository.

Deleting data from repositories

We went over moving data between repositories, but what if somebody leaves the company and the data related to their account has to be removed? Again, we can leverage PowerShell to easily perform this task by using Remove-VBOEntityData.

The same algorithm applies here. We can remove three types of data, with the option to drill down to a specific data type (Mailbox, ArchiveMailbox, OneDrive, Sites):

  • User data
  • Group data
  • Organization site data

If we want to remove data from a specific user, we can use the following snippet:

$repository = Get-VBORepository -Name “repository”
$user = Get-VBOEntityData -Type User -Repository $ repository -Name “Niels Engelen”

Remove-VBOEntityData -Repository $repository -User $user -Confirm:$false 

The same applies here. You can choose not to add an extra parameter and it will remove everything related to the account. However, it is also possible to provide extra options. If you only want to remove OneDrive for Business data, you can do this by using the following:

Remove-VBOEntityData -Repository $repository -User $user -OneDrive-Confirm:$false


This article was provided by our service partner : veeam


Endpoint Security

Why MSPs Should Expect No-Conflict Endpoint Security

“Antivirus programs use techniques to stop viruses that are very “virus-like” in and of themselves, and in most cases if you try to run two antivirus programs, or full endpoint security suites, each believes the other is malicious and they then engage in a battle to the death (of system usability, anyway).”

“…running 2 AV’s will most likely cause conflicts and slowness as they will scan each other’s malware signature database. So it’s not recommended.”

The above quotes come from top answers on a popular computer help site and community forum in response to a question about “Running Two AVs” simultaneously.

Seattle Times tech columnist Patrick Marshall has similarly warned his readers about the dangers of antivirus products conflicting on his own computers.

Historically, these comments were spot-on, 100% correct in describing how competing Endpoint Security solutions interacted on endpoints. Here’s why.

The (Traditional) Issues with Running Side-by-Side AV Programs

In pursuit of battling it out on your machine for security supremacy, AV solutions have traditionally had a tendency to cause serious performance issues.

This is because:

  • Each is convinced the other is an imposter. Antivirus programs tend to look a lot like viruses to other antivirus programs. The behaviors they engage in, like scanning files or scripts and exporting information about those data objects, can look a little shady to a program that’s sole purpose is to be on the lookout for suspicious activity.
  • Each wants to be the anti-malware star. Ideally both AV programs installed on a machine would be up to the task of spotting a virus on a computer. And both would want to let the user know when they’d found something. So while one AV number one may isolate a threat, you can bet AV number two will still want to alert the user to its presence. This can lead to an endlessly annoying cycle of warnings, all-clears, and further warnings.
  • Both are hungry for your computer’s limited resources. Traditional antivirus products store static lists of known threats on each user’s machine so they can be checked against new data. This, plus the memory used for storing the endpoint agent, CPU for scheduled scans, on-demand scans, and even resource use during idling can add up to big demand. Multiply it by two and devices quickly become sluggish.

Putting the Problem Into Context

Those of you reading this may be thinking, But is all of this really a problem? Who wants to run duplicate endpoint security products anyway?

Consider a scenario, one in which you’re unhappy with your current AV solution. Maybe the management overhead is unreasonable and it’s keeping you from core business responsibilities. Then what?

“Rip and replace”—a phrase guaranteed to make many an MSP shudder—comes to mind. It suggests long evenings of after-hours work removing endpoint protection from device after device, exposing each of the machines under your care to a precarious period of no protection. For MSPs managing hundreds or thousands of endpoints, even significant performance issues can seem not worth the trouble.

Hence we’ve arrived at the problem with conflicting AV software. They lock MSPs into a no-win quagmire of poor performance on the one hand, and a potentially dangerous rip-and-replace operation on the other.

But by designing a no-conflict agent, these growing pains can be eased almost completely. MSPs unhappy with the performance of their current AV can install its replacement during working hours without breaking a sweat. A cloud-based malware prevention architecture and “next-gen” approach to mitigating attacks allows everyone to benefit from the ability to change and upgrade their endpoint security with minimal effort.

Simply wait for your new endpoint agent to be installed, uninstall its predecessor, and still be home in time for dinner.

Stop Wishing and Expect No-Conflict Endpoint Protection

Any modern endpoint protection worth its salt or designed with the user in mind has two key qualities that address this problem:

  1. It won’t conflict with other AV programs and
  2. It installs fast and painlessly.

After all, this is 2019 (and over 30 years since antivirus was invented) so you should expect as much. Considering the plethora of (often so-called) next-gen endpoint solutions out there, there’s just no reason to get locked into a bad relationship you can’t easily replace if something better comes along.

So when evaluating a new cybersecurity tool, ask whether it’s no conflict and how quickly it installs. You’ll be glad you did.


This article was provided by our service partner : webroot.com

How to create a file server cluster with Windows 2019

High Availability of data and applications has been an important topic in IT for decades. One of the critical services in many companies is the file servers, which serve file shares where users or applications store their data. If the file server is offline, then people cannot work. Downtime means additional costs, which organizations try to avoid. Windows Server 2019 (and earlier versions) allow you to create highly available file services.

Prerequisites

Before we can start with the file server cluster configuration, the file server role must be installed and permissions must be set in Active Directory for the failover cluster computer object.

There are two ways to install the file server role on the two cluster nodes:

  • Via the Add Roles and Features Wizard of the server manager
  • Via PowerShell

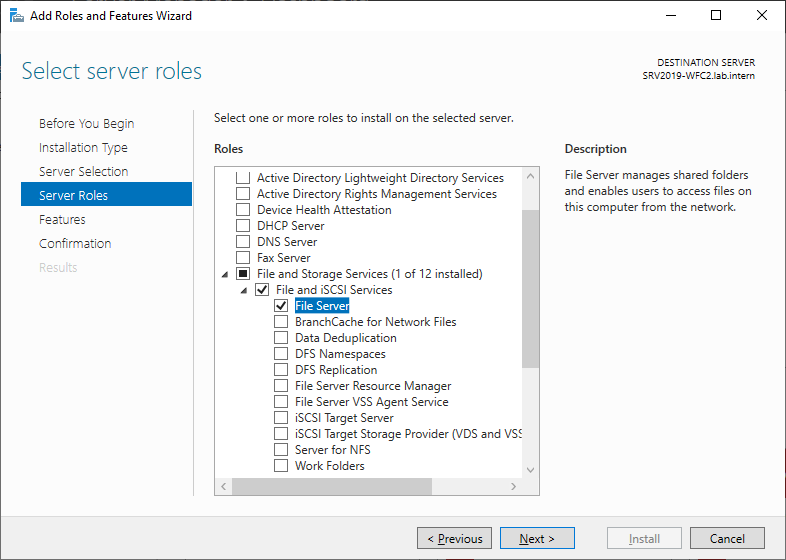
In Server manager, click Add roles and features and follow the wizard. Select the File Server role and install it. A reboot is not required.

server 2019 cluster 1

As an alternative, you can use the following PowerShell command to install the file server feature:

Install-WindowsFeature -Name FS-FileServer

server 2019 cluster 2

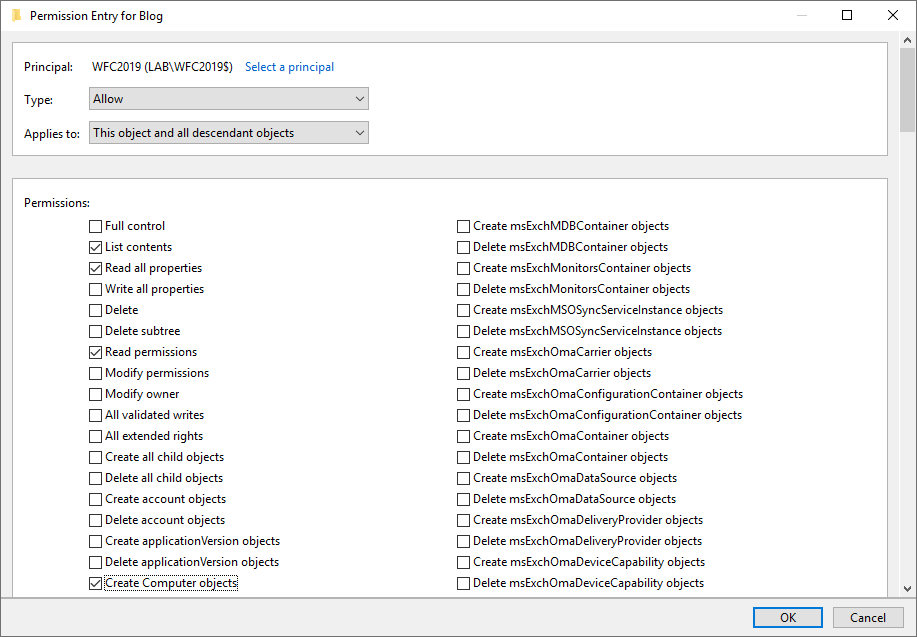
To avoid errors at later steps, first configure Active Directory permissions for the failover cluster computer object. The computer object of the cluster (in my case, WFC2019) must have the Create Computer Objects permissions in the Active Directory Organizational Unit (OU).

If you forget about this, the role will fail to start later. Errors and event IDs 1069, 1205 and 1254 will show up in the Windows event log and failover cluster manager.

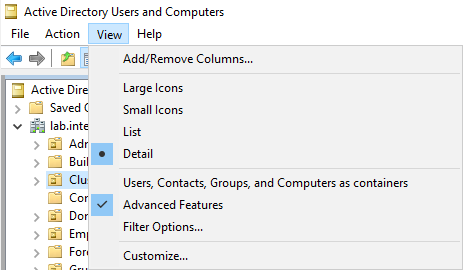
Open the Active Directory Users and Computers console and switch to Advanced Features in the View menu.

server 2019 cluster 3

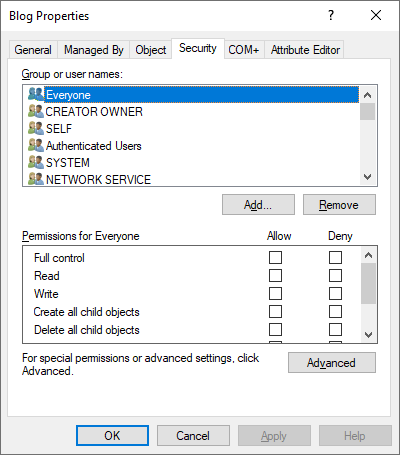
Go the OU where your cluster object is located (in my case the OU is Blog). Go to the Security tab (in properties) and click Advanced.

server 2019 cluster 4

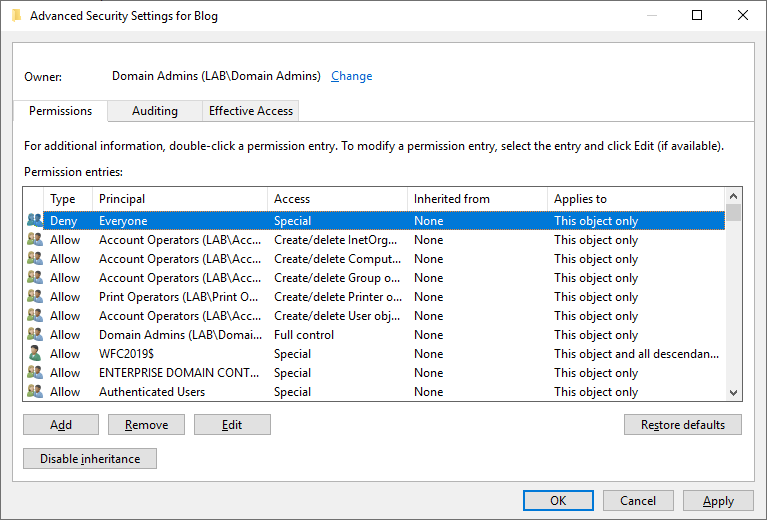
In the new window click Add and select your cluster computer object as principal (in my case WFC2019).

server 2019 cluster 5

In the Permissions list select Create Computer objects

server 2019 cluster 6

Click OK in all windows to confirm everything

Configure the file server cluster role

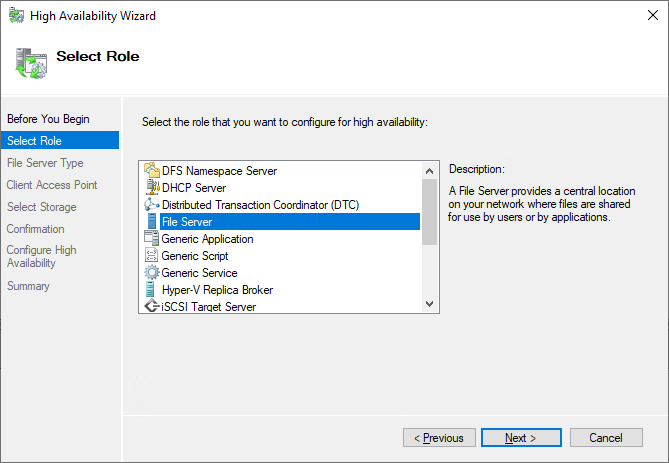
Because all pre-requisites are now met, we can configure the file server cluster role. Open the Failover Cluster manager and add the role to your cluster (right-click on Roles of your cluster -> configure role -> and select the File Server role).

server 2019 cluster 7

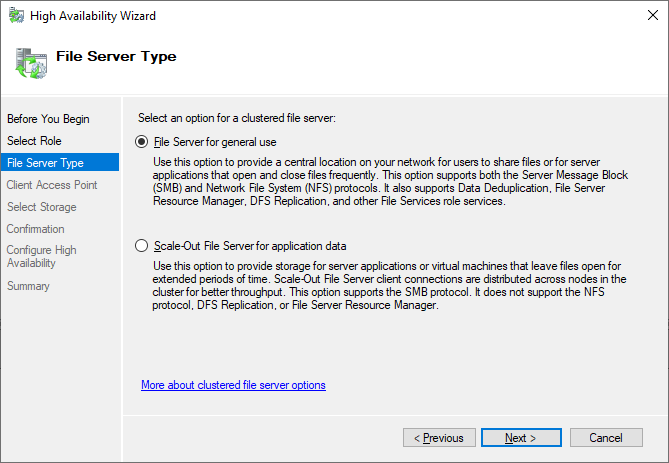
We will create a file server for general use as we plan to host file shares for end users.

server 2019 cluster 8

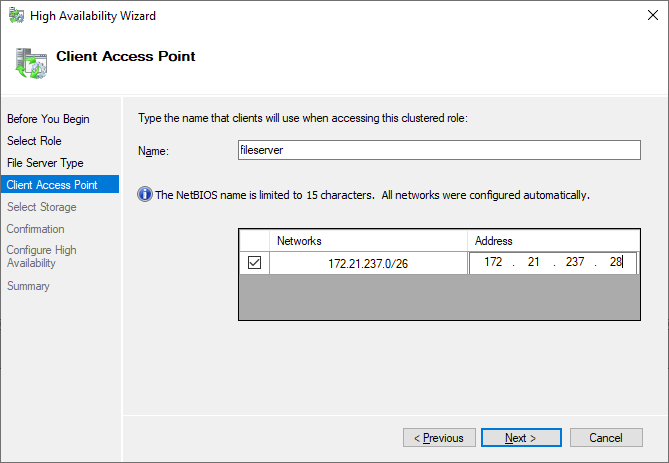
In the next step we define how clients can access the file server cluster. Select a name for your file server and assign an additional IP address.

server 2019 cluster 9

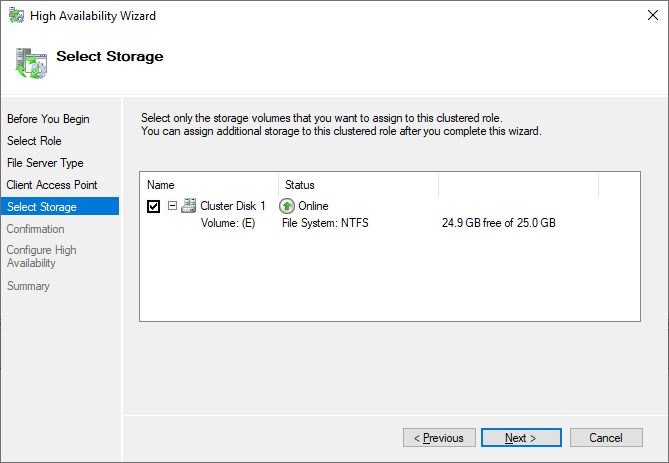
Use the storage configured earlier.

server 2019 cluster 10

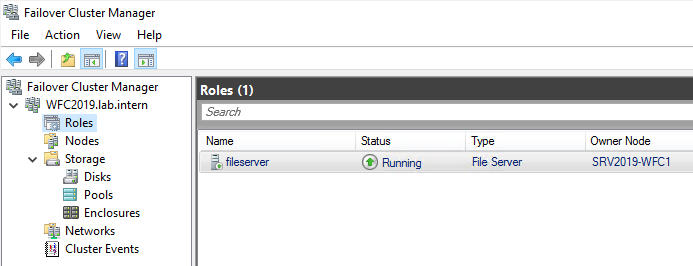
After you finish the wizard, you can see the File Server role up and running in the Failover Cluster Manager. If you see errors here, check the create computer objects permissions described earlier.

server 2019 cluster 10

A new Active Directory object also appears in Active Directory Users and Computers, including a new DNS entry

server 2019 cluster 11

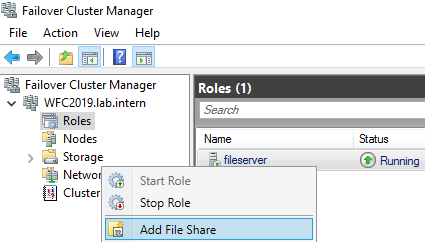
Now it’s time to create file shares for users. You can right-click on the file server role or use the actions panel on the right hand side.

server 2019 cluster 12

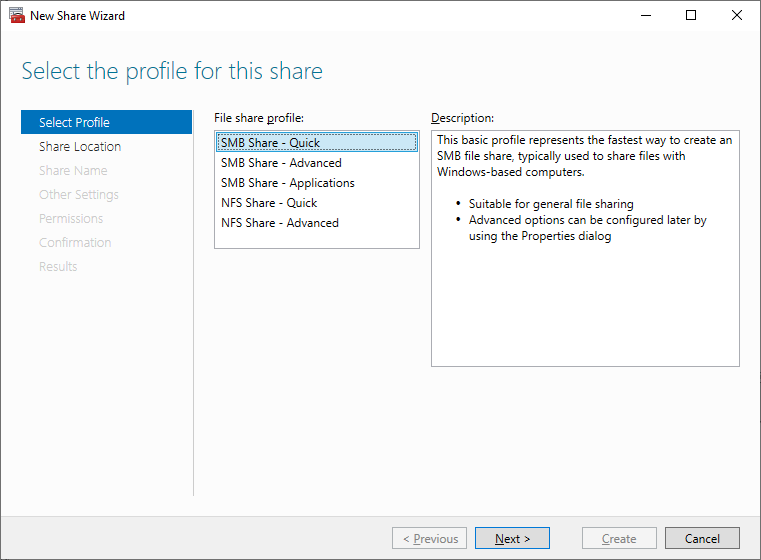
I select the SMB Share  Quick as I plan a general purpose file server for end users.

server 2019 cluster 13

I also keep the default permissions because this is just an example. After you have finished the wizard, the new file share is ready to use.

In the following video I show the advances of a continuous available file share. The upload of the file will continue even during a cluster failover. The client is a Windows 10 1809. I upload an iso to the file share I created earlier. My upload speed it about 10-20Mbit/s WAN connection. During failover to a different cluster node, the upload stops for some seconds. After successful failover it continues uploading the ISO file.

Next steps and backup

As soon as the file server contains data, it is also time to think about backing up the file server. Veeam Agent for Microsoft Windows can back up Windows failover clusters with shared disks. We also recommend doing backups of the entire system of the cluster. This also backs up the operating systems of the cluster members and helps to speed up restore of a failed cluster node because you don’t need to search for drivers, etc. in case of a restore.


This article was provided by our service partner : Veeam

smishing

Smishing Explained: What It Is and How You Can Prevent It

Do you remember the last time you’ve interacted with a brand, political cause, or fundraising campaign via text message? Have you noticed these communications occurring more frequently as of late?

It’s no accident. Whereas marketers and communications professionals can’t count on email opens or users accepting push notifications from apps, they’re well aware that around 98% of SMS messages are read within seconds of being received

As with any development in how we communicate, the rise in brand-related text messaging has attracted scammers looking to profit. Hence we arrive at a funny new word in the cybersecurity lexicon, “smishing.” Mathematical minds might understand it better represented by the following equation:

SMS + Phishing = Smishing

For the rest of us, smishing is the act of using text messages to trick individuals into divulging sensitive information, visiting a risky site, or downloading a malicious app onto a smartphone. These often benign seeming messages might ask you to confirm banking details, verify account information, or subscribe to an email newsletter via a link delivered by SMS.

As with phishing emails, the end goal is to trick a user into an action that plays into the hands of cybercriminals. Shockingly, smishing campaigns often closely follow natural disasters as scammers try to prey on the charitable to divert funds into their own pockets.

Smishing vs Vishing vs Phishing

If you’re at all concerned with the latest techniques cybercriminals are using to defraud their victims, your vocabulary may be running over with terms for the newest tactics. Here’s a brief refresher to help keep them straight.

  • Smishing, as described above, uses text messages to extract the sought after information. Different smishing techniques are discussed below.
  • Vishing is when a fraudulent actor calls a victim pretending to be from a reputable organization and tries to extract personal information, such as banking or credit card information.
  • Phishing is any type of social engineering attack aimed at getting a victim to voluntarily turn over valuable information by pretending to be a legitimate source. Both smishing and vishing are variations of this tactic.

Examples of Smishing Techniques

Enterprising scammers have devised a number of methods for smishing smartphone users. Here are a few popular techniques to be aware of:

  • Sending a link that triggers the downloading of a malicious app. Clicks can trigger automatic downloads on smartphones the same way they can on desktop internet browsers. In smishing campaigns, these apps are often designed to track your keystrokes, steal your identity, cede control of your phone to hackers, or encrypt the files on your phone and hold them for ransom.
  • Linking to information-capturing forms. In the same way many email phishing campaigns aim to direct their victims to online forms where their information can be stolen, this technique uses text messages to do the same. Once a user has clicked on the link and been redirected, any information entered into the form can be read and misused by scammers.
  • Targeting users with personal information. In a variation of spear phishing, committed smishers may research a user’s social media activity in order to entice their target with highly personalized bait text messages. The end goal is the same as any phishing attack, but it’s important to know that these scammers do sometimes come armed with your personal information to give their ruse a real feel.
  • Referrals to tech support. Again, this technique is a variation on the classic tech support scam, or it could be thought of as the “vish via smish.” An SMS message will instruct the recipient to contact a customer support line via a number that’s provided. Once on the line, the scammer will try to pry information from the caller by pretending to be a legitimate customer service representative. 

How to Prevent Smishing

For all the conveniences technology has bestowed upon us, it’s also opened us up to more ways to be ripped off. But if a text message from an unknown number promising to rid you of mortgage debt (but only if you act fast) raises your suspicion, then you’re already on the right track to avoiding falling for smishing.

Here are a few other best practices for frustrating these attacks:

  • Look for all the same signs you would if you were concerned an email was a phishing attempt: 1) Check for spelling errors and grammar mistakes, 2) Visit the sender’s website itself rather than providing information in the message, and 3) Verify the sender’s telephone address to make sure it matches that of the company it purports to belong to.
  • Never provide financial or payment information on anything other than the trusted website itself.
  • Don’t click on links from unknown senders or those you do not trust
  • Be wary of “act fast,” “sign up now,” or other pushy and too-good-to-be-true offers.
  • Always type web addresses in a browser rather than clicking on the link.
  • Install a mobile-compatible antivirus on your smart devices.

This article was provided by our service partner : webroot.com

vSan

How policy based backups will benefit you

With VMworld 2019 right around the corner, we wanted to share a recap on some of the powerful things that VMware has in their armoury and also discuss how Veeam can leverage this to enhance your Availability.

This week VMware announced vSAN 6.7 Update 3. This release seems to have a heavy focus on simplifying data center management while improving overall performance. A few things that stood out to me with this release included:

  • Cleaner, simpler UI for capacity management: 6.7 Update 3 has color-coding, consumption breakdown, and usable capacity analysis for better capacity planning allowing administrators to more easily understand the consumption breakdown.
  • Storage Policy changes now occur in batches. This ensures that all policy changes complete successfully, and free capacity is not exhausted.
  • iSCSI LUNs presented from vSAN can now be resized without the need to take the volume offline, preventing application disruption.
  • SCSI-3 persistent reservations (SCSI-3 PR) allow for native support for Windows Server Failover Clusters (WSFC) requiring a shared disk.

Veeam is listed in the vSAN HCL for vSAN Partner Solutions and can protect and restore VMs. The certification for the new Update 3 release is also well on its way to being complete.

Another interesting point to mention is the Windows Server Failover Clusters (WSFC). While these are seen as VMDKs, they are not applicable to the data protection APIs used for data protection tasks. This is where the Veeam Agent for Microsoft Windows comes in with the ability to protect those failover clusters in the best possible way.

What is SPBM?

Storage Policy Based Management (SPBM) is the vSphere administrator’s answer to control within their environments. This framework allows them to overcome upfront storage provisioning challenges, such as capacity planning, differentiated service levels and managing capacity resources in a much better and efficient way. All of this is achieved by defining a set of policies within vSphere for the storage layer. These storage policies optimise the provisioning process of VMs by provisioning specific datastores at scale, which in turn will remove the headaches between vSphere admins and storage admins.

However, this is not a closed group between the storage and virtualisation admins. It also allows Veeam to hook into certain areas to provide better Availability for your virtualised workloads.

SPBM spans all storage offerings from VMware, traditional VMFS/NFS datastore as well as vSAN and Virtual Volumes, allowing policies to overarch any type of environment leveraging whatever type of storage that is required or in place.

What can Veeam do?

Veeam can leverage these policies to better protect virtual workloads, by utilising vSphere tags on old and newly created virtual machines and having specific jobs setup in Veeam Backup & Replication with specific schedules and settings that are required to meet the SLA of those workloads.

Veeam will also back up any virtual machine that has an SPBM policy assigned to it, as well as protect the data. It will also protect the policy, so if you had to restore the whole virtual machine, the policy would be available as part of the restore process.

Automate IT

Gone are the days of the backup admin adding and removing virtual machines from a backup job, so let’s spend time on the interesting and exciting things that provide much more benefit to your IT systems investment.

With vSphere tags, you can create logical groupings within your VMware environment based on any characteristic that is required. Once this is done, you are able to migrate those tags into Veeam Backup & Replication and create backup jobs based on vSphere tags. You can also create your own set of vSphere tags to assign to your virtual machine workloads based on how often you need to back up or replicate your data, providing a granular approach to the Availability of your infrastructure.

VMware Snapshots – The vSAN way

In vSAN 6.0, VMware introduced vSAN Sparse Snapshots. The snapshot implementation for vSAN provides significantly better I/O performance. The good news for Veeam customers is if you are using the traditional VMFS or the newer vSAN sparse snapshots the display and output are the same — a backup containing your data. The benefits are incredible from a performance and methodology point of view when it comes to the sparse snapshot way and can play a huge role in achieving your backup windows.

The difference between the “traditional” and the new snapshot methodology that both vSAN as well as Virtual Volumes leverage is that a traditional VMFS snapshot is using Redo logs which, when working with high I/O workloads, could cause performance hits when committing those changes back to the VM disk. The vSAN way is much more similar to a shared storage system and a Copy On Write snapshot. This means that there is no commitment after a backup job has released a snapshot, meaning that I/O can continue to run as the business needs.

There are lots of other integrations between Veeam and VMware but I feel that this is still the number one touch point where a vSphere and Backup Admin can really make their life easier by using policy-based backups using Veeam.


This article was provided by our service partner : veeam.com

Security risk

Why You Shouldn’t Share Security Risk

There are some things in life that would be unfathomable to share. Your toothbrush, for example. We need to adopt the same clear distinction with cybersecurity risk ownership as we do with our toothbrush.

You value sharing as a good characteristic. However, even if you live with other people, everyone in your household still has their own toothbrush. It’s very clear which toothbrush is yours and which toothbrush is your partner’s/spouse’s or your children’s.

At some point in our lives, we were taught that toothbrushes should not be shared, and we pass that knowledge down to our children and dependents and make sure they also know. The same type of education about not sharing cybersecurity risks needs to happen. By not defining risk ownership, you’re sharing it with your customers.

Why Risk Should Never Be Shared

There should be no such thing as shared risk. It is very binary. Either the customer owns it, or you own it. Setting the correct expectation of an MSP’s cybersecurity and risk responsibility is critical to keeping a long-term business relationship.

When a breach occurs is not the time to be wondering which side is at fault. Notice I said ‘when’ not ‘if.’ Nearly 70% of SMBs have already experienced a cyberattack, with 58% of SMBs experiencing a cybersecurity attack within the past year—costing these companies an average of $400,000. The last thing you need is to be on the hook for a potentially business-crippling event. You need to limit your liability.
What Are Your Cybersecurity Risk Management Options?

1. Accept the Risk

When an organization accepts the risk, they have identified and logged the risk, but don’t take any action to remediate it. This is an appropriate action when the risk aligns with the organization’s risk tolerance, meaning they are willing to leave the risk unaddressed as a part of their normal business operations.

There is no set severity to the risk that an organization is willing to accept. Depending on the situation, organizations can accept risk that is low, moderate, or high.

When an organization decides to accept the risk, they have identified and logged the risk, but don’t take any action to remediate it. This is an appropriate action when the risk fits into the organization’s risk tolerance, and there is no set severity to the risk. Meaning, depending on the situation, an organization could be willing to accept low, moderate, or even high risk.

Here are two examples:

An organization has data centers located in the northeastern part of the United States and accept the risk of earthquakes. They know that an earthquake is possible but decide not to put the money into addressing the risk due to the infrequency of earthquakes in that area.

On the other end of the risk spectrum, a federal agency might share classified information with first responders who don’t typically have access to that information to stop an impending attack.

Many factors go into an organization accepting risk, including the organization’s overall mission, business needs, and potential impact on individuals, other organizations, and the Nation.1

2. Transfer the Risk

Transferring risk means just that; an organization passing the identified risk onto another entity. This action is appropriate when the organization has both the desire and the means to transfer the risk. As an MSP, you make a recommendation to a customer and they want you to do something, they’ve transferred the risk to you in exchange for payment for your products and service.

Transferring risk does not reduce the likelihood of an attack or incident occurring or the consequences associated with the risk.2

3. Mitigate the Risk

When mitigating risk, measures are put in place to address the risk. It’s appropriate when the risk cannot be accepted, avoided, or transferred. Mitigating risk depends on the risk management tier, the scope of the response, and the organization’s risk management strategy.

Organizations can approach risk mitigation in a variety of ways across three tiers:

  • Tier 1 can include common security controls
  • Tier 2 can introduce process re-engineering
  • Tier 3 can be a combination of new or enhanced management, operational, or technical safeguards

An organization could put this into practice by, for example, prohibiting the use or transport of mobile devices to certain parts of the world.3

4. Avoid the Risk (Not Recommended)

Risk avoidance is the opposite of risk acceptance because it’s an all-or-nothing kind of stance. For example, cutting down a tree limb hanging over your driveway, rather than waiting for it to fall, would be risk avoidance. You would be avoiding the risk of the tree limb falling on your car, your house, or on a passerby. Most insurance companies, in this example, would accept the risk and wait for the limb to fall, knowing that they can likely avoid incurring that cost. However, the point is that risk avoidance means taking steps so that the risk is completely addressed and cannot occur.

In business continuity and disaster recovery plans, risk avoidance is the action that avoids any exposure to the risk whatsoever. If you want to avoid data loss, you have a fully redundant data center in another geographical location that is completely capable of running your entire organization from that location. That would be complete avoidance of any local disaster such as an earthquake or hurricane.

While risk avoidance reduces the cost of downtime and recovery and may seem like a safer bet, it is usually the most expensive of all risk mitigation strategies. Not to mention it’s simply no longer feasible to rely on risk avoidance in today’s society with increasingly sophisticated cyberattacks.4

By using a risk assessment report to identify risk, you can establish a new baseline of the services you are and are not covering. This will put the responsibility onto your customers to either accept or refuse your recommendations to address the risk.

Summary

There are many different options when it comes to dealing with risks to your business. The important thing is to know what risks you have, how you are going to manage those risks, and who owns those risks. Candid discussions with your customers, once you know and understand the risks, is the only true way for each of you to know who owns the risks and what risk management option is going to be put in place for those risks. Don’t be afraid to have these conversations. In the long run, it will lead to outcomes which will be best for both you and your customers.


This article was provided by our service partner : Connectwise

healthcare backup

Healthcare backup vs record retention

Healthcare overspends on long term backup retention

There is a dramatic range of perspective on how long hospitals should keep their backups: some keep theirs for 30 days while others keep their backups forever. Many assume the long retention is due to regulatory requirements, but that is not actually the case. Retention times longer than needed have significant cost implications and lead to capital spending 50-70% higher than necessary. At a time when hospitals are concerned with optimization and cost reduction across the board, this is a topic that merits further exploration and inspection.

Based on research to date and a review of all relevant regulations, we find:

  • There is no additional value in backups older than 90 days.
  • Significant savings can be achieved through reduced backup retention of 60-90 days.
  • Longer backup retention times impose unnecessary capital costs by as much as 70% and hinder migration to more cost-effective architectures.
  • Email retention can be greatly shortened to reduce liability and cost through set policy.

Let’s explore these points in more details.

What are the relevant regulations?

HIPAA mandates that Covered Entities and Business Associates have backup and recovery procedures for Patient Health Information (PHI) to avoid loss of data. Nothing regarding duration is specified (CFR 164.306CFR 164.308). State regulations govern how long PHI must be retained, usually ranging from six to 25 years, sometimes longer.

The retention regulations refer to the PHI records themselves, not the backups thereof. This is an important distinction and a source of confusion and debate. In the absence of deeper understanding, hospitals often opt for long term backup retention, which has significant cost implications without commensurate value.

How do we translate applicable regulations into policy?

There are actually two policies at play: PHI retention and Backup retention. PHI retention should be the responsibility of data governance and/or application data owners. Backup retention is IT policy that governs the recoverability of systems and data.

I have yet to encounter a hospital that actively purges PHI when permitted by regulations. There’s good reason not to: older records still have value as part of analytics datasets but only if they are present in live systems. If PHI is never purged, records in backups from one year ago will also be present in backups from last night. So, what value exists in the backups from one year ago, or even six months ago?

Keeping backups long term increases the capital requirements, complexity of data protection systems, and limits hospitals’ abilities to transition to new data protection architectures that offer a lower TCO, all without mitigating additional risk or adding additional value.

What is the right backup retention period for hospital systems?

Most agree that the right answer is 60-90 days. Thirty days may expose some risk from undesirable system changes that require going further back at the system (if not the data) level; examples given include changes that later caused a boot error. Beyond 90 days, it’s very difficult to identify scenarios where the data or systems would be valuable.

What about legacy applications?

Most hospitals have a list of legacy applications that contain older PHI that was not imported into the current primary EMR system or other replacement application. The applications exist purely for reference purposes, and they often have other challenges such as legacy operating systems and lack of support, which increases risk.

For PHI that only exists in legacy systems, we have only two choices: keep those aging apps in service or migrate those records to a more modern platform that replicates the interfaces and data structures. Hospitals that have pursued this path have been very successful reducing risk by decommissioning legacy applications, using solutions from HarmonyMediquantCITI, and Legacy Data Access.

What about email?

Hospitals have a great deal of freedom to define their email policies. Most agree that PHI should not be in email and actively prevent it by policy and process. Without PHI in email, each hospital can define whatever email retention policy they wish.

Most hospitals do not restrict how long emails can be retained, though many do restrict the ultimate size of user mailboxes. There is a trend, however, often led by legal to reduce the history of email. It is often phased in gradually: one year they will cut off the email history at ten years, then to eight or six and so on.

It takes a great deal of collaboration and unity among senior leaders to effect such changes, but the objectives align the interests of legal, finance, and IT. Legal reduces discoverable information; finance reduces cost and risk; and IT reduces the complexity and weight of infrastructure.

The shortest email history I have encountered is two years at a Detroit health system: once an item in a user mailbox reaches two years old, it is actively removed from the system by policy. They also only keep their backups for 30 days. They are the leanest healthcare data protection architecture I have yet encountered.

Closing thoughts

It is fascinating that hospitals serving the same customer needs bound by vastly similar regulatory requirements come to such different conclusions about backup retention. That should be a signal that there is real optimization potential both with PHI and email. You can also consider Foresee Medical and learn about this healthcare software.


This article was provided by our service partner : veeam.com