Veeam Backup & Replication is known for ease of installation and a moderate learning curve. It is something that we take as a great achievement, but as we see in our support practice, it can sometimes lead to a “deploy and forget” approach, without fine-tuning the software or learning the nuances of its work. In our previous blog posts, we examined tape configuration considerations and some common misconfigurations. This time, the blog post is aimed at giving the reader some insight on a Veeam Backup & Replication infrastructure, how data flows between the components, and most importantly, how to properly load balance backup components so that the system can work stably and efficiently.
Overview of a Veeam Backup & Replication infrastructure
Veeam Backup & Replication is a modular system. This means that Veeam as a backup solution consists of a number of components, each with a specific function. Examples of such components are the Veeam server itself (as the management component), proxy, repository, WAN accelerator and others. Of course, several components can be installed on a single server (provided that it has sufficient resources) and many customers opt for all-in-one installations. However, distributing components can give several benefits:
- For customers with branch offices, it is possible to localize the majority of backup traffic by deploying components locally.
- It allows to scale out easily. If your backup window increases, you can deploy an additional proxy. If you need to expand your backup repository, you can switch to scale-out backup repository and add new extents as needed.
- You can achieve a High Availability for some of the components. For example, if you have multiple proxies and one goes offline, the backups will still be created.
Such system can only work efficiently if everything is balanced. An unbalanced backup infrastructure can slow down due to unexpected bottlenecks or even cause backup failures because of overloaded components.
Let’s review how data flows in a Veeam infrastructure during a backup (we’re using a vSphere environment in this example):
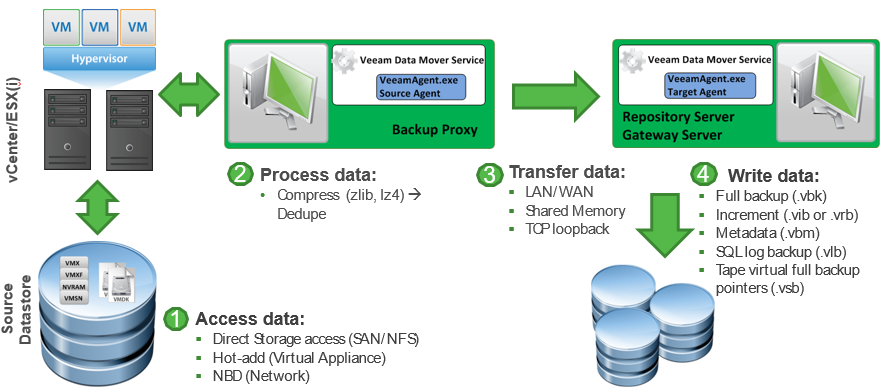
All data in Veeam Backup & Replication flows between source and target transport agents. Let’s take a backup job as an example: a source agent is running on a backup proxy and its job is to read the data from a datastore, apply compression and source-side deduplication and send it over to a target agent. The target agent is running directly on a Windows/Linux repository or a gateway if a CIFS share is used. Its job is to apply a target-side deduplication and save the data in a backup file (.VKB, .VIB etc).
That means there are always two components involved, even if they are essentially on the same server and both must be taken into account when planning the resources.
Tasks balancing between proxy and repository
To start, we must examine the notion of a “task.” In Veeam Backup & Replication, a task is equal to a VM disk transfer. So, if you have a job with 5 VMs and each has 2 virtual disks, there is a total of 10 tasks to process. Veeam Backup & Replication is able to process multiple tasks in parallel, but the number is still limited.
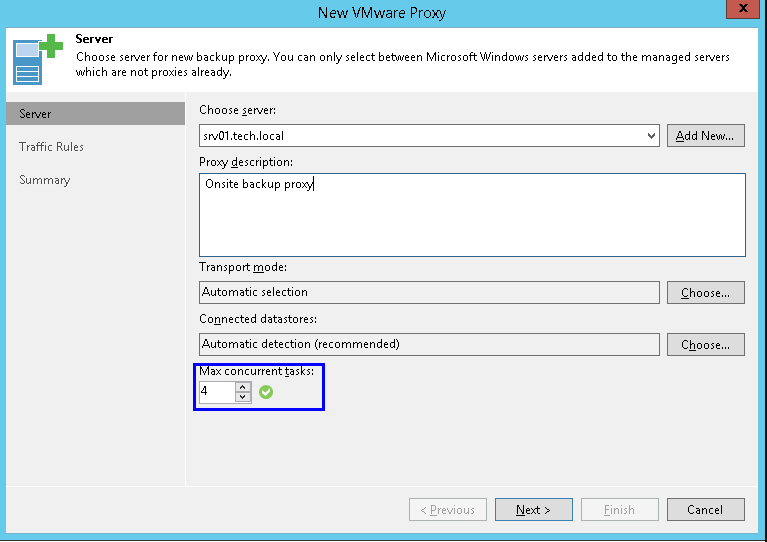
If you go to the proxy properties, on the first step you can configure the maximum concurrent tasks this proxy can process in parallel:
For normal backup operations, a task on the repository side also means one virtual disk transfer.
On the repository side, you can find a very similar setting:
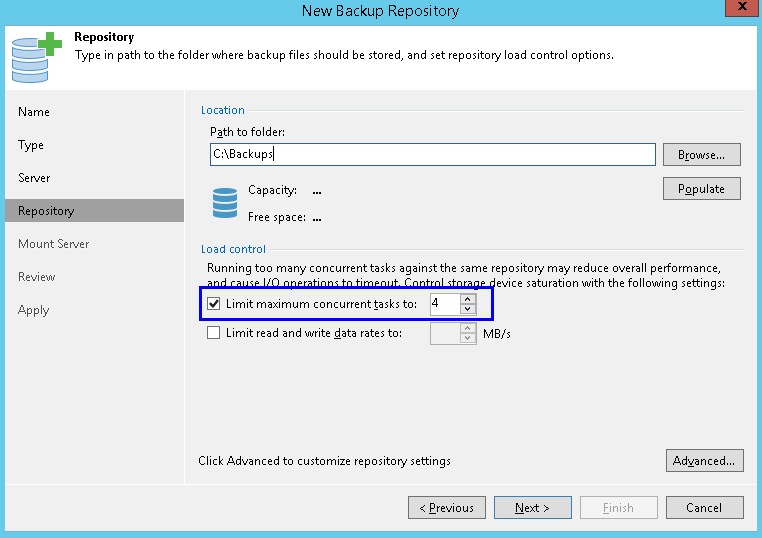
For normal backup operations, a task on the repository side also means one virtual disk transfer.
This brings us to our first important point: it is crucial to keep the resources and number of tasks in balance between proxy and repository. Suppose you have 3 proxies set to 4 tasks each (that means that on the source side, 12 virtual disks can be processed in parallel), but the repository is set to 4 tasks only (that is the default setting). That means that only 4 tasks will be processed, leaving idle resources.
The meaning of a task on a repository is different when it comes to synthetic operations (like creating synthetic full). Recall that synthetic operations do not use proxies and happen locally on a Windows/Linux repository or between a gateway and a CIFS share. In this case for normal backup chains, a task is a backup job (so 4 tasks mean that 4 jobs will be able to generate synthetic full in parallel), while for per-VM backup chains, a task is still a VM (so 4 tasks mean that repo can generate 4 separate VBKs for 4 VMs in parallel). Depending on the setup, the same number of tasks can create a very different load on a repository! Be sure to analyze your setup (the backup job mode, the job scheduling, the per-VM option) and plan resources accordingly.
Note that, unlike for a proxy, you can disable the limit for number of parallel tasks for a repository. In this case, the repository will accept all incoming data flows from proxies. This might seem convenient at first, but we highly discourage from disabling this limitation, as it may lead to overload and even job failures. Consider this scenario: a job has many VMs with a total of 100 virtual disks to process and the repository uses the per-VM option. The proxies can process 10 disks in parallel and the repository is set to the unlimited number of tasks. During an incremental backup, the load on the repository will be naturally limited by proxies, so the system will be in balance. However, then a synthetic full starts. Synthetic full does not use proxies and all operations happen solely on the repository. Since the number of tasks is not limited, the repository will try to process all 100 tasks in parallel! This will require immense resources from the repository hardware and will likely cause an overload.
Considerations when using CIFS share
If you are using a Windows or Linux repository, the target agent will start directly on the server. When using a CIFS share as a repository, the target agent starts on a special component called a “gateway,” that will receive the incoming traffic from the source agent and send the data blocks to the CIFS share. The gateway must be placed as close to the system sharing the folder over SMB as possible, especially in scenarios with a WAN connection. You should not create topologies with a proxy/gateway on one site and CIFS share on another site “in the cloud” — you will likely encounter periodic network failures.
The same load balancing considerations described previously apply to gateways as well. However, the gateway setup requires an additional attention because there are 2 options available — set the gateway explicitly or use an automatic selection mechanism:

Any Windows “managed server” can become a gateway for a CIFS share. Depending on the situation, both options can come handy. Let’s review them.
You can set the gateway explicitly. This option can simplify the resource management — there can be no surprises as to where the target agent will start. It is recommended to use this option if an access to the share is restricted to specific servers or in case of distributed environments — you don’t want your target agent to start far away from the server hosting the share!
Things become more interesting if you choose Automatic selection. If you are using several proxies, automatic selection gives ability to use more than one gateway and distribute the load. Automatic does not mean random though and there are indeed strict rules involved.
The target agent starts on the proxy that is doing the backup. In case of normal backup chains, if there are several jobs running in parallel and each is processed by its own proxy, then multiple target agents can start as well. However, within a single job, even if the VMs in the job are processed by several proxies, the target agent will start only on one proxy, the first to start processing. For per-VM backup chains, a separate target agent starts for each VM, so you can get the load distribution even within a single job.
Synthetic operations do not use proxies, so the selection mechanism is different: the target agent starts on the mount server associated with the repository (with an ability to fail over to Veeam server if the mount server in unavailable). This means that the load of synthetic operations will not be distributed across multiple servers. As mentioned above, we discourage from setting the number of tasks to unlimited — that can cause a huge load spike on the mount/Veeam server during synthetic operations.
Additional notes
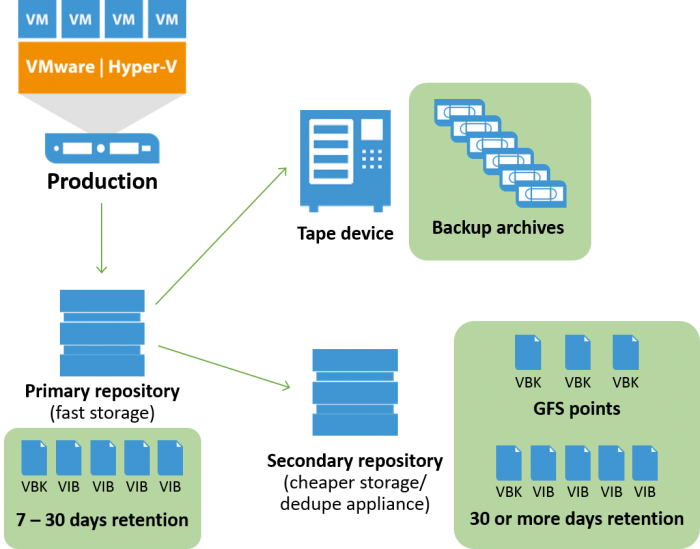
Scale-out backup repository. SOBR is essentially a collection of usual repositories (called extents). You cannot point a backup job to a specific extent, only to SOBR, however extents retain some of settings, including the load control. So what was discussed about standalone repositories, pertains to SOBR extents as well. SOBR with per-VM option (enabled by default), the “Performance” placement policy and backup chains spread out across extents will be able to optimize the resource usage.
Backup copy. Instead of a proxy, source agents will start on the source repository. All considerations described above apply to source repositories as well (although in case of Backup Copy Job, synthetic operations on a source repository are logically not possible). Note that if the source repository is a CIFS share, the source agents will start on the mount server (with a failover to Veeam server).
Deduplication appliances. For DataDomain, StoreOnce (and possibly other appliances in the future) with Veeam integration enabled, the same considerations apply as for CIFS share repositories. For a StoreOnce repository with source-side deduplication (Low Bandwidth mode) the requirement to place gateway as close to the repository as possible does not apply — for example, a gateway on one site can be configured to send data to a StoreOnce appliance on another site over WAN.
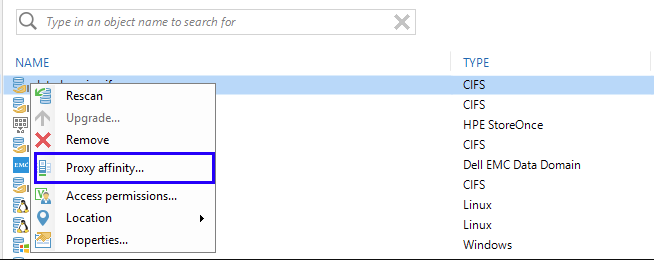
Proxy affinity. A feature added in 9.5, proxy affinity creates a “priority list” of proxies that should be preferred when a certain repository is used.
If a proxy from the list is not available, a job will use any other available proxy. However, if the proxy is available, but does not have free task slots, the job will be paused waiting for free slots. Even though the proxy affinity is a very useful feature for distributed environments, it should be used with care, especially because it is very easy to set and forget about this option. Veeam Support encountered cases about “hanging” jobs which came down to the affinity setting that was enabled and forgotten about. More details on proxy affinity.
Conclusion
Whether you are setting up your backup infrastructure from scratch or have been using Veeam Backup & Replication for a long time, we encourage you to review your setup with the information from this blog post in mind. You might be able to optimize the use of resources or mitigate some pending risks!
This article was provided by our service partner veeam.com