Posts

5 Steps to a Stronger Backup Disaster Recovery Plan

Between catastrophic natural events and human error, data loss is a very real threat that no company is immune to. Businesses that experience data disaster, whether it’s due to a mistake or inclement weather, seldom recover from the event that caused the loss.

The saddest thing about the situation is that it’s possible to sidestep disaster completely, specifically when it comes to data loss. You just have to take the time to build out a solid backup disaster recovery (BDR) plan.

Things to consider when developing your BDR plan include: structural frameworks, conducting risk assessments and impact analysis, and creating policies that combine data retention requirements with regulatory and compliance needs.

If you already have a BDR plan in place (as you should), use this checklist to make sure you’ve looked at all the possible angles of a data disaster and are prepared to bounce back without missing a beat. Otherwise, these steps chart out the perfect place to start building a data recovery strategy.


1. Customize the Plan

Unfortunately, there’s no universal data recovery plan. As needs will vary per department, it’ll be up to you, and the decision makers on your team, to identify potential weaknesses in your current strategy, and decide on the best game plan for covering all of your bases moving forward.

2. Assign Ownership

Especially in the case of a real emergency, it’s important that everyone on your team know and understand their role within your BDR plan. Discuss the plan with your team, and keep communication open. Don’t wait until the sky turns gray to have this conversation.

3. Conduct Fire Drills

The difference between proactive and reactive plans comes down to consistent checkups. Schedule regular endpoint reviews, alert configuration and backup jobs. Test your plan’s effectiveness with simulated emergency. Find out what works, and what needs improvement, and act accordingly.

4. Centralize Documentation

You’ll appreciate having your offsite storage instructions, vendor contracts, training plans, and other important information in a centralized location. Don’t forget to keep track of frequency and maintenance of endpoint BDR! Which brings us to point 5.

5. Justify ROI

Explore your options. There are many BDR solutions available on the market. Once you’ve identified your business’ unique needs, and assembled a plan of action, do your research to find out what these solutions could do to add even more peace of mind to this effort.

Or, if you’re an employee hoping to get the green light from management to implement BDR at your company, providing documentation with metrics that justify ROI will dramatically increase your likelihood of getting decision-makers on board.

Outside of these 5 components, you should also think about your geographical location and common natural occurrences that happen there. Does it make more sense for you to store your data offsite, or would moving to the cloud yield bigger benefits?

One thing is certain: disaster could strike at any time. Come ready with a plan of action, and powerful tools that will help you avoid missing a beat when your business experiences data loss. At LabTech® by ConnectWise®, we believe in choice, and offer several different BDR solutions that natively integrate to help you mitigate threats and avoid costly mistakes.

This article was provided by our partner Labtech


veeam

Veeam Disaster Recovery Services

Veeam have put together an excellent guide ‘The Essential Guide to the Biggest Challenges with Cloud Backup & Cloud Disaster Recovery‘.  As one of our chosen backup partners, I urge any data and data security conscious I.T Admin to review this document, it gives a great overview on Veeam’s newest technology such as ‘Disaster Recovery as a Service’ and its benefits over more traditional modes of disaster recovery.

I include a small snippet below:

The cloud offers a variety of advantages over traditional approaches to off-site disaster recovery: it reduces the need to physically move backup media from one location to another, is increasingly cheap, has functionally limitless storage capacity and is flexible

Since the public cloud providers strengthened their ability to replicate complex on-premises environments, and as software vendors developed more powerful DRaaS-enablement technology, DRaaS has become a more powerful option for organizations compared to traditional disaster recovery sites.

In this essential guide you’ll learn about some of the challenges around cloud backup and disaster recovery including:

-The traditional way of doing off-site backup and recovery

-Cloud security worries

-Concerns about pricing blowouts

-Managing and monitoring cloud backup and disaster recovery

-Taking advantage of DRaaS


This guide is available in its entirety from Veeams’  website -> here


veeam

Save backup storage using Veeam Backup & Replication BitLooker

Introduction

When you need to back up large amounts of data, you want to use up as little disk space as possible in order to minimize backup storage costs. However, with host-based image-level backups, traditional technologies force you to back up the entire virtual machine (VM) image, which presents multiple challenges that were never problems for classic agent-based backups.

For example, during backup analysis using Veeam ONE, you might notice that some VM backups are larger than the actual disk space usage in guest OS, resulting in higher-than-planned backup repository consumption. Most commonly, this phenomenon can be observed with file servers or other systems where a lot of data is deleted without being replaced with new data.

Another big sink for repository disk space consumption is useless files. While you might not need to back up data stored in certain files or directories in the first place, image-level backups force you to do this.

“Deleted” does not necessarily mean actually deleted

It is widely known that in vast majority of most modern file systems deleted files do not disappear from the hard drive completely. The file will only be flagged as deleted in the file allocation table (FAT) of the file system (e.g., the master file table (MFT) in case of NTFS). However, the file’s data will continue to exist on the hard drive until it is overwritten by a new file. This is exactly what makes tools like Undelete even possible. In order to reset the content of those blocks, you have to use tools like SDelete by Windows Sysinternals. This tool effectively overwrites the content of blocks belonging to deleted files with zeroes. Most backup solutions will then dedupe and/or compress these zeroed blocks so they do not take any extra disk space in the backup. However, running SDelete periodically on all your VMs is time consuming and hardly doable when you have hundreds of VMs, so most users simply don’t do this and allow blocks belonging to the deleted files to remain in the backup.

Another drawback of using SDelete is that it will inflate thin-provisioned virtual disks and will require you to use technologies such as VMware Storage vMotion to deflate them after SDelete processing. See VMware KB 2004155 for more information.

Finally, these tools must be used with caution. Because SDelete creates a very big zeroed file, you have to be careful not to affect other production applications on the processed server because that file is temporarily consuming all available free disk space on the volume.

Not backing up useless files in the first place

It goes without saying that there are certain files and directories that you don’t want to back up at all (e.g., application logs, application caches, temporary export files or user directories with personal files). There also might be data protection regulations in place that actually require you to exclude specific objects from backup. However, until today, the only way for most VM backup solutions to filter out useless data was to manually move useless data on every VM to the dedicated virtual drives (VMDK/VHDX) and exclude those virtual drives from processing. Again, because it’s simply not feasible to maintain this approach in large environments with dozens of new VMs appearing daily, most users simply accepted the need to back up useless data with image-based backups as a fact of life.

Meet Veeam BitLooker

Veeam BitLooker is the patent-pending data reduction technology from Veeam that allows the efficient and fully automated exclusion of deleted file blocks and useless files, thus enabling you to save considerable amount of backup storage and network bandwidth and further reduce costs.

The first part of BitLooker was introduced in Veeam Backup & Replication back a few years ago and enabled the exclusion of the swap file blocks from processing. Considering that each VM creates a swap file, which is usually at least 2 GB in size and changes daily, this is a considerable amount of data that noticeably affects full and incremental backup size. However, BitLooker automatically detects the swap file location and determines the blocks backing it in the corresponding VMDK. These blocks are then automatically excluded from processing, replaced with zeroed blocks in the target image and are not stored in a backup file or transferred to a replica image. The resulting savings are easy to see!

BitLooker in v9

In Veeam Backup & Replication v9, BitLooker’s capabilities have extended considerably in order to further improve data reduction ratios. In Veeam Backup & Replication v9, BitLooker has now three distinct capabilities:

  • Excluding swap and hibernation files blocks
  • Excluding deleted files blocks
  • Excluding user-specified files and folders

In v9, BitLooker supports NTFS-formatted volumes only. Most of BitLooker is available right in the Veeam Backup & Replication Standard edition. However, excluding user-specified files and folders requires at least Enterprise edition.

Configuring BitLooker

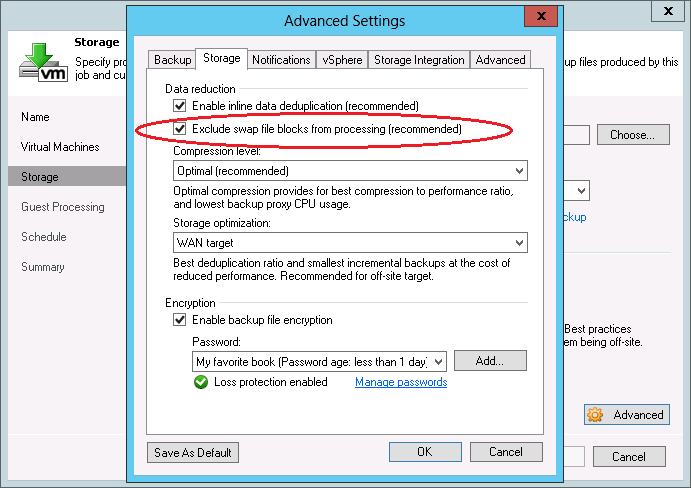
There are a few options for controlling BitLooker in v9. You can find the first two in the advanced settings of each backup and replication job.

Note that the option to exclude swap file blocks was available in previous product versions, but it was enhanced in v9 to also exclude hibernation files.

Now, there is the new option that enables the exclusion of deleted file blocks:

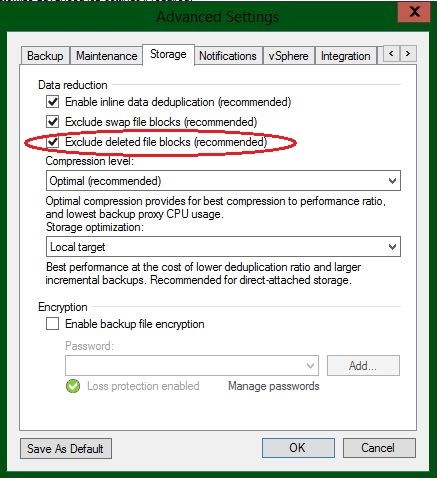
Users upgrading from previous versions will note that by default, deleted file blocks exclusion remains disabled for existing jobs after upgrading so it doesn’t not alter their existing behavior. You can enable it manually for individual jobs or automatically for all existing jobs with this PowerShell script.

In most cases, you should only expect to see minor backup file size reduction after enabling deleted file blocks exclusion. This is because in the majority of server workloads, data is never simply deleted, but rather always overwritten with new data. More often than not, it is replaced with more data than what was deleted, which is the very reason the world’s data almost doubles every 2 years. However, in certain scenarios (such as those involving data migrations), the gains can be quite dramatic.

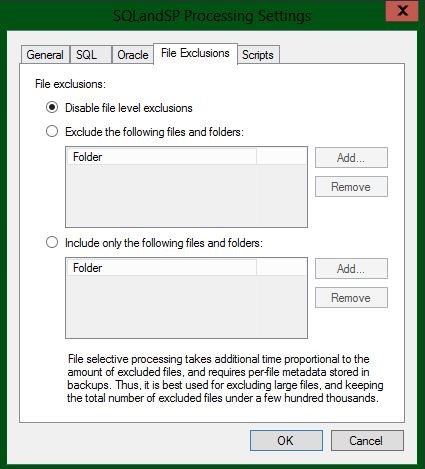
Finally, in v9, BitLooker also allows you to configure the exclusion of specific files and folders for each backup job. Unlike previous options, this functionality is a part of the application-aware guest processing logic, and exclusions can only be performed on a running VM. Correspondingly, you can find the file exclusion settings in the advanced settings of guest processing step of the job wizard. You have the option to either exclude specific file system objects or, conversely, back up nothing but specific objects:

When using this functionality, keep in mind that it increases both VM processing time and memory consumption by the data mover, depending on the amount of excluded files. For example, if processing exclusions for 10,000 files takes less than 10 seconds and requires just 50MB of extra RAM, then excluding 100,000 files takes 2 minutes and requires almost 400MB of extra RAM.

Summary

Veeam BitLooker offers users the possibility to further reduce backup storage and network bandwidth consumption without incurring additional costs. Enabling this functionality takes just a few clicks, and the data reduction benefits can be enjoyed in the immediate backup or replication job run.

What results are you seeing after enabling BitLooker in v9? Please share your numbers in the comments!


Re-posted from : https://www.veeam.com/blog/save-backup-storage-using-veeam-backup-replication-bitlooker.html

Veeam v9 New Features

From: http://blog.mwpreston.net/2015/11/09/veeam-v9-what-we-know-so-far/

Unlimited Scale-out Backup Repository

This is perhaps one the biggest features included within v9 – all to often we see environments over provision the storage for their backup repositories – you never know when we might get a large delta or incremental and the last thing we want to have to do is go through the process of running out of space and having to provision more.  In the end we are left with a ton of unused and wasted capacity, and when we need more instead of utilizing what we have we simply buy more – not efficient in terms of capacity and budget management.  This is a problem that Veeam is looking to solve in v9 with their Unlimited Scale-out Backup Repository functionality.  In a nutshell the scale-out backup repo will take all of those individual backup repositories you have now and group them into a single entity or pool of storage.  From there, we can simply select this global pool of storage as our target rather than an individual repository.  Veeam can then chose the best location to place your backup files within the pool depending on the functionalities and user-defined roles each member of the pool is assigned.  In an essence it’s a software defined storage play, only targeted at backup repositories – gone are the days of worrying about which repository to assign to which job – everybody in the pool!

More Snapshot/Repository integration.

Backup and restore from storage snapshots is no doubt a more efficient way to process your backups.  Just as Veeam has added support for HP 3PAR/StorVirtual and NetApp, we are now seeing EMC Dell thrown into that mix.  As of v9 we will now be able to leverage storage snapshots on EMC VNX/VNXe arrays to process our backup and restores directly from Veeam Backup and Replication – minimizing impact on our production storage and allowing us to keep more restore points, processing them faster and truly providing us with the ability to have < 15 minutes RTPO.

On the repository end of things we’ve seen the integration provided for DataDomain and Exagrid – as of v9 we can throw HP StoreOnce Catalyst into that mix. Having a tighter integration between Veeam and the StoreOnce deduplication appliance provides a number of enhancements in terms of performance to your backups and restores.  First off you will see efficiencies in copying data over slower links due to the source side deduplication that StoreOnce provides.  StoreOnce can also create synthetic full backups by performing only meta data operations, eliminating the need to actual perform a copy of the data during the synthetic creation, which in turns provides efficiency to a very high i/o intensive operation.  And of course, creating repositories for Veeam backups on the StoreOnce Catalyst can be done directly from within Veeam Backup & Replication, without the need to jump into separate management tools or UIs.

Cloud connect replication

Last year Veeam announced the Cloud Connect program which essentially allows partners to become somewhat of a service provider for their customers looking to ship their Veeam backups offsite.  Well, it’s 2015 now and we now can see that the same type of cloud connect technology now is available for replication.  Shipping backups offsite was a great feature, but honestly, being able to provide customers with a simple way to replicate their VMs offsite is ground breaking.  Disaster Recovery is a process and technology that is simply out of reach for a lot of business – there isn’t the budget set aside for a secondary site, let alone extra hardware sitting at that site essentially doing nothing.  Now customers are able to simply leverage a Veeam Cloud/Service Provider and replicate their VMs on a subscription based process to their data center.

DirectNFS

When VMware introduced the VMware API’s for Data Protection (VADP) it was ground breaking in what it provided vendors such as Veeam the ability to do in terms of backup  VADP is the grounds to how Veeam accesses data in their Direct SAN transport mode, allowing data to be simply transferred directly from the SAN to the Veeam Backup and Replication console.  That said VADP is only supported on block transports, limiting Direct SAN to just iSCSI and Fibre Channel.  In true Veeam fashion when they see an opportunity to innovate and develop functionality where it may be lacking they do so.  As of v9 we will now be able to leverage Direct SAN mode on our NFS arrays using a technology called DirectNFS.  DirectNFS will allow the VBR console server to directly mount to our NFS exports, allowing Veeam to process the data directly from the SAN, leaving the ESXi hosts to do what they do best – run production!

On-Demand Sandbox for Storage Snapshots

The opportunities that vPower and Virtual Labs have brought to organizations has been endless. Having the ability to spin up exact duplicates of our production environments, running them directly from our deduplicated backup files has solved many issues around patch testing, application upgrades, etc.  That said up until now we could only use backup files as the grounds for getting access to these VMs – starting with v9 we can now leverage storage snapshots on supported arrays (HP, EMC, NetApp) to create completely isolated copies of the data that resides on them.  This is huge for those organizations that leverage Virtual Labs frequently to perform testing of code or training.  Instead of waiting for backups to occur we could technically have a completely isolated testing sandbox spun up using Storage Snapshots in essentially, minutes.  A very awesome feature in my opinion.

ROBO Enhancements

Those customers who currently use Veeam and have multiple locations we will be happy to hear about some of the enhancements that v9 has centering around Remote/Branch Offices.  A typical configuration in deploying Veeam is to have a centralized console controlling the backups at all of our remote locations.  In v8, even if you had a remote proxy and repository located at the remote office, all the guest interaction traffic was forced to traverse your WAN as it was communicated directly from the centralized console.  In v9 things have changed – a new Guest Interaction Proxy can be deployed which will handle then handle this type of traffic.  When placed at the remote location, only simple commands will be sent across the WAN from the centralized console to the new GIP, which will in turn facilitate the backup of the remote VMs, thus saving on bandwidth and providing more room for, oh, I don’t know, this little thing called production.

When it comes to recovery things have also drastically changed.  In v8 when we performed a file-level recovery the data actually had to traverse our WAN twice – once when the centralized backup console pulled the data, then again as it pushed it back out to it’s remote target – not ideal by any means.  Within v9 we can now designate and remote Windows server as a mount server for that remote location – when a File-level recovery is initiated the Mount Server can now handle the processing of the files rather than the backup console, saving again on bandwidth and time.

Standalone Console

“Veeam Backup & Replication console is already running”  <- Any true Veeam end-user is sure to have seen this message at one time or another, forcing us to either find and kill the process or yell at someone to log off.  As of v9 the Veeam Backup & Replication console has now been broken out from the Veeam Backup & Replication server, meaning we can install a client on our laptops in order to access Veeam.  This is not a technical change in nature, but honestly this is one of my favorite v9 features.  I have a lot of VBR consoles and am just sick of having all those RDP sessions open – this alone is enough to force me to upgrade to VBR v9 .

Per-VM backup files

The way Veeam is storing our backup files is coming with another option in version 9.  Instead of having one large backup file that contains multiple VMs we can now enable what is called a “Per-VM backup file chain” option.  What this does store each VMs restore points within the job in their own dedicated backup file.  Some advantages to this?  Think about writing multiple streams inside of parallel processing mode into our repositories – this technically should increase the performance of our backup jobs.  Certainly this sounds like an option you may only want to use if your repository provides deduplication as you would lose the deduplication provided job-wide by Veeam if you have enabled this.

New and improved Explorers

The Veeam Explorers are awesome, allowing us to restore individual application objects from our backup files depending on what application is inside it.  Well, with v9 we have one new explorer as well as some great improvements to the existing ones.

  • Veeam Explorer for Oracle – new in v9 is the explorer functionality for Oracle.  Transaction-level recovery and transaction log backup and replay are just a couple of the innovative features that we can no perform on our Oracle databases.
  • Veeam Explorer for MS Exchange – We can now get a detailed export report which will outline exactly what has been exported from our Exchange servers – great for auditing and reporting purposes for sure!  Another small but great feature – Veeam will no provide us with an estimation in terms of export size for the data contained in our search queries.  At least we will have some idea as to how long it might take.
  • Veeam Explorer for Active Directory – Aside from Users and Groups and the normal objects in AD we might want to restore we can now process GPO’s and AD-Integrated DNS Records).  Oh, and if you know what you are doing Veeam v9 can also restore configuration partition objects (I’ll stay away from this one)
  • Veeam Explorer for MS SQL – One big item that has been missing from the SQL explorer has been table-level recovery – in v9 this is now possible.  Also in v9 is the ability to process even more SQL objects such as Stored Procedures, functions and views as well as utilize a remote SQL server as a staging server for the restore.
  • Veeam Explorer for SharePoint – As much as I hate it SharePoint is still widely used, therefore we are still seeing development within Veeam on their explorer.  In v9 we can process and restore full sites as well as site-collections.  Also, list and item-level permissions are now possible to restore as well.

The 10-step guide to a Disaster Recovery plan

Problem: You need a plan for responding to major and minor disasters to let your company restore IT and business operations as quickly as possible.

1. Review Your Backup Strategy

  • Full daily backups of all essential servers and data is recommended.
  • Incremental and differential backups may not be efficient during major disasters, due to search times and hassle
  • If running Microsoft Exchange or SQL servers, consider making hourly backups of transaction logs for more recent restores
  • Store at least one tape off site weekly, and store on-site tapes in a data-approved fireproof safe
  • Have a compatible backup tape drive

2. Make Lots of Lists

  • Document Business Locations
  • Addresses, phone numbers, fax numbers, building management contact information
  • Include a map to the location and surrounding geographic area.
  • Equipment Lists
  • Compile an inventory listing of all network components at each business location. Include: model, manufacturer, description, serial number, and cost
  • Application List
  • Make a list of business critical applications running at each location
  • Include account numbers and any contract agreements
  • Include technical support contact information for major programs
  • Essential Vendor List
  • List of essential vendors, those who are necessary for business operations
  • Establish lines of credit with vendors incase bank funds are no longer readily available after disasters
  • Critical Customer List
  • Compile a list of customers for whom your company provides business critical services
  • Designate someone in the company to handle notifying these customers
  • Draw detailed diagrams for all networks in your organization, including LANs and WANs

3. Diagram Your Network

  • LAN Diagram: Make a diagram that corresponds to the physical layout of the office, as opposed to a logical one
  • Wireless access using Wi-Fi Protected Access security (WPA2) in order to operate in a new location

4. Go Wireless
5. Assign a Disaster Recovery Administrator

  • Assign Primary and Secondary disaster recovery administrators.· Ideally, each admin should live close to the office, and have each other’s contact information. Administrators are responsible for declaring the disaster, defining the disaster level, assessing and documenting damages, and coordinating recovery efforts. When a major disaster strikes, expect confusion, panic, and miscommunication. These uncontrollable forces interrupt efforts to keep the company up and running. By minimizing these challenges through planning with employees, efficiency increases. Assign employees into teams that carry out tasks the Disaster Recovery Administrator needs performed.

6. Assemble Teams

Damage Assessment/Notification Team

  • Collects information about initial status of damaged area, and communicates this to the appropriate members of staff and management
  • Compiles information from all areas of business including: business operations, IT, vendors, and customers

Office Space/Logistics Team

  • Assists in locating temporary office space in the event of a Level Four disaster
  • Responsible for transporting co-workers and equipment to the temporary site and are authorized to contract with moving companies and laborers as necessary

Employee Team

  • Oversees employee issues: staff scheduling, payroll functions, and staff relocation


Technology Team

  • Orders replacement equipment and restores computer systems.
  • Re-establishes connection to telephone service and internet/VPN connections

Public Relations TeamSafety and Security Team

  • Ensures safety of all employees during the recovery process.
  • Decides who will and who will not have access to any areas in the affected location.

Office Supply Team

7. Create a Disaster Recovery Website

  • A website where employees, vendors, and customers can obtain up-to-date information about the company after a disaster could be vital.· The website should be mirrored and co-hosted at two geographically separate business locations.
  • On the website, the disaster recovery team should post damage assessments for business locations, each location’s operational status, and when and where employees should report for work.
  • The site should allow for timestamped-messages to be posted by disaster recovery administrators. SSL certificates should be assigned to the website’s non-public pages.

8. Test Your Recovery Plan

  • Most IT professionals face level one or level two disasters regularly, and can quickly respond to such events. Level three and four disasters require a bit more effort. To respond to these more serious disasters, your disaster plan should be carefully organized.· Plan to assign whatever resources you do have control over in such situations. Test the plan after revisions, and discuss what worked and what didn’t.

9. Develop a Hacking Recovery Plan

  • Hacks attacks fall under the scope of disaster recovery plans.
  • Disconnect external lines. If you suspect that a hacker has compromised your network, disconnect any external WAN lines coming into the network. If the attack came from the Internet, taking down external lines will make it harder for the hacker to further compromise any machines and with luck prevent the hacker from compromising remote systems.
  • Perform a wireless sweep. Wireless networking makes it relatively simple for a hacker to set up a rogue Access Point (AP) and perform hacks from the parking lot. You can use a wireless sniffer perform a wireless sweep and locate APs in your immediate area.

10. Make the DRP a Living Document

  • · Review your disaster recovery plans at least once a year. If your company network changes frequently, you should probably create a semi-annual review. It’s best to know that an out-of-date disaster plan is almost as useless as having none.
  • WAN Diagram: Include all WAN locations and include IP addresses, model, serial numbers, and firmware revision of firewalls

Troubleshooting Backup issues

Backing up files can be troublesome. Speeds can reach disasterous new lows, and files tend to get corrupted along the way. It might just seem like more trouble than it’s worth, but in our experience, it makes the difference of hours and days. However, with the correct tools and information, it is possible to narrow down the problem, and even solve it. Below is a troubleshooting guide for common reasons why your server backup process may be causing errors.

1.Here is a summary of what we will be examining in order to better realize a potential problem:

oDocument any noticeable problems

oWhen did you notice the change or error(s)?

oHave there been any changes to the main backup server, media servers, or backup clients?

oWhat, if anything, have you done already to troubleshoot this problem?

oDo you have any site documentation?

oWhat are your expectations once the problem has been ratified

2.Hardware Related Slow-down

oThe speed of the disk controller and hardware errors caused by the disk drive, tape drive, disk controller, SCSI bus, or even improper cabling/termination can slow performance.

oTape drives are incompatible with SCSI Raid Controllers.

oFragmented disks (act of data being written on different physical locations of a disk) take much longer to back up. Not only will it affect the rate at which data is written, but it will affect your overall system performance. A solution to this is simply by defragmentation.

oThe amount of available memory greatly impacts backup speed. A lack of free hard disk space is a commonly overlooked issue. This is generally due to improper file paging settings.

3.File Types and Compression

oThe average file can potentially compress at a 2:1 ratio if hardware compression is used. Backup speed could potentially double if average compression is used prior.

oThe total number of files on a disk, and the relative size of each file is important in calculating backup speed. The fewer large files, the faster the backup.

oBlock size has an important role in compression, and thus, affects backup speed. The bigger the block size, the more capable the drive is to achieve better throughput and increased capacity. It is not recommended to increase the Block Size above the default.

4.Remote-Disk Backup

oThe backup speed for a remote disk is limited by the speed of the physical connection. The rate at which a remote server’s hard disks are able to be backed up depends on the make/model of network cards, the mode/frame type configuration for the adapter, the connectivity equipment (hubs, switches, routers, and so on), and the Windows NT 4 or Windows 2000 settings.

oA commonly overlooked reason for slowdown on network backups can be the configuration of the network itself. Certain features such as “Full-Duplex” and “Auto-Detect” may not be fully supported in every environment. Setting the speed to 100Mb and duplex to half/full on the server side, and 100 MB on the switch port is the common practice. Dependent on the resulting speeds, half or full duplex will be the better solution.

5.Methods to potentially improve tape backup performance

oMake sure the tape drive is properly defined for the host system. It is common for a SCSI host to disable the adaptive cache on the drive if it is not recognized. The cache enables features like drive streaming to operate at peak performance.

oPut the tape drive on a non-Raid controller by itself.

oMake sure all settings in the controller’s Post Bios Setup Utility are correct.

oMake sure the proper driver updates have been applied for the SCSI Controllers.

oConfirm proper cabling/termination for the devices being used.

oUpdate the firmware on the tape drive to the latest level. In some cases, the firmware may actually require downgrading to improve performance.

oCheck the tape drive and tape media statistics to see if errors occur when backups run.

oCheck the Windows NT or Windows 2000 Application Event Logs for warnings/errors.