Posts

veeam

Veeam Cloud Tier

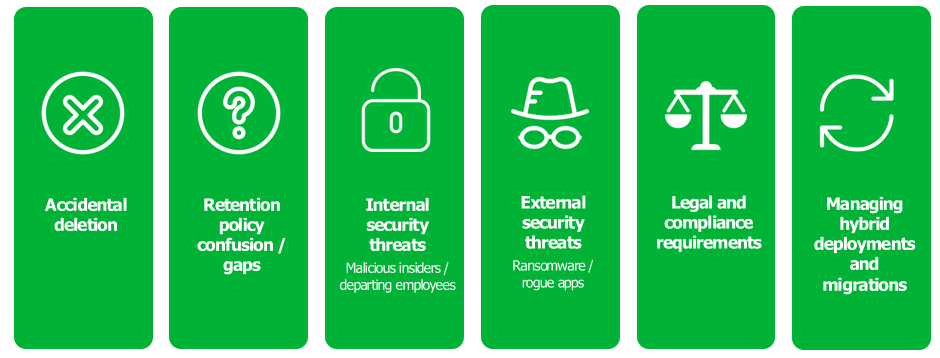
Data is growing faster and is more important than ever!  All organization are experiencing explosive data growth and it’s becoming more and more apparent that the data being generated and protected is critical. Company viability is jeopardized when data is at risk and without secure and protected access to critical data, organizations face potential collapse. While the threat of a malicious attack against organizational data is not new, the methods and vectors of attack have evolved, and attacks have drastically increased in recent years.

Attacks on your data are at an all-time high!  Ransomware is more powerful than ever, and corporations face an increased number of malicious attacks including both external and internal threats due to the era of connected platforms. The threat to data is real, and as part of an overall data management strategy leveraging new technologies is critical to protecting that data and ensuring that organizations are protected from malicious intent where data is either permanently deleted or held for ransom.

The storage landscape has fundamentally changed with Object Storage. With the release of Veeam Backup & Replication 9.5 Update 4 in 2019, we introduced the Veeam Cloud Tier which enabled customers to take advantage of Object Storage. Due to its increasing popularity, infinite scale-out capacity and lower cost for long term retention, Object Storage offers many advantages over traditional block and file-based storage systems. With regards to increasing amounts of backup data, and requirements to keep that data for longer periods of time, Object Storage is a perfect fit. Veeam has witnessed an overwhelming adoption of Object Storage with over 100PB of data offloaded to just a few top cloud object storage providers alone, despite the fact that in Update 4, the Cloud Tier was only capable of offloading older data to help to reduce the costs of long-term archival. This was just step 1, and now v10 brings more!

Introducing the next iteration of Veeam Cloud Tier in v10

With the launch of Veeam Backup & Replication v10 we have made drastic improvements. In v10, the Cloud Tier feature set has been extended to include three distinct, but very interconnected customer needs:

  • Achieving the 3-2-1 rule and performing off-site backup in a fast, effective and automated fashion, thus lowering off-site RPOs
  • Protecting your data from attacks by malicious insiders and hackers
  • Simplifying recovery from a major disaster

Let’s dive into each of these customer needs further.

Copy Policy:  Makes 3-2-1 easier than ever

Building on the “Move Policy” in Update 4, Copy Policy allows backup data to be instantly copied to the SOBR Capacity Tier as it’s created. This is an important distinction from what Move Policy does, where there is only ever one copy of the data sitting either in Performance Tier or Capacity Tier, which can leave recent restore points within the Operational Restore Window at risk in the case of disaster or malicious intent.

With Copy Policy enabled on a SOBR, all backup files that are created are effectively duplicated as soon as they are created to the Capacity Tier. This allows us to adhere to the 3-2-1 rule (3 copies of backup, on 2 different media, with 1 offsite) of backup that requires one independent copy of data offsite. In fact, when using cloud object storage, it allows customers to much more easily achieve 3-2-1, by being 1 of the copies, on a different media AND in a different location. It’s a 3-2-1 rule slam dunk!

When used together, both Move and Copy policies complement each other perfectly to fully take advantage of object storage by keeping the local landing zone for quicker operational restore easier to manage from a data growth and capacity planning point of view. Copy mode then ensures that, in the case of disaster, there is a full copy of backup restore points available for recovery.

Ok, 3-2-1 is achieved faster and easier than ever.  Check! Now, are you fully protected and 100% safe? Not yet. What about ransomware, hackers or malicious insiders?

Immutability – Your solution for ultimate protection.

Protection against malicious intent or accidental deletion of backup data has become critical in anyone’s data protection strategy– and with immutable backup functionality for Amazon S3 and S3-compatible object storage repositories, data that is shifted or copied into the Capacity Tier is further protected. This feature relies on the S3 API to set a period of time on each block of data uploaded to Object Storage where it cannot be modified or deleted by anybody. Yes, we mean anybody:  intruders, malicious actors, accidental deletion by admins and more.

This effectively works to protect all recent (and generally most important) backup points until the set period has expired. And even having the highest-possible privileges on an AWS account does not provide you the ability to delete or modify the data, period.

As mentioned, immutable backups is a feature available for Amazon S3 and a variety of S3-compatible object storage providers including Ceph, Cloudian, Zadara and more. Check out the latest approved Veeam Ready “object” providers here for the latest and expect many more to come soon.

Now ransomware and inside threats are under control, but what if I lose the datacenter completely? We have a solution there too.

Enhanced Recoverability with Simplified Backup Import

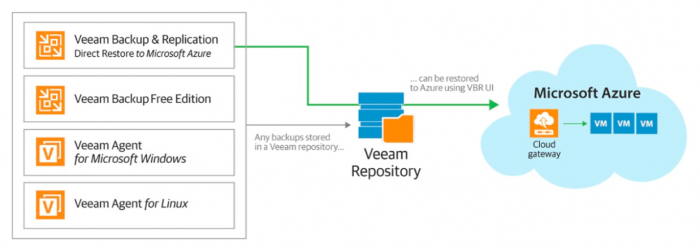
The resiliency built into the Cloud Tier is such that if you totally lost your on-premises installation of Veeam Backup & Replication, you would be able to  restore from data that was copied or moved into the object storage. This was true in the Update 4 release, but we have further improved the convenience and speed in which this data back be accessed after a disaster scenario has been triggered with the new Mount Object Storage Repository feature in v10.

With this feature, content in an existing object storage repository can be registered in a newly provisioned backup server (even running on a laptop and using Community Edition), and you can have the existing backup data points made available for restore operations in no time, including restores directly to the public cloud or instant recovery back to on-prem.

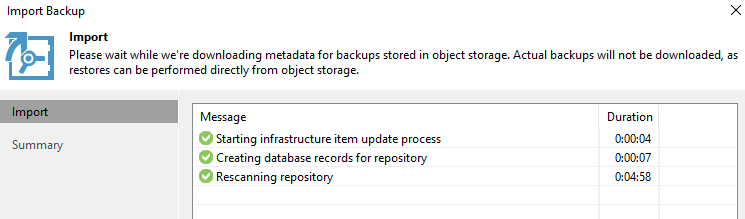
Unlike with the previous version, you no longer need to re-create and re-scan SOBR, because we make restore points available directly from the object storage by quickly downloading a very small amount of metadata during the most familiar Import Backup process. In other words, you can now import backups from object storage as quickly and easily as from local storage. How cool is that?

Conclusion

With these innovative additions to Veeam Cloud Tier, the abilities for customers to do off-site backup faster, store data for longer periods at lower costs, achieve 3-2-1 , and to  recover quickly from a potential malicious attack or disaster scenario have been greatly enhanced. Not only are we now able to copy backups offsite for redundancy and longer term retention on object storage, but we are able to also have that data immutable, and easily recoverable with the new Import feature, leading to much lower RTOs.


This article was provided by our service partner : Veeam

Windows Server 2019

How to backup a Windows 2019 file server cluster

A cluster ensures high availability but does not protect against accidental data loss. For example, if a user (or malware) deletes a file from a Microsoft Windows file server cluster, you want to be able to restore that data. So, backup for data on clusters is still necessary. But also, it can save much time for the Windows operating system to have a full backup. Imagine that one of the cluster member servers has a hardware issue and needs to be replaced. You could manually install Windows, install all updates, install all the drivers, join the cluster again and then remove the old cluster member, or you could simply do a bare metal restore with Veeam Agent for Microsoft Windows.

Backup and restore of physical Windows clusters is supported by Veeam Backup & Replication with Veeam Agent for Microsoft Windows. It can backup Windows clusters with shared disks (e.g., a classic file-server cluster) or shared nothing clusters like Microsoft Exchange DAG or SQL Always-On clusters. In this article I will show how to backup a file server cluster with a shared disk. Earlier blog post ( How to create a file server cluster with Windows 2019) show the setup of the system.

The backup of a cluster requires three steps:

  1. Creating a protection group
  2. Creating a backup job
  3. Starting the backup job

Create a protection group

A Veeam Backup & Replication protection group is a logical unit to group multiple machines to one logical unit. But it’s not only used for grouping, it manages the agent deployment to the computers. Go to the inventory and select “physical and cloud infrastructure” to create a new protection group. After defining a name, you need to choose the type “Microsoft Active Directory objects”.

In the next step, select the cluster object. In my case, it’s “WFC2019”

Only add the Active Directory cluster here. You don’t need to add the nodes here. You can also find the cluster object in Active Directory Users and Computers

As I run my cluster as a virtual machine (VM), I do not want to exclude VMs from processing.

In the next step, you must specify a user that has local administrator privileges. In my lab I simplified everything by using the domain administrator

It is always a good idea to test the credentials. This ensures that no problems (e.g., firewall issues) occur during agent deployment.

The options page is more interesting. Veeam regularly scans for changes and then deploys or updates the agent automatically.

The distribution server is the machine that deploys the agents. In most cases, the backup server is also fine as distribution server. Reasons for dedicated distribution servers would be if you have branch office deployments or when you plan to deploy a hundred or more agents.

On large servers we recommend installing the change block tracking driver for better incremental backup performance. Keep in mind that the driver requires a reboot during installation and updates.

In the advanced settings, you can find a setting that is particularly relevant from a performance perspective: Backup I/O control. It throttles the agent if the server has too high of a load.

You can reboot directly from the Veeam Backup & Replication console.

After the installation has succeeded and no reboots are pending anymore, the rescan shows that everything’s okay.

Create a backup job

The second step is to create a backup job. Just go to the jobs section in “home” and select to create a new backup job for a Windows computer. At the first step, select the type “failover cluster”.

Give a name to the backup job and add the protection group created earlier.

I want to back up everything (e.g., the entire computer)

Then, select how long you want to store the backups and where you want to store them. The next section, “guest processing,” is more interesting. Veeam Agent for Microsoft Windows always does backups based on VSS snapshots. That means that the backup is always consistent from a file-level perspective. For application servers (e.g., SQL, Microsoft Exchange) you might want to configure log shipping settings. For this simple file-server example no additional configuration is needed.

Finally, you can configure a backup schedule.

Run the backup job

Running a Veeam Agent for Microsoft Windows backup job is the same as a classic VM backup job. The only thing you might notice is that a cluster backup does not use per-host-backup-chains if you configured your repository to “per-VM backup files”.  All the data from the cluster members of one job is stored in one backup chain.

Another thing to note is that the failover of a cluster does not result in a new full backup. There is not even a change-block-tracking reset (e.g., CBT-reset) in most failover situations. A failover cluster backup always does block-level backup (e.g., image-level backup). Of course, you can do single-item or file-level restore from block level backups.

During the backup, Veeam will also collect the recovery media data. This data is required for a bare-metal or full-cluster restore.

Next steps and restore

After a successful backup, you can do restores. The user interface offers all the options that are available for Veeam Agent for Microsoft Windows restores. In most cases, the restores will be file-level or application restores. For Windows failover clusters, the restore of Microsoft Exchange and SQL is possible (and is not shown in the screenshot because it’s a file server). For non-clustered systems, there are additional options for Microsoft Active Directory, SharePoint and Oracle databases.

Download Veeam Agent for Microsoft Windows below and give this flow a try.


This article was provided by our service partner : veeam.com

veeam office 365

How to manage Office 365 backup data with Veeam

As companies grow, data grows and so does the backup data. Managing data is always an important aspect of the business. A common question we get around Veeam Backup for Microsoft Office 365 is how to manage the backup data in case something changes. Data management can be needed for several reasons:

  • Migration to new backup storage
  • Modification of backup jobs
  • Removal of data related to a former employee

Within Veeam Backup for Microsoft Office 365, we can easily perform these tasks via PowerShell. Let’s take a closer look at how this works exactly.

Moving data between repositories

Whether you need to move data because you bought new storage or because of a change in company policy, from time to time it will occur. We can move backup data by leveraging Move-VBOEntityData. This will move the organization entity data from one repository to another and can move the following types of data:

  • User data
  • Group data
  • Organization site data

The first two are related to Exchange and OneDrive for Business data, where the last option is related to SharePoint online data. Each of these types also supports four additional data types such as Mailbox, ArchiveMailbox, OneDrive and Sites.

If we want to move data, we need three parameters, by default, to perform the move:

  • Source repository
  • Target repository
  • Type of data

The example below will move all the data related to a specific user account:

$source = Get-VBORepository -Name “sourceRepo”
$target = Get-VBORepository -Name “targetRepo”
$user = Get-VBOEntityData -Type User -Repository $source -Name “Niels Engelen”

Move-VBOEntityData -From $source -To $target -User $user -Confirm:$false

The result of the move can be seen within the history tab in the console. As seen on the screenshot, all the data is being moved to the target repository. However, it is possible to adjust this and only move, for example, mailbox and archive mailbox data.

Move-VBOEntityData -From $source -To $target -User $user -Mailbox -ArchiveMailbox-Confirm:$false

As seen on the screenshot, this will only move the two specific data types and leave the OneDrive for Business and personal SharePoint site on the source repository.

Deleting data from repositories

We went over moving data between repositories, but what if somebody leaves the company and the data related to their account has to be removed? Again, we can leverage PowerShell to easily perform this task by using Remove-VBOEntityData.

The same algorithm applies here. We can remove three types of data, with the option to drill down to a specific data type (Mailbox, ArchiveMailbox, OneDrive, Sites):

  • User data
  • Group data
  • Organization site data

If we want to remove data from a specific user, we can use the following snippet:

$repository = Get-VBORepository -Name “repository”
$user = Get-VBOEntityData -Type User -Repository $ repository -Name “Niels Engelen”

Remove-VBOEntityData -Repository $repository -User $user -Confirm:$false 

The same applies here. You can choose not to add an extra parameter and it will remove everything related to the account. However, it is also possible to provide extra options. If you only want to remove OneDrive for Business data, you can do this by using the following:

Remove-VBOEntityData -Repository $repository -User $user -OneDrive-Confirm:$false


This article was provided by our service partner : veeam


How to create a file server cluster with Windows 2019

High Availability of data and applications has been an important topic in IT for decades. One of the critical services in many companies is the file servers, which serve file shares where users or applications store their data. If the file server is offline, then people cannot work. Downtime means additional costs, which organizations try to avoid. Windows Server 2019 (and earlier versions) allow you to create highly available file services.

Prerequisites

Before we can start with the file server cluster configuration, the file server role must be installed and permissions must be set in Active Directory for the failover cluster computer object.

There are two ways to install the file server role on the two cluster nodes:

  • Via the Add Roles and Features Wizard of the server manager
  • Via PowerShell

In Server manager, click Add roles and features and follow the wizard. Select the File Server role and install it. A reboot is not required.

server 2019 cluster 1

As an alternative, you can use the following PowerShell command to install the file server feature:

Install-WindowsFeature -Name FS-FileServer

server 2019 cluster 2

To avoid errors at later steps, first configure Active Directory permissions for the failover cluster computer object. The computer object of the cluster (in my case, WFC2019) must have the Create Computer Objects permissions in the Active Directory Organizational Unit (OU).

If you forget about this, the role will fail to start later. Errors and event IDs 1069, 1205 and 1254 will show up in the Windows event log and failover cluster manager.

Open the Active Directory Users and Computers console and switch to Advanced Features in the View menu.

server 2019 cluster 3

Go the OU where your cluster object is located (in my case the OU is Blog). Go to the Security tab (in properties) and click Advanced.

server 2019 cluster 4

In the new window click Add and select your cluster computer object as principal (in my case WFC2019).

server 2019 cluster 5

In the Permissions list select Create Computer objects

server 2019 cluster 6

Click OK in all windows to confirm everything

Configure the file server cluster role

Because all pre-requisites are now met, we can configure the file server cluster role. Open the Failover Cluster manager and add the role to your cluster (right-click on Roles of your cluster -> configure role -> and select the File Server role).

server 2019 cluster 7

We will create a file server for general use as we plan to host file shares for end users.

server 2019 cluster 8

In the next step we define how clients can access the file server cluster. Select a name for your file server and assign an additional IP address.

server 2019 cluster 9

Use the storage configured earlier.

server 2019 cluster 10

After you finish the wizard, you can see the File Server role up and running in the Failover Cluster Manager. If you see errors here, check the create computer objects permissions described earlier.

server 2019 cluster 10

A new Active Directory object also appears in Active Directory Users and Computers, including a new DNS entry

server 2019 cluster 11

Now it’s time to create file shares for users. You can right-click on the file server role or use the actions panel on the right hand side.

server 2019 cluster 12

I select the SMB Share  Quick as I plan a general purpose file server for end users.

server 2019 cluster 13

I also keep the default permissions because this is just an example. After you have finished the wizard, the new file share is ready to use.

In the following video I show the advances of a continuous available file share. The upload of the file will continue even during a cluster failover. The client is a Windows 10 1809. I upload an iso to the file share I created earlier. My upload speed it about 10-20Mbit/s WAN connection. During failover to a different cluster node, the upload stops for some seconds. After successful failover it continues uploading the ISO file.

Next steps and backup

As soon as the file server contains data, it is also time to think about backing up the file server. Veeam Agent for Microsoft Windows can back up Windows failover clusters with shared disks. We also recommend doing backups of the entire system of the cluster. This also backs up the operating systems of the cluster members and helps to speed up restore of a failed cluster node because you don’t need to search for drivers, etc. in case of a restore.


This article was provided by our service partner : Veeam

vSan

How policy based backups will benefit you

With VMworld 2019 right around the corner, we wanted to share a recap on some of the powerful things that VMware has in their armoury and also discuss how Veeam can leverage this to enhance your Availability.

This week VMware announced vSAN 6.7 Update 3. This release seems to have a heavy focus on simplifying data center management while improving overall performance. A few things that stood out to me with this release included:

  • Cleaner, simpler UI for capacity management: 6.7 Update 3 has color-coding, consumption breakdown, and usable capacity analysis for better capacity planning allowing administrators to more easily understand the consumption breakdown.
  • Storage Policy changes now occur in batches. This ensures that all policy changes complete successfully, and free capacity is not exhausted.
  • iSCSI LUNs presented from vSAN can now be resized without the need to take the volume offline, preventing application disruption.
  • SCSI-3 persistent reservations (SCSI-3 PR) allow for native support for Windows Server Failover Clusters (WSFC) requiring a shared disk.

Veeam is listed in the vSAN HCL for vSAN Partner Solutions and can protect and restore VMs. The certification for the new Update 3 release is also well on its way to being complete.

Another interesting point to mention is the Windows Server Failover Clusters (WSFC). While these are seen as VMDKs, they are not applicable to the data protection APIs used for data protection tasks. This is where the Veeam Agent for Microsoft Windows comes in with the ability to protect those failover clusters in the best possible way.

What is SPBM?

Storage Policy Based Management (SPBM) is the vSphere administrator’s answer to control within their environments. This framework allows them to overcome upfront storage provisioning challenges, such as capacity planning, differentiated service levels and managing capacity resources in a much better and efficient way. All of this is achieved by defining a set of policies within vSphere for the storage layer. These storage policies optimise the provisioning process of VMs by provisioning specific datastores at scale, which in turn will remove the headaches between vSphere admins and storage admins.

However, this is not a closed group between the storage and virtualisation admins. It also allows Veeam to hook into certain areas to provide better Availability for your virtualised workloads.

SPBM spans all storage offerings from VMware, traditional VMFS/NFS datastore as well as vSAN and Virtual Volumes, allowing policies to overarch any type of environment leveraging whatever type of storage that is required or in place.

What can Veeam do?

Veeam can leverage these policies to better protect virtual workloads, by utilising vSphere tags on old and newly created virtual machines and having specific jobs setup in Veeam Backup & Replication with specific schedules and settings that are required to meet the SLA of those workloads.

Veeam will also back up any virtual machine that has an SPBM policy assigned to it, as well as protect the data. It will also protect the policy, so if you had to restore the whole virtual machine, the policy would be available as part of the restore process.

Automate IT

Gone are the days of the backup admin adding and removing virtual machines from a backup job, so let’s spend time on the interesting and exciting things that provide much more benefit to your IT systems investment.

With vSphere tags, you can create logical groupings within your VMware environment based on any characteristic that is required. Once this is done, you are able to migrate those tags into Veeam Backup & Replication and create backup jobs based on vSphere tags. You can also create your own set of vSphere tags to assign to your virtual machine workloads based on how often you need to back up or replicate your data, providing a granular approach to the Availability of your infrastructure.

VMware Snapshots – The vSAN way

In vSAN 6.0, VMware introduced vSAN Sparse Snapshots. The snapshot implementation for vSAN provides significantly better I/O performance. The good news for Veeam customers is if you are using the traditional VMFS or the newer vSAN sparse snapshots the display and output are the same — a backup containing your data. The benefits are incredible from a performance and methodology point of view when it comes to the sparse snapshot way and can play a huge role in achieving your backup windows.

The difference between the “traditional” and the new snapshot methodology that both vSAN as well as Virtual Volumes leverage is that a traditional VMFS snapshot is using Redo logs which, when working with high I/O workloads, could cause performance hits when committing those changes back to the VM disk. The vSAN way is much more similar to a shared storage system and a Copy On Write snapshot. This means that there is no commitment after a backup job has released a snapshot, meaning that I/O can continue to run as the business needs.

There are lots of other integrations between Veeam and VMware but I feel that this is still the number one touch point where a vSphere and Backup Admin can really make their life easier by using policy-based backups using Veeam.


This article was provided by our service partner : veeam.com

healthcare backup

Healthcare backup vs record retention

Healthcare overspends on long term backup retention

There is a dramatic range of perspective on how long hospitals should keep their backups: some keep theirs for 30 days while others keep their backups forever. Many assume the long retention is due to regulatory requirements, but that is not actually the case. Retention times longer than needed have significant cost implications and lead to capital spending 50-70% higher than necessary. At a time when hospitals are concerned with optimization and cost reduction across the board, this is a topic that merits further exploration and inspection.

Based on research to date and a review of all relevant regulations, we find:

  • There is no additional value in backups older than 90 days.
  • Significant savings can be achieved through reduced backup retention of 60-90 days.
  • Longer backup retention times impose unnecessary capital costs by as much as 70% and hinder migration to more cost-effective architectures.
  • Email retention can be greatly shortened to reduce liability and cost through set policy.

Let’s explore these points in more details.

What are the relevant regulations?

HIPAA mandates that Covered Entities and Business Associates have backup and recovery procedures for Patient Health Information (PHI) to avoid loss of data. Nothing regarding duration is specified (CFR 164.306CFR 164.308). State regulations govern how long PHI must be retained, usually ranging from six to 25 years, sometimes longer.

The retention regulations refer to the PHI records themselves, not the backups thereof. This is an important distinction and a source of confusion and debate. In the absence of deeper understanding, hospitals often opt for long term backup retention, which has significant cost implications without commensurate value.

How do we translate applicable regulations into policy?

There are actually two policies at play: PHI retention and Backup retention. PHI retention should be the responsibility of data governance and/or application data owners. Backup retention is IT policy that governs the recoverability of systems and data.

I have yet to encounter a hospital that actively purges PHI when permitted by regulations. There’s good reason not to: older records still have value as part of analytics datasets but only if they are present in live systems. If PHI is never purged, records in backups from one year ago will also be present in backups from last night. So, what value exists in the backups from one year ago, or even six months ago?

Keeping backups long term increases the capital requirements, complexity of data protection systems, and limits hospitals’ abilities to transition to new data protection architectures that offer a lower TCO, all without mitigating additional risk or adding additional value.

What is the right backup retention period for hospital systems?

Most agree that the right answer is 60-90 days. Thirty days may expose some risk from undesirable system changes that require going further back at the system (if not the data) level; examples given include changes that later caused a boot error. Beyond 90 days, it’s very difficult to identify scenarios where the data or systems would be valuable.

What about legacy applications?

Most hospitals have a list of legacy applications that contain older PHI that was not imported into the current primary EMR system or other replacement application. The applications exist purely for reference purposes, and they often have other challenges such as legacy operating systems and lack of support, which increases risk.

For PHI that only exists in legacy systems, we have only two choices: keep those aging apps in service or migrate those records to a more modern platform that replicates the interfaces and data structures. Hospitals that have pursued this path have been very successful reducing risk by decommissioning legacy applications, using solutions from HarmonyMediquantCITI, and Legacy Data Access.

What about email?

Hospitals have a great deal of freedom to define their email policies. Most agree that PHI should not be in email and actively prevent it by policy and process. Without PHI in email, each hospital can define whatever email retention policy they wish.

Most hospitals do not restrict how long emails can be retained, though many do restrict the ultimate size of user mailboxes. There is a trend, however, often led by legal to reduce the history of email. It is often phased in gradually: one year they will cut off the email history at ten years, then to eight or six and so on.

It takes a great deal of collaboration and unity among senior leaders to effect such changes, but the objectives align the interests of legal, finance, and IT. Legal reduces discoverable information; finance reduces cost and risk; and IT reduces the complexity and weight of infrastructure.

The shortest email history I have encountered is two years at a Detroit health system: once an item in a user mailbox reaches two years old, it is actively removed from the system by policy. They also only keep their backups for 30 days. They are the leanest healthcare data protection architecture I have yet encountered.

Closing thoughts

It is fascinating that hospitals serving the same customer needs bound by vastly similar regulatory requirements come to such different conclusions about backup retention. That should be a signal that there is real optimization potential both with PHI and email. You can also consider Foresee Medical and learn about this healthcare software.


This article was provided by our service partner : veeam.com

How to create a Failover Cluster in Windows Server 2019

This article gives a short overview of how to create a Microsoft Windows Failover Cluster (WFC) with Windows Server 2019 or 2016. The result will be a two-node cluster with one shared disk and a cluster compute resource (computer object in Active Directory).

Windows server 2019 failover cluster

Preparation

It does not matter whether you use physical or virtual machines, just make sure your technology is suitable for Windows clusters. Before you start, make sure you meet the following prerequisites:

Two Windows 2019 machines with the latest updates installed. The machines have at least two network interfaces: one for production traffic, one for cluster traffic. In my example, there are three network interfaces (one additional for iSCSI traffic). I prefer static IP addresses, but you can also use DHCP.

failover cluster 02

Join both servers to your Microsoft Active Directory domain and make sure that both servers see the shared storage device available in disk management. Don’t bring the disk online yet.

The next step before we can really start is to add the “Failover clustering” feature (Server Manager > add roles and features).

Reboot your server if required. As an alternative, you can also use the following PowerShell command:

Install-WindowsFeature -Name Failover-Clustering –IncludeManagementTools

After a successful installation, the Failover Cluster Manager appears in the start menu in the Windows Administrative Tools.

After you installed the Failover-Clustering feature, you can bring the shared disk online and format it on one of the servers. Don’t change anything on the second server. On the second server, the disk stays offline.

After a refresh of the disk management, you can see something similar to this:

Server 1 Disk Management (disk status online)


Server 2 Disk Management (disk status offline)

Failover Cluster readiness check

Before we create the cluster, we need to make sure that everything is set up properly. Start the Failover Cluster Manager from the start menu and scroll down to the management section and click Validate Configuration.

Select the two servers for validation.

Run all tests. There is also a description of which solutions Microsoft supports.

After you made sure that every applicable test passed with the status “successful,” you can create the cluster by using the checkbox Create the cluster now using the validated nodes, or you can do that later. If you have errors or warnings, you can use the detailed report by clicking on View Report.

Create the cluster

If you choose to create the cluster by clicking on Create Cluster in the Failover Cluster Manager, you will be prompted again to select the cluster nodes. If you use the Create the cluster now using the validated nodes checkbox from the cluster validation wizard, then you will skip that step. The next relevant step is to create the Access Point for Administering the Cluster. This will be the virtual object that clients will communicate with later. It is a computer object in Active Directory.

The wizard asks for the Cluster Name and IP address configuration.

As a last step, confirm everything and wait for the cluster to be created.

The wizard will add the shared disk automatically to the cluster per default. If you did not configure it yet, then it is also possible afterwards.

As a result, you can see a new Active Directory computer object named WFC2019.

You can ping the new computer to check whether it is online (if you allow ping on the Windows firewall).

As an alternative, you can create the cluster also with PowerShell. The following command will also add all eligible storage automatically:

New-Cluster -Name WFC2019 -Node SRV2019-WFC1, SRV2019-WFC2 -StaticAddress 172.21.237.32

You can see the result in the Failover Cluster Manager in the Nodes and Storage > Disks sections.

The picture shows that the disk is currently used as a quorum. As we want to use that disk for data, we need to configure the quorum manually. From the cluster context menu, choose More Actions > Configure Cluster Quorum Settings.

Here, we want to select the quorum witness manually.

Currently, the cluster is using the disk configured earlier as a disk witness. Alternative options are the file share witness or an Azure storage account as witness. We will use the file share witness in this example. There is a step-by-step how-to on the Microsoft website for the cloud witness. I always recommend configuring a quorum witness for proper operations. So, the last option is not really an option for production.

Just point to the path and finish the wizard.

After that, the shared disk is available for use for data.

Congratulations, you have set up a Microsoft failover cluster with one shared disk.

Next steps and backup

One of the next steps would be to add a role to the cluster, which is out of scope of this article. As soon as the cluster contains data, it is also time to think about backing up the cluster. Veeam Agent for Microsoft Windows can back up Windows failover clusters with shared disks. We also recommend doing backups of the “entire system” of the cluster. This also backs up the operating systems of the cluster members. This helps to speed up restore of a failed cluster node, as you don’t need to search for drivers, etc. in case of a restore.


This article was provided by our service partner : Veeam

veeam

Veeam : Set up vSphere RBAC for self-service backup portal

Wouldn’t it be great to empower VMware vSphere users to take control of their backups and restores with a self-service portal? The good news is you can as of Veeam Backup & Replication 9.5 Update 4. This feature is great because it eliminates operational overhead and allows users to get exactly what they want when they want it. It is a perfect augmentation for any development team taking advantage of VMware vSphere virtual machines.

Introducing vSphere role-based access control (RBAC) for self-service

vSphere RBAC allows backup administrators to provide granular access to vSphere users using the vSphere permissions already in place. If a user does not have permissions to virtual machines in vCenter, they will not be able to access them via the Self-Service Backup Portal.

Additionally, to make things even simpler for vSphere users, they can create backup jobs for their VMs based on pre-created job templates. They will not have to deal with advanced settings they are not familiar with (This is a really big deal by the way).vSphere users can then monitor and control the backup jobs they have created using the Enterprise Manager UI, and restore their backups as needed.

Setting up vSphere RBAC for self-service

Setting up vSphere RBAC for self-service could not be easier. In the Enterprise Manager configuration screen, a Veeam administrator simply has to navigate to “Configuration – Self-service.” Then, he should add the vSphere user’s account, specify a backup repository, set a quota, and select the delegation method. These permissions can also be applied at the group level for enhanced ease of administration too.

Besides VMware vCenter Roles, vSphere privileges or vSphere tags can be used as the delegation method. vSphere tags is one of my favorite methods to use since tags can be applied to either reach a very broad or very granular set of permissions. The ability to use vSphere tags is especially helpful for new VMware vSphere deployments, since it provides quick, easy, and secure access to virtual machine users for this case.

For example, I could set vSphere tags at a vSphere cluster level if I had a development cluster, or I could set vSphere tags on a subset of virtual machines using a tag such as “KryptonSOAR Development” to only provide access to development virtual machines.

After setting the Delegation Mode, the user account can be edited to select the vSphere tag, vCenter server role, or VM privilege. From the Edit screen, the repository and quota can also be changed at any time if required.

Using RBAC for VMware vSphere

After this very simple configuration, vSphere users simply need to log into the Self-Service Backup Portal to begin protecting and recovering their virtual machines. The URL can be shared across the entire organization: https://<EnterpriseManagerServer>:9443/backup, thus giving everyone a very convenient way of managing their workloads. Job creation and viewing in the Self-Service Backup Portal is extremely user friendly, even for those who have never backed up a virtual machine before! When creating a new backup job, users will only see the virtual machines they have access to, which makes the solution more secure and less confusing.

There is even a helpful dashboard, so users can monitor their backup jobs and the amount of backup storage they are consuming.

Enabling vSphere users to back up and restore virtual machines empowers them in new ways, especially when it comes to DevOps and rapid development cycles. Best of all, Veeam’s self-service implementation leverages the VMware vSphere permissions framework organizations already have in place, reducing operational complexity for everyone involved.

When it comes to VM recovery, there are also many self-service options available. Users can independently navigate to “VMs” tab to perform full VM restores. Again, the process is very easy as the user should decide whether to preserve the original VM if Veeam detects it or to overwrite its data, select the desired restore point, and specify whether it should be powered on after this procedure. Three simple actions and the data is on its way.

In addition to that, the portal makes file- and application-level recovery very convenient too. There are quite a few scenarios available and what’s really great about it is that users can navigate into the file system tree via the file explorer. They can utilize a search engine with advanced filters for both indexed and non-indexed guest OS file systems. Under the hood, Veeam is going to decide how exactly the operation should be handled but the user won’t even know about it. There is no chance the sought-for document can slip here. The cherry on top is that Veeam provides recovery of application-aware SQL and Oracle backups, thus making your DBAs happy without giving them too many rights for the virtual environments.


This article was provided by our service partner : Veeam

Veeam’s Office 365 backup

It is no secret anymore, you need a backup for Microsoft Office 365! While Microsoft is responsible for the infrastructure and its availability, you are responsible for the data as it is your data. And to fully protect it, you need a backup. It is the individual company’s responsibility to be in control of their data and meet the needs of compliance and legal requirements. In addition to having an extra copy of your data in case of accidental deletion, here are five more reasons WHY you need a backup.

Office 365 backup 1

With that quick overview out of the way, let’s dive straight into the new features.

Increased backup speeds from minutes to seconds

With the release of Veeam Backup for Microsoft Office 365 v2, Veeam added support for protecting SharePoint and OneDrive for Business data. Now with v3, we are improving the backup speed of SharePoint Online and OneDrive for Business incremental backups by integrating with the native Change API for Microsoft Office 365. By doing so, this speeds up backup times up to 30 times which is a huge game changer! The feedback we have seen so far is amazing and we are convinced you will see the difference as well.

Improved security with multi-factor authentication support

Multi-factor authentication is an extra layer of security with multiple verification methods for an Office 365 user account. As multi-factor authentication is the baseline security policy for Azure Active Directory and Office 365, Veeam Backup for Microsoft Office 365 v3 adds support for it. This capability allows Veeam Backup for Microsoft Office 365 v3 to connect to Office 365 securely by leveraging a custom application in Azure Active Directory along with MFA-enabled service account with its app password to create secure backups.

Office 365 backup 2

From a restore point of view, this will also allow you to perform secure restores to Office 365.

Office 365 backup 3

Veeam Backup for Microsoft Office 365 v3 will still support basic authentication, however, using multi-factor authentication is advised.

Enhanced visibility

By adding Office 365 data protection reports, Veeam Backup for Microsoft Office 365 will allow you to identify unprotected Office 365 user mailboxes as well as manage license and storage usage. Three reports are available via the GUI (as well as PowerShell and RESTful API).

License Overview report gives insight in your license usage. It shows detailed information on licenses used for each protected user within the organization. As a Service Provider, you will be able to identify the top five tenants by license usage and bring the license consumption under control.

Storage Consumption report shows how much storage is consumed by the repositories of the selected organization. It will give insight on the top-consuming repositories and assist you with daily change rate and growth of your Office 365 backup data per repository.

Office 365 backup 4

Mailbox Protection report shows information on all protected and unprotected mailboxes helping you maintain visibility of all your business-critical Office 365 mailboxes. As a Service Provider, you will especially benefit from the flexibility of generating this report either for all tenant organizations in the scope or a selected tenant organization only.

Office 365 backup 5

Simplified management for larger environments

Microsoft’s Extensible Storage Engine has a file size limit of 64 TB per year. The workaround for this, for larger environments, was to create multiple repositories. Starting with v3, this limitation and the manual workaround is eliminated! Veeam’s storage repositories are intelligent enough to know when you are about to hit a file size limit, and automatically scale out the repository, eliminating this file size limit issue. The extra databases will be easy to identify by their numerical order, should you need it:

Office 365 backup 6

Flexible retention options

Before v3, the only available retention policy was based on items age, meaning Veeam Backup for Microsoft Office 365 backed up and stored the Office 365 data (Exchange, OneDrive and SharePoint lists items) which was created or modified within the defined retention period.

Item-level retention works similar to how classic document archive works:

  • First run: We collect ALL items that are younger (attribute used is the change date) than the chosen retention (importantly, this could mean that not ALL items are taken).
  • Following runs: We collect ALL items that have been created or modified (again, attribute used is the change date) since the previous run.
  • Retention processing: Happens at the chosen time interval and removes all items where the change date became older than the chosen retention.

This retention type is particularly useful when you want to make sure you don’t store content for longer than the required retention time, which can be important for legal reasons.

Starting with Veeam Backup for Microsoft Office 365 v3, you can also leverage a “snapshot-based” retention type option. Within the repository settings, v3 offers two options to choose from: Item-level retention (existing retention approach) and Snapshot-based retention (new).

Snapshot-based retention works similar to image-level backups that many Veeam customers are so used to:

  • First run: We collect ALL items no matter what the change date is. Thus, the first backup is an exact copy (snapshot) of an Exchange mailbox / OneDrive account / SharePoint site state as it looks at that point in time.
  • Following runs: We collect ALL new items that have been created or modified (attribute used here is the change date) since the previous run. Which means that the backup represents again an exact copy (snapshot) of the mailbox/site/folder state as it looks at that point in time.
  • Retention processing: During clean-up, we will remove all items belonging to snapshots of mailbox/site/folder that are older than the retention period.

Retention is a global setting per repository. Also note that once you set your retention option, you will not be able to change it.

Other enhancements

As Microsoft released new major versions for both Exchange and SharePoint, we have added support for Exchange and SharePoint 2019. We have made a change to the interface and now support internet proxies. This was already possible in previous versions by leveraging a change to the XML configuration, however, starting from Veeam Backup for Microsoft Office 365 v3, it is now an option within the GUI. As an extra, you can even configure an internet proxy per any of your Veeam Backup for Microsoft Office 365 remote proxies.  All of these new options are also available via PowerShell and the RESTful API for all the automation lovers out there.

Office 365 backup 7

On the point of license capabilities, we have added two new options as well:

  • Revoking an unneeded license is now available via PowerShell
  • Service Providers can gather license and repository information per tenant via PowerShell and the RESTful API and create custom reports

To keep a clean view on the Veeam Backup for Microsoft Office 365 console, Service Providers can now give organizations a custom name.

Office 365 backup 8

Based upon feature requests, starting with Veeam Backup for Microsoft Office 365 v3, it is possible to exclude or include specific OneDrive for Business folders per job. This feature is available via PowerShell or RESTful API. Go to the What’s New page for a full list of all the new capabilities in Veeam Backup for Microsoft Office 365.


This article was supplied by our service partner : veeam.com

Windows Server 2019

Windows Server 2019 and what we need to do now: Migrate and Upgrade!

IT pros around the world were happy to hear that Windows Server 2019 is now generally available and since there have been some changes to the release. This is a huge milestone, and I would like to offer congratulations to the Microsoft team for launching the latest release of this amazing platform as a big highlight of Microsoft Ignite.

As important as this new operating system is now, there is an important subtle point that I think needs to be raised now (and don’t worry – Veeam can help). This is the fact that both SQL Server 2008 R2 and Windows Server 2008 R2 will soon have extended support ending. This can be a significant topic to tackle as many organizations have applications deployed on these systems.

What is the right thing to do today to prepare for leveraging Windows Server 2019? I’m convinced there is no single answer on the best way to address these systems; rather the right approach is to identify options that are suitable for each workload. This may also match some questions you may have. Should I move the workload to Azure? How do I safely upgrade my domain functional level? Should I use Azure SQL? Should I take physical Windows Server 2008 R2 systems and virtualize them or move to Azure? Should I migrate to the latest Hyper-V platform? What do I do if I don’t have the source code? These are all indeed natural questions to have now.

These are questions we need to ask today to move to Windows Server 2019, but how do we get there without any surprises? Let me re-introduce you to the Veeam DataLab. This technology was first launched by Veeam in 2010 and has evolved in every release and update since. Today, this technology is just what many organizations need to safely perform tests in an isolated environment to ensure that there are no surprises in production. The figure below shows a data lab:

windows 2008 eol

Let’s deconstruct this a bit first. An application group is an application you care about — and it can include multiple VMs. The proxy appliance isolates the DataLab from the production network yet reproduces the IP space in the private network without interference via a masquerade IP address. With this configuration, the DataLab allows Veeam users to test changes to systems without risk to production. This can include upgrading to Windows Server 2019, changing database versions, and more. Over the next weeks and month or so, I’ll be writing a more comprehensive document in whitepaper format that will take you through the process of setting up a DataLab and doing specific task-like upgrading to Windows Server 2019 or a newer version of SQL Server as well as migrating to Azure.

Another key technology where Veeam can help is the ability to restore Veeam backups to Microsoft Azure. This technology has been available for a long while and is now built into Veeam Backup & Replication. This is a great way to get workloads into Azure with ease starting from a Veeam backup. Additionally, you can easily test other changes to Windows and SQL Server with this process — put it into an Azure test environment to test the migration process, connectivity and more. If that’s a success, repeat the process as part of a planned migration to Azure. This cloud mobility technique is very powerful and is shown below for Azure:

Windows 2008 EOL

Why Azure?

This is because Microsoft announced that Extended Security Updates will be available for FREE in Azure for Windows server 2008 R2 for an additional three years after the end of the support deadline. Customers can rehost these workloads to Azure with no application code changes, giving them more time to plan for their future upgrades. Read more here.

What also is great about moving workloads to Azure is that this applies to almost anything that Veeam can back up. Windows Servers, Linux Agents, vSphere VMs, Hyper-V VMs and more!

Migrating to the latest platforms are a great way to stay in a supported configuration for critical applications in the data center. The difference is being able to do the migration without any surprises and with complete confidence. This is where Veeam’s DataLabs and Veeam Recovery to Microsoft Azure can work in conjunction to provide you a seamless experience in migrating to the latest SQL and Windows Server platforms.

Have you started testing Windows Server 2019? How many Windows Server 2008 R2 and SQL Server 2008 systems do you have? Let’s get DataLabbing!