Posts

vSan

How policy based backups will benefit you

With VMworld 2019 right around the corner, we wanted to share a recap on some of the powerful things that VMware has in their armoury and also discuss how Veeam can leverage this to enhance your Availability.

This week VMware announced vSAN 6.7 Update 3. This release seems to have a heavy focus on simplifying data center management while improving overall performance. A few things that stood out to me with this release included:

  • Cleaner, simpler UI for capacity management: 6.7 Update 3 has color-coding, consumption breakdown, and usable capacity analysis for better capacity planning allowing administrators to more easily understand the consumption breakdown.
  • Storage Policy changes now occur in batches. This ensures that all policy changes complete successfully, and free capacity is not exhausted.
  • iSCSI LUNs presented from vSAN can now be resized without the need to take the volume offline, preventing application disruption.
  • SCSI-3 persistent reservations (SCSI-3 PR) allow for native support for Windows Server Failover Clusters (WSFC) requiring a shared disk.

Veeam is listed in the vSAN HCL for vSAN Partner Solutions and can protect and restore VMs. The certification for the new Update 3 release is also well on its way to being complete.

Another interesting point to mention is the Windows Server Failover Clusters (WSFC). While these are seen as VMDKs, they are not applicable to the data protection APIs used for data protection tasks. This is where the Veeam Agent for Microsoft Windows comes in with the ability to protect those failover clusters in the best possible way.

What is SPBM?

Storage Policy Based Management (SPBM) is the vSphere administrator’s answer to control within their environments. This framework allows them to overcome upfront storage provisioning challenges, such as capacity planning, differentiated service levels and managing capacity resources in a much better and efficient way. All of this is achieved by defining a set of policies within vSphere for the storage layer. These storage policies optimise the provisioning process of VMs by provisioning specific datastores at scale, which in turn will remove the headaches between vSphere admins and storage admins.

However, this is not a closed group between the storage and virtualisation admins. It also allows Veeam to hook into certain areas to provide better Availability for your virtualised workloads.

SPBM spans all storage offerings from VMware, traditional VMFS/NFS datastore as well as vSAN and Virtual Volumes, allowing policies to overarch any type of environment leveraging whatever type of storage that is required or in place.

What can Veeam do?

Veeam can leverage these policies to better protect virtual workloads, by utilising vSphere tags on old and newly created virtual machines and having specific jobs setup in Veeam Backup & Replication with specific schedules and settings that are required to meet the SLA of those workloads.

Veeam will also back up any virtual machine that has an SPBM policy assigned to it, as well as protect the data. It will also protect the policy, so if you had to restore the whole virtual machine, the policy would be available as part of the restore process.

Automate IT

Gone are the days of the backup admin adding and removing virtual machines from a backup job, so let’s spend time on the interesting and exciting things that provide much more benefit to your IT systems investment.

With vSphere tags, you can create logical groupings within your VMware environment based on any characteristic that is required. Once this is done, you are able to migrate those tags into Veeam Backup & Replication and create backup jobs based on vSphere tags. You can also create your own set of vSphere tags to assign to your virtual machine workloads based on how often you need to back up or replicate your data, providing a granular approach to the Availability of your infrastructure.

VMware Snapshots – The vSAN way

In vSAN 6.0, VMware introduced vSAN Sparse Snapshots. The snapshot implementation for vSAN provides significantly better I/O performance. The good news for Veeam customers is if you are using the traditional VMFS or the newer vSAN sparse snapshots the display and output are the same — a backup containing your data. The benefits are incredible from a performance and methodology point of view when it comes to the sparse snapshot way and can play a huge role in achieving your backup windows.

The difference between the “traditional” and the new snapshot methodology that both vSAN as well as Virtual Volumes leverage is that a traditional VMFS snapshot is using Redo logs which, when working with high I/O workloads, could cause performance hits when committing those changes back to the VM disk. The vSAN way is much more similar to a shared storage system and a Copy On Write snapshot. This means that there is no commitment after a backup job has released a snapshot, meaning that I/O can continue to run as the business needs.

There are lots of other integrations between Veeam and VMware but I feel that this is still the number one touch point where a vSphere and Backup Admin can really make their life easier by using policy-based backups using Veeam.


This article was provided by our service partner : veeam.com

vcenter server

Decoding the vCenter Server Lifecycle: Update and Versioning Explained

Have you ever wondered what the difference is between a vCenter Server update and a patch? Or between an upgrade and a migration? Why don’t some vCenter Server versions align? Keep reading for the answers!

Version Numbering

The first thing you should understand is vCenter Server versioning. When reviewing your vCenter Server version’s you may see many different references to versions or builds.

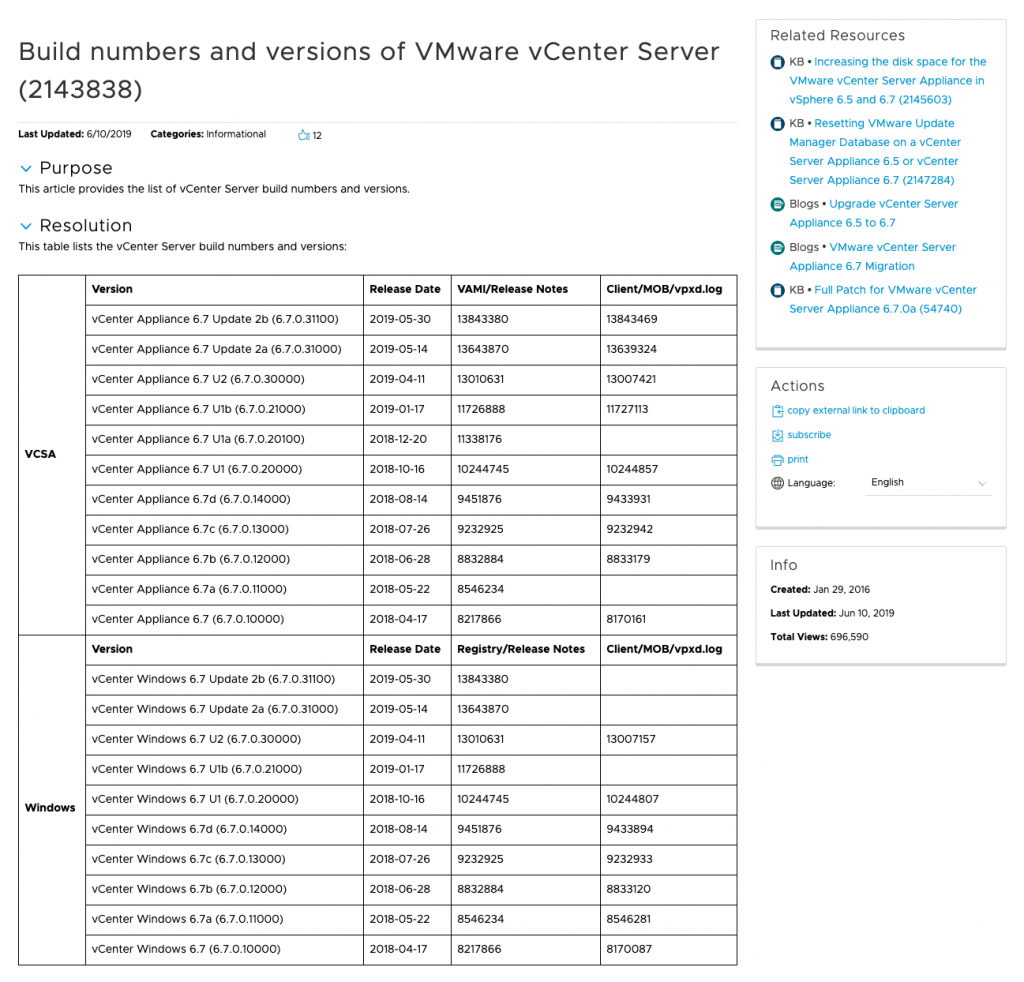
One of the first places you will notice a version identifier, is in our release notes. Here you will see the product version listed as vCenter Server 6.7 Update 2a and the build number listed as 13643870.


Once you have upgraded or deployed your vCenter Server you will see version identifiers such as 6.7.0.31000 listed in the VMware Appliance Management Interface (VAMI). You will also see a build number, such as 13643870.

If you review the version information within your vSphere Client you will see the version listed as 6.7.0 and the build as 13639324.

The reason you will see differing versions among these places are because the release notes show the vCenter Server build and full release name, in the VAMI it will show the vCenter Server Appliance version in addition to the build and in the vSphere Client it will show the vCenter Server version and the build of the vSphere Client.

KB2143838 is a great resource that will explain the breakdown of versioning and builds for all vCenter Server versions.

Now that we have  explained the way versioning works, let’s jump into the different scenarios where VMware will increment a version.

vCenter Server Updates and Patches

What is a vCenter Server Update and how does It differ from a patch?

A vCenter Server Update is one that applies to the vCenter Server application. An update can include new features, bug fixes or updates for additional functionality. vCenter Server updates will have a dedicated set of release notes and will be hosted on the my.vmware.com download portal.

A vCenter Server patch is more much streamlined as these are associated with operating system and security level updates. There are no application related changes, and these can target Photon OS, the Postgres DB, Java versions and any other supporting Linux libraries on the vCenter Server Appliance.

A vCenter Server patch also has no dedicated release notes as these are part of the rolled up VMware vCenter Server Appliance Photon OS Security Patches. Patches are also not stored on the my.vmware.com download portal but on the alternate VMware Patch Portal. It is also very important to note as listed in the release notes, these should not be used for any deployment or upgrade. The only reason the vCenter Server ISO’s are hosted on the VMware Patch Portal is to be used to restore your vCenter Server Appliance if using the built-in File-Based Backup. Patches can also only be applied within one and the same update release. So for example if you are currently on 6.7 Update 1 you would not be able to patch directly to 6.7 Update 2b , you would first update to 6.7 Update  2a and then patch to 6.7 Update 2b.

Now that we have explained the differences between a vCenter Server update and patch we can review the differences between an upgrade and migration.

vCenter Server Upgrades and Migrations

In its simplest form a vCenter Server Upgrade is defined as doing a major version change between vCenter Server Appliance versions. If you are running the vCenter Server Appliance 6.5  in your environment and move to vCenter Server Appliance 6.7 this would be considered an upgrade.

A vCenter Server migration is defined as doing a major version change between vCenter Server for Windows and the vCenter Server Appliance. If you are running vCenter Server for Windows 6.5 and move to the vCenter Server Appliance 6.7 this would be considered a migration. It is not supported to do a migration between the same major version as it consists of both a change of platform and an upgrade together.

In vSphere 6.5 and 6.7 an upgrade or migration of the vCenter Server is not completed in place. During the upgrade process a brand new appliance of the newer version is deployed, and based on the settings defined the data is exported from the old version and imported into the new one retaining the same FQDN, IP, Certs and UUIDs.

A back-in-time upgrade restriction is when you are unable to upgrade from one 6.5 release to another 6.7 release. For example, Upgrade from vSphere 6.5 Update 2d to vSphere 6.7 Update 1 is not supported due to the back-in-time nature of vSphere 6.7 Update 1. vSphere 6.5 Update 2d contains code and security fixes that are not in vSphere 6.7 Update 1 and might cause regression. When performing vCenter Server upgrades and migrations it’s also very important to pay attention to unsupported upgrade paths which are normally restricted due to being a back-in-time upgrade. It is also important to note that just because two releases might have the same release date, does not mean that they will be compatible. The best resource to review supported upgrade paths will be in the vCenter Server Release Notes section titled Upgrade Notes for this Release.

Resource Wrap-Up

 Conclusion

Versioning of a complex product can be difficult, but hopefully you now have a better understanding of what these numbers mean. If you have any questions feel free to post a comment below or check out any of the resources linked.


This article was provided by our service partner : Vmware

vmware vsphere

10 Things To Know About vSphere Certificate Management

With security and compliance on the minds of IT staff everywhere, vSphere certificate management is a huge topic. Decisions made can seriously affect the effort it takes to support a vSphere deployment, and often create vigorous discussions between CISO and information security staff, virtualization admins, and enterprise PKI/certificate authority admins. Here are ten things that organizations should consider when choosing a path forward.

1. Certificates are about encryption and trust

Certificates are based on public key cryptography, a technique developed by mathematicians in the 1970s, both in the USA and Britain. These techniques allow someone to create two mathematical “keys,” public and private. You can share the public key with another person, who can then use it to encrypt a message that can only be read by the person with the private key.

When we think about certificates we often think of the little padlock icon in our browser, next to the URL. Green and locked means safe, and red with an ‘X’ and a big “your connection is not private” warning means we’re not safe, right? Unfortunately, it’s a lot more complicated than that. A lot of things need to be true for that icon to turn green.

When we’re using HTTPS the communications between our web browser and a server are sent across a connection protected with Transport Layer Security (TLS). TLS is the successor to Secure Sockets Layer, or SSL, but we often refer to them interchangeably. TLS has four versions now:

  • Version 1.0 has vulnerabilities, is insecure, and shouldn’t be used anymore.
  • Version 1.1 doesn’t have the vulnerabilities as 1.0 but it uses MD5 and SHA-1 algorithms which are both insecure.
  • Version 1.2 adds AES cryptographic ciphers that are faster, removes some insecure ciphers, and switches to SHA-256. It is the current standard.
  • Version 1.3 removes weak ciphers and adds features that increase the speed of connections. It is the upcoming standard.

Using TLS means that your connection is encrypted, even if the certificates are self-signed and generate warnings. Signing a certificate means that someone vouches for that certificate, in much the same way as a trusted friend would introduce someone new to you. A self-signed certificate simply means that it’s vouching for itself, not unlike a random person on the street approaching you and telling you that they are trustworthy. Are they? Maybe, but maybe not. You don’t know without additional information.

To get the green lock icon you need to trust the certificate by trusting who signed it. This is where a Certificate Authority (CA) comes in. Certificate Authorities are usually specially selected and subject to rigorous security protocols, because they’re trusted implicitly by web browsers. Having a CA sign a certificate means you inherit the trust from the CA. The browser lock turns green and everything seems secure.

Having a third-party CA sign certificates can be expensive and time-consuming, especially if you need a lot of them (and nowadays you do). As a result, many enterprises create their own CAs, often using the Microsoft Active Directory Certificate Services, and teach their web browsers and computers to trust certificates signed by that CA by importing the “root CA certificates” into the operating systems.

2. vSphere uses certificates extensively

All communications inside vSphere are protected with TLS. These are mainly:

  • ESXi certificates, issued to the management interfaces on all the hosts.
  • “Machine” SSL certificates used to protect the human-facing components, like the web-based vSphere Client and the SSO login pages on the Platform Service Controllers (PSCs).
  • “Solution” user certificates used to protect the communications of other products, like vRealize Operations Manager, vSphere Replication, and so on.

The vSphere documentation has a full list. The important point here is that in a fully-deployed cluster the number of certificates can easily reach into the hundreds.

3. vSphere has a built-in certificate authority

Managing hundreds of certificates can be quite a daunting task, so VMware created the VMware Certificate Authority (VMCA). It is a supported and trusted component of vSphere that runs on a PSC or on the vCenter VCSA in embedded mode. Its job is to automate the management of certificates that are used inside a vSphere deployment. For example, when a new host is attached to vCenter it asks you to verify the thumbprint of the host ESXi certificate, and once you confirm it’s correct the VMCA will automatically replace the certificates with ones issued by the VMCA itself. A similar thing happens when additional software, like vRealize Operations Manager or VMware AppDefense is installed.

The VMCA is part of the vCenter infrastructure and is trusted in the same way vCenter is. It’s patched when you patch your PSCs and VCSAs. It is sometimes criticized as not being a full-fledged CA but it is just-enough-CA, purpose-built to serve a vSphere deployment securely, safely, and in an automated way to make it easy to be secure.

4. There are four main ways to manage certificates

  1. First, you can just use a self-signed CA certificate. The VMCA is fully-functional once vCenter is installed and automatically creates root certificates to use for signing ESXi, machine, and solution certificates. You can download the root certificates from the main vCenter web page and import them into your operating systems to establish trust and turn the browser lock icon green for both vCenter and ESXi. This is the easiest solution but it requires you to accept a self-signed CA root certificate. Remember, though, that we trust vCenter, so we trust the VMCA.
  2. Second, you can make the VMCA an intermediate, or subordinate, CA. We do not recommend this (see below).
  3. Third, you can disable the VMCA and use custom certificates for everything. To do this you can ask the certificate-manager tool to generate Certificate Signing Requests (CSRs) for everything. You take those to a third-party CA, have them signed, and then install them all manually. This is time-consuming and error-prone.
  4. Fourth, you can use “hybrid” mode to replace the machine certificates (the human-facing certificates for vCenter) with custom certificates, and let the VMCA manage everything else with its self-signed CA root certificates. All users of vCenter would then see valid, trusted certificates. If the virtualization infrastructure admin team desires they can import the CA root certificates to just their workstations and then they’ll have green lock icons for ESXi, too, as well as warnings if there is an untrusted certificate. This is the recommended solution for nearly all customers because it balances the desire for vCenter security with the realities of automation and management.

5. Enterprise CAs are self-signed, too

“But wait,” you might be thinking, “we are trying to get rid of self-signed certificates, and you’re advocating their use.” True, but think about it this way: enterprise CAs are self-signed, too, and you have decided to trust them. Now you simply have two CAs, and while that might seem like a problem it really means that a separation exists between the operators of the enterprise CA and the virtualization admin team, for security, organizational politics, staff workload management, and even troubleshooting. Because we trust vCenter, as the core of our virtualization management, we also implicitly trust the VMCA.

6. Don’t create an intermediate CA

You can create an intermediate CA, also known as a subordinate CA, by issuing the VMCA a root CA certificate capable of signing certificates on behalf of the enterprise CA and using the Certificate Manager to import it. While this has applications, it is generally regarded as unsafe because anybody with access to that CA root key pair can now issue certificates as the enterprise CA. We recommend maintaining the security & trust separation between the enterprise CA and the VMCA and not using the intermediate CA functionality.

7. You can change the information on the self-signed CA root certificate

Using the Certificate Manager utility you can generate new VMCA root CA certificates with your own organizational information in them, and the tool will automate the reissue and replacement of all the certificates. This is a popular option with the Hybrid mode, as it makes the self-signed certificates customized and easy to identify. You can also change the expiration dates if you dislike the defaults.

8. Test, test, test!

The only way to truly be comfortable with these types of changes is to test them first. The best way to test is with a nested vSphere environment, where you install a test VCSA as well as ESXi inside a VM. This is an incredible way to test vSphere, especially if you shut it down and take a snapshot of it. Then, no matter what you do, you can restore the test environment to a known good state. See the links at the end for more information on nested ESXi.

Another interesting option is using the VMware Hands-on Labs to experiment with this. Not only are the labs a great way to learn about VMware products year-round, they’re also great for trying unscripted things out in a low-risk way. Try the new vSphere 6.7 Lightning Lab!

9. Make backups

When the time comes to do this for real make sure you have a good file-based backup of your vCenter and PSCs using the VAMI interface. Additionally, the Certificate Manager utility backs up the old certificates, so you can restore them if needed (only one set, though, so think that through). This way you can restore them if things go wrong. If things do not go as planned or tested know that these operations are fully supported by VMware Global Support Services, who can walk you through resolving any problem you might encounter.

10. Know why you’re doing this

In the end the choice of how you manage vSphere certificates depends on what your goals are.

  • Do you want that green lock icon?
  • Does everybody need the green lock icon for ESXi, or just the virtualization admin team?
  • Do you want to get rid of self-signed certificates, or are you more interested in establishing trust?
  • Why do you trust vCenter as the core of your infrastructure but not a subcomponent of vCenter?
  • What is the difference in trust between the enterprise self-signed CA root and the VMCA self-signed CA root?
  • Is this about compliance, and does the compliance framework truly require custom CA certificates?
  • What is the cost, in staff time and opportunity cost, of ignoring the automated certificate solution in favor of manual replacements?
  • Does the solution decrease or increase risk, and why?

Whatever you decide know that thousands of organizations across the world have asked the same questions, and out of the discussions have come good understandings of certificates & trust as well as better relations between security and virtualization admin teams.


This article was provided by our service partner : Vmware

veeam

Veeam : Set up vSphere RBAC for self-service backup portal

Wouldn’t it be great to empower VMware vSphere users to take control of their backups and restores with a self-service portal? The good news is you can as of Veeam Backup & Replication 9.5 Update 4. This feature is great because it eliminates operational overhead and allows users to get exactly what they want when they want it. It is a perfect augmentation for any development team taking advantage of VMware vSphere virtual machines.

Introducing vSphere role-based access control (RBAC) for self-service

vSphere RBAC allows backup administrators to provide granular access to vSphere users using the vSphere permissions already in place. If a user does not have permissions to virtual machines in vCenter, they will not be able to access them via the Self-Service Backup Portal.

Additionally, to make things even simpler for vSphere users, they can create backup jobs for their VMs based on pre-created job templates. They will not have to deal with advanced settings they are not familiar with (This is a really big deal by the way).vSphere users can then monitor and control the backup jobs they have created using the Enterprise Manager UI, and restore their backups as needed.

Setting up vSphere RBAC for self-service

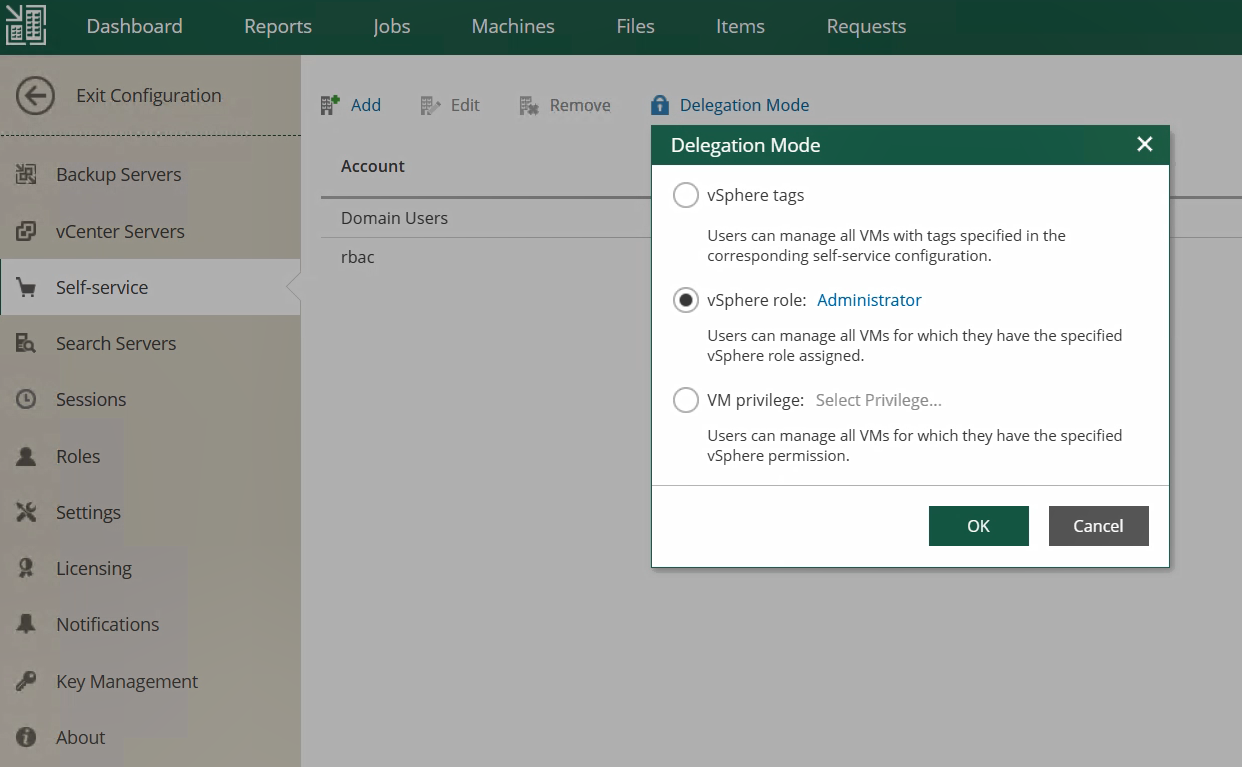
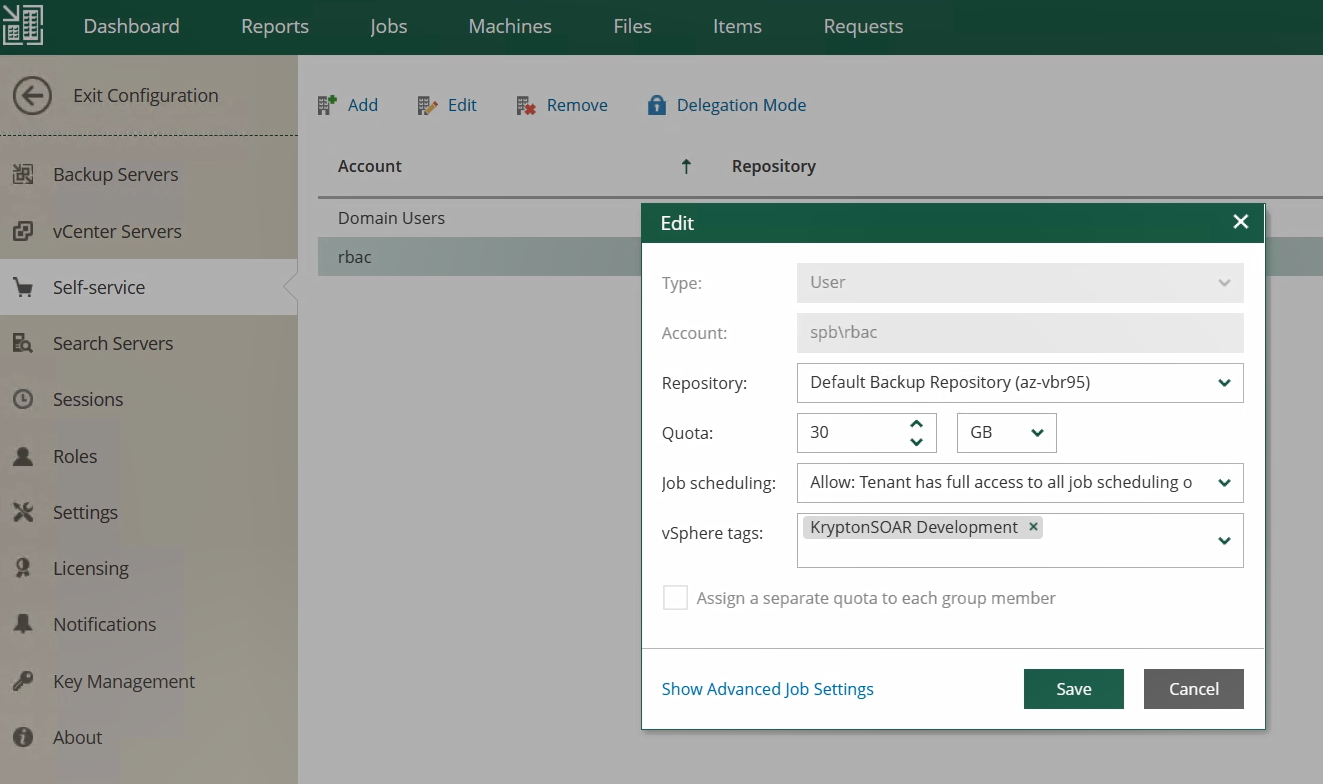
Setting up vSphere RBAC for self-service could not be easier. In the Enterprise Manager configuration screen, a Veeam administrator simply has to navigate to “Configuration – Self-service.” Then, he should add the vSphere user’s account, specify a backup repository, set a quota, and select the delegation method. These permissions can also be applied at the group level for enhanced ease of administration too.

Besides VMware vCenter Roles, vSphere privileges or vSphere tags can be used as the delegation method. vSphere tags is one of my favorite methods to use since tags can be applied to either reach a very broad or very granular set of permissions. The ability to use vSphere tags is especially helpful for new VMware vSphere deployments, since it provides quick, easy, and secure access to virtual machine users for this case.

For example, I could set vSphere tags at a vSphere cluster level if I had a development cluster, or I could set vSphere tags on a subset of virtual machines using a tag such as “KryptonSOAR Development” to only provide access to development virtual machines.

After setting the Delegation Mode, the user account can be edited to select the vSphere tag, vCenter server role, or VM privilege. From the Edit screen, the repository and quota can also be changed at any time if required.

Using RBAC for VMware vSphere

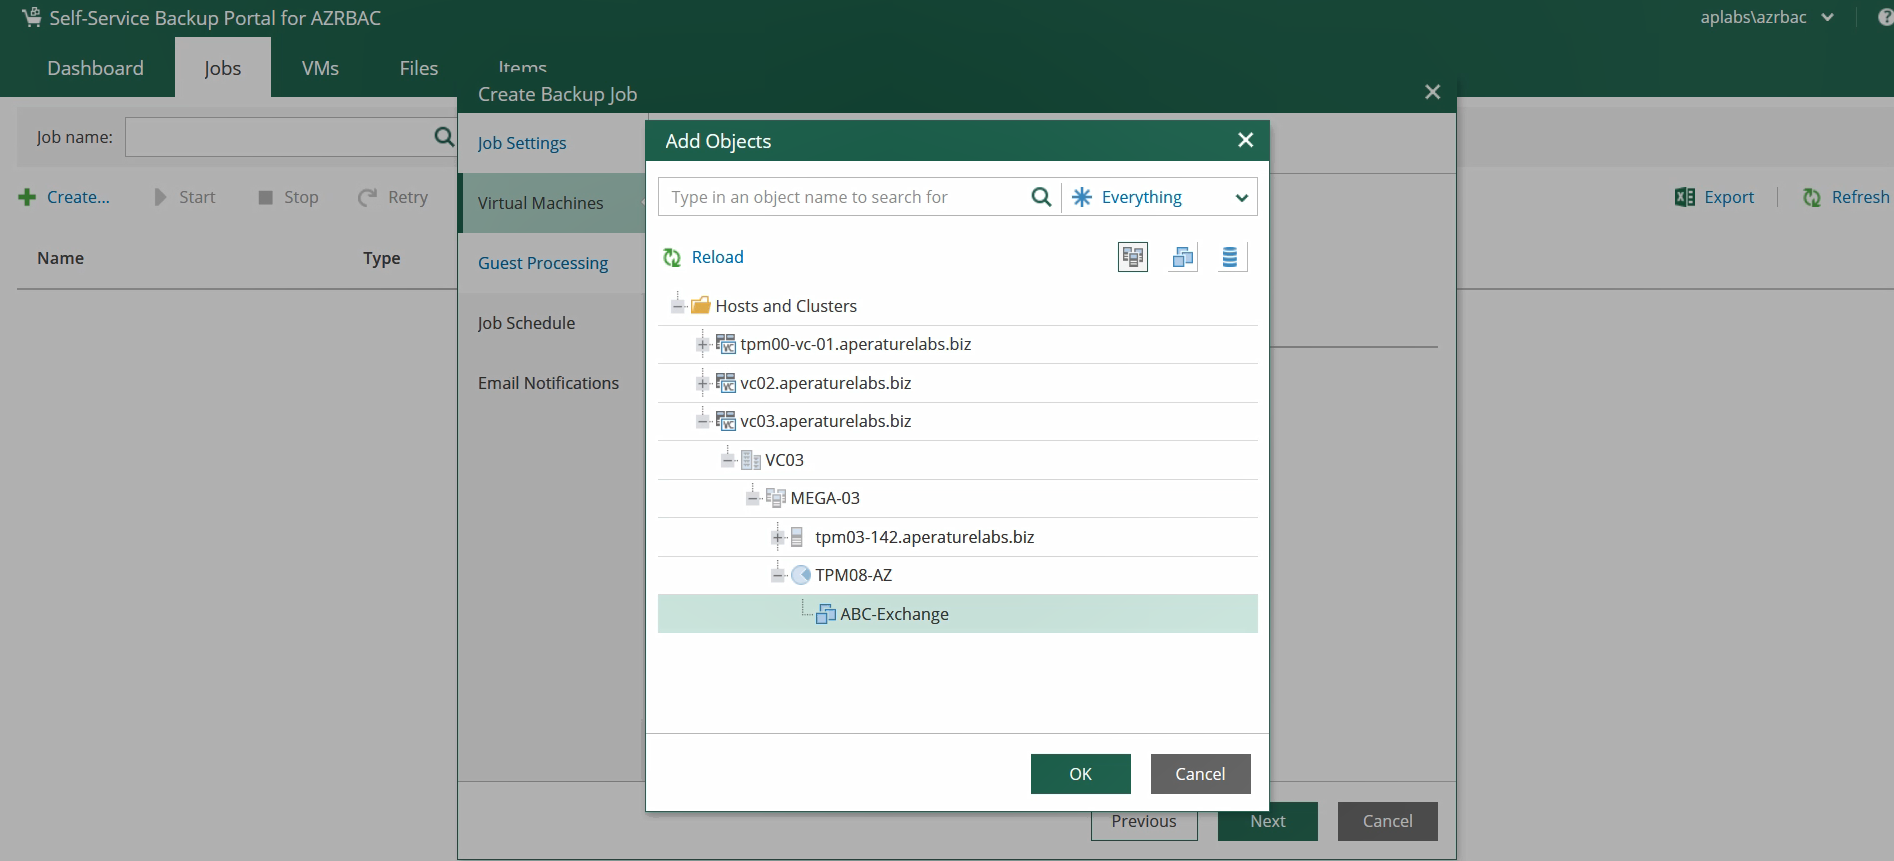
After this very simple configuration, vSphere users simply need to log into the Self-Service Backup Portal to begin protecting and recovering their virtual machines. The URL can be shared across the entire organization: https://<EnterpriseManagerServer>:9443/backup, thus giving everyone a very convenient way of managing their workloads. Job creation and viewing in the Self-Service Backup Portal is extremely user friendly, even for those who have never backed up a virtual machine before! When creating a new backup job, users will only see the virtual machines they have access to, which makes the solution more secure and less confusing.

There is even a helpful dashboard, so users can monitor their backup jobs and the amount of backup storage they are consuming.

Enabling vSphere users to back up and restore virtual machines empowers them in new ways, especially when it comes to DevOps and rapid development cycles. Best of all, Veeam’s self-service implementation leverages the VMware vSphere permissions framework organizations already have in place, reducing operational complexity for everyone involved.

When it comes to VM recovery, there are also many self-service options available. Users can independently navigate to “VMs” tab to perform full VM restores. Again, the process is very easy as the user should decide whether to preserve the original VM if Veeam detects it or to overwrite its data, select the desired restore point, and specify whether it should be powered on after this procedure. Three simple actions and the data is on its way.

In addition to that, the portal makes file- and application-level recovery very convenient too. There are quite a few scenarios available and what’s really great about it is that users can navigate into the file system tree via the file explorer. They can utilize a search engine with advanced filters for both indexed and non-indexed guest OS file systems. Under the hood, Veeam is going to decide how exactly the operation should be handled but the user won’t even know about it. There is no chance the sought-for document can slip here. The cherry on top is that Veeam provides recovery of application-aware SQL and Oracle backups, thus making your DBAs happy without giving them too many rights for the virtual environments.


This article was provided by our service partner : Veeam

vmware expert

VMware vCenter Server 6.7 Update 2

VMware just released a new vCenter Server version: 6.7 Update 2, 6.7.0.30000, build 13010631. In this article I will cover some of the new features and resolved issues. I will also demonstrate how easy is to update from a previous version of vCenter Server 6.7 to VMware vCenter Server 6.7 Update 2.

In case you are looking for a plain installation of vCenter Server 6.7, you can check my other article: How to Install VCSA 6.7 (VMware vCenter Server Appliance).

VMware vCenter Server 6.7 Update 2 New Features

vCenter Server 6.7 Update 2 introduces Virtual Hardware Version 15 which adds support for creating virtual machines with up to 256 virtual CPUs.

There are few changes in vCenter backups: you can use NFS v3 (Network File System) and SMB2 (Server Message Block) protocols for file-based backup and restore operations. Also it adds version details to the “Enter backup details” page that help you to pick the correct build to restore the backup file. You can create alarm definitions to monitor the backup status of your system (using email, SNMP traps or scripts as actions).

vCenter Server 6.7 Update 2 introduces the Developer Center with two new features: API Explorer and Code Capture. This update brings API Explorer (formerly accessible via https://<vCSA-FQDN>/apiexplorer) into the vSphere Client, thus removing the extra steps to authenticate prior to interacting with the REST APIs. If you ever played with the old Onyx flings, you will enjoy Code Capture. Just enable recording, do something in vSphere Client, then end recording and see the equivalent PowerCLI code generated.

VMware vCenter Server 6.7 Update 2 - Code Capture

You can now publish your VM templates managed by Content Library from a published library to multiple subscribers. You can trigger this action from the published library, which gives greater control over the distribution of VM templates.

vCenter Server 6.7 Update 2 Resolved Issues

VMware vCenter Server 6.7 Update 2 resolves plenty of issues with vMotion, backup, auto deploy, VMware tools, storage, management of VMs, and networking.

  • vSphere vMotion operations for encrypted virtual machines might fail after a restart of the vCenter Sever system
  • Power-on or vSphere vMotion operations with virtual machines might fail with an infinite loop error
  • Migrating a virtual machine might fail due to inability to access the parent disk
  • Migrating a virtual machine might fail due to inability to access the parent disk
  • VMware vSphere Auto Deploy Discovered Hosts tab might display an error after creating or editing a deployment rule
  • Customization of virtual machines by using Microsoft Sysprep on vSphere 6.7 might fail and virtual machines stay in customization state
  • The c:\sysprep directory might not be deleted after Windows guest customization
  • You might not see the configured CPU shares when exporting a virtual machine to OVF
  • vCenter Server might stop responding when adding a fault message in the vSphere Storage DRS
  • The vpxd service might fail when the vSphere Storage DRS provides an initial placement operation
  • ESXi hosts with visibility to RDM LUNs might take a long time to start or experience delays during LUN rescans
  • Expanding the disk of a virtual machine by using VMware vRealize Automation might fail with an error for insufficient disk space on a datastore
  • Provisioning of virtual machines might fail if the same replication group is used for some or all virtual machine files and disks
  • You cannot add permissions for a user or group beyond the first 200 security principals in an Active Directory domain by using the vSphere Client
  • User login and logout events might not contain the IP address of the user
  • The vCenter Server daemon service vpxd might fail to start with an error for invalid descriptor index
  • Cloning a virtual machine from a snapshot of a template might fail with a “missing vmsn file” error
  • An internal error might occur in alarm definitions of the vSphere Web Client
  • Attempts to log in to a vCenter Server system after an upgrade to vCenter Server 6.7 might fail with a credentials validation error
  • Migration of vCenter Server for Windows to vCenter Server Appliance might stop at 75% if system time is not synchronized with an NTP server
  • Upgrading vCenter Server for Windows to 6.7 Update 2 from earlier versions of the 6.7 line might fail
  • vCenter Server upgrades might fail due to compatibility issue between VMware Tools version 10.2 and later, and ESXi version 6.0 and earlier
  • You might see a message that an upgrade of VMware vSphere Distributed Switch is running even after the upgrade is complete
  • You cannnot migrate virtual machines by using vSphere vMotion between ESXi hosts with NSX managed virtual distributed switches (N-VDS) and vSphere Standard Switches

VMware vCenter Server 6.7 Update 2 also updates some of the internal packages used.

  • VMware Postgres is updated to version 9.6.11
  • Oracle (Sun) JRE is updated to version 1.8.202.
  • Apache httpd is updated to version 2.4.37
  • The OpenSSL package is updated to version openssl-1.0.2q.
  • The ESXi userworld libxml2 library is updated to version 2.9.8.
  • The OpenSSH is updated to version 7.4p1-7.

For full list of resolved issues you can check the Release Notes.

How to Update to vCenter Server 6.7 Update 2

I will demonstrate an online update from vCenter Appliance Management console. I logged in to https://<vCSA-FQDN>:5480/ using the root appliance password, then I navigated to Update menu. After a short check, I can see my current version is 6.7.0.20000 and I have an available update to 6.7.0.30000 (which is vCenter Server 6.7 Update 2). I will click on “Stage and install” link.

VMware vCenter Server 6.7 Update 2 - Check Update Availability

Next step is to accept the end user license agreement (EULA). Check the “I accept…” checkbox and click on “Next”.

VMware vCenter Server 6.7 Update 2 - End User License Agreement

The installer will run pre-update checks now. For example, if your root password has expired, you will receive a notice and you will not be able to proceed further before fixing the problem. If everything is allright, the wizard will jump to the next screen. You can see a downtime estimation (which proved to be waaay overestimated in my case). Confirm you have a backup of vCenter Server and click on “Finish”.

VMware vCenter Server 6.7 Update 2 - Backup Server

We can sit down and relax now while the vCenter Server is upgraded.

VMware vCenter Server 6.7 Update 2 - Installation in Progress
VMware vCenter Server 6.7 Update 2 - Stopping Services
VMware vCenter Server 6.7 Update 2 - Installing Packages

After some time we will be logged out from the appliance. Wait few minutes and then you can log back in.

VMware vCenter Server 6.7 Update 2 - Appliance Management Login

Installation is now completed!

VMware vCenter Server 6.7 Update 2 - Installation Completed

Going on the Summary page of the Appliance Management console, you can see the new version: 6.7.0.30000, build 13010631.

VMware vCenter Server 6.7 Update 2 - Status

This article was provided by our service partner : vmware.com

vsphere

Get your data ready for vSphere 5.5 End of Support

There have been lots of articles and walkthroughs on how to make that upgrade work for you, and how to get to a supported level of vSphere. This VMware article is very thorough walking through each step of the process.

But we wanted to touch on making sure your data is protected prior, during and after the upgrade events.

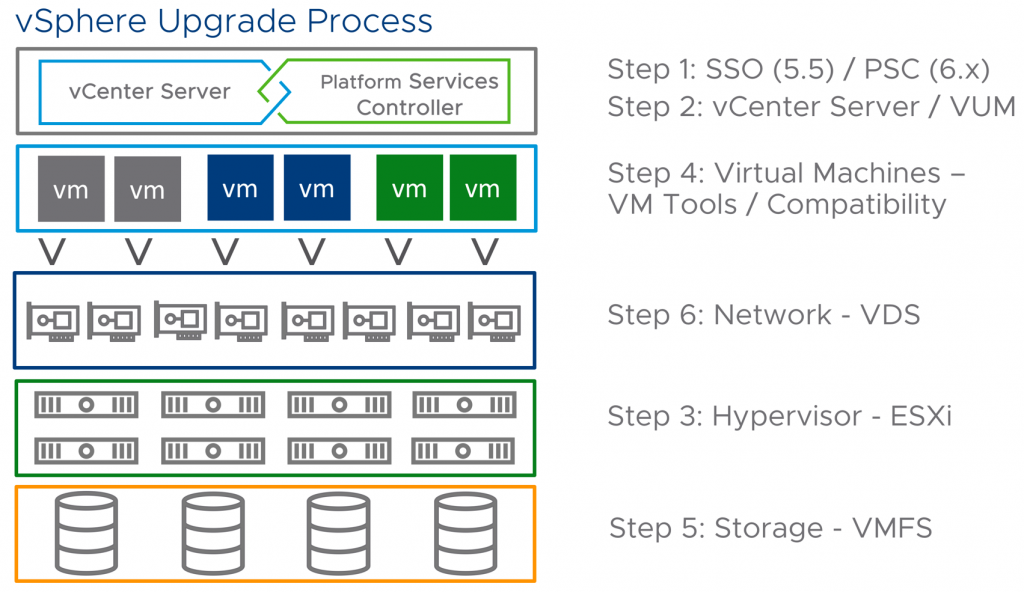
If we look at the best practice upgrade path for vSphere, we’ll see how we make sure we’re protected at each step along the way:

vSphere EOL

Upgrade Path

The first thing that needs to be considered is what path you’ll be taking to get away from the end of general support of vSphere 5.5. You have two options:

  • vSphere 6.5 which is now going to be supported till November 2021 (so another 5 years’ time)
  • vSphere 6.7 which is the latest released version from VMware.

Another consideration to make here is support for surrounding and ecosystem partners, including Veeam. Today, Veeam fully supports vSphere 6.5 and 6.7, however, vSphere 6.5 U2 is NOT officially supported with Veeam Backup & Replication Update 3a due to the vSphere API regression.

The issue is isolated to over-provisioned environments with heavily loaded hosts (so more or less individual cases).

It’s also worth noting that there is no direct upgrade path from 5.5 to 6.7. If you’re currently running vSphere 5.5, you must first upgrade to either vSphere 6.0 or vSphere 6.5 before upgrading to vSphere 6.7.

Management – VMware Virtual Center

The first step of the vSphere upgrade path after you’ve decided and found the appropriate version, is to make sure you have a backup of your vCenter server. The vSphere 5.5 virtual center could be a Windows machine or it could be using the VCSA.

Both variants can be protected with Veeam, however, the VCSA runs on a Postgres-embedded database. Be sure to take an image-level backup with Veeam and then there is a database backup option within the appliance. Details of the second step can be found in this knowledge base article.

If you’re an existing Veeam customer, you’ll already be protecting the virtual center as part of one of your existing backup jobs.

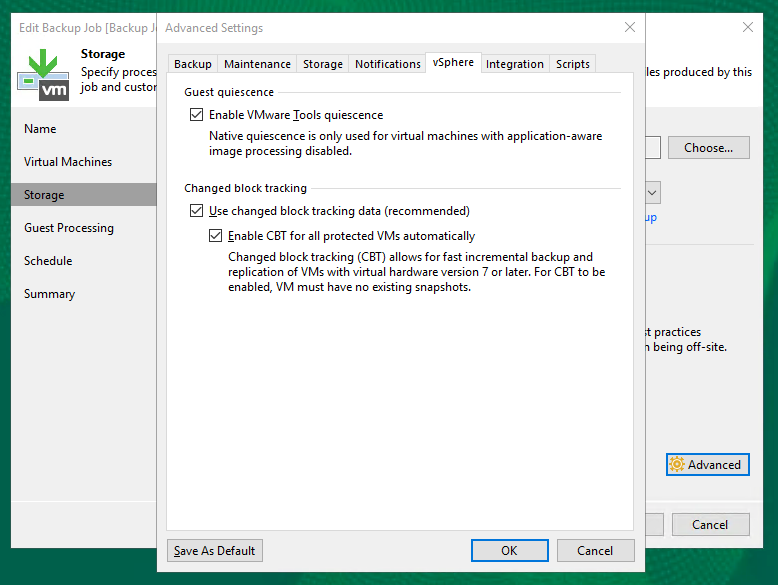
You must also enable VMware tools quiescence to create transactionally-consistent backups and replicas for VMs that do not support Microsoft VSS (for example, Linux VMs). In this case, Veeam Backup & Replication will use the VMware Tools to freeze the file system and application data on the VM before backup or replication. VMware Tools quiescence is enabled at the job level for all VMs added to the job. By default, this option is disabled.

vSphere EOL 02

You must also ensure Application-Aware Image Processing (AAIP) is either disabled or excluded for the VCSA VM.

vSphere EOL 03

Virtual Machine Workloads

If you are already a Veeam customer, then you’ll already have your backup jobs created and working with success before the upgrade process begins. However, as part of the upgrade process, you’ll want to make sure that all backup job processes that initiate through the virtual center are paused during the upgrade process.

If the upgrade path consists of new hardware but with no vMotion licensing, then the following section will help.

Quick Migration

Veeam Quick Migration enables you to promptly migrate one or more VMs between ESXi hosts and datastores. Quick Migration allows for the migration of VMs in any state with minimum disruption.

More information on Quick Migration can be found in our user guide.

During the upgrade process

As already mentioned in the virtual machine workloads section, it is recommended to stop all vCenter-based actions prior to update. This includes Veeam, but also any other application or service that communicates with your vCenter environment. It is also worth noting that whilst the vCenter is unavailable, vSphere Distributed Resource Scheduler (DRS) and vSphere HA will not work.

Veeam vSphere Web Client

If you’re moving to vSphere 6.7 and you have the Veeam vSphere Web Client installed as a vSphere plug-in, you’ll need to install the new vSphere Veeam web client plug-in from a post-upgraded Veeam Enterprise Manager.

vSphere EOL 04

More detail can be found in Anthony Spiteri’s blog post on new HTML5 plug-in functionality.

You’ll also need to ensure that any VMware-based products or other integrated products vCenter supports are the latest versions as you upgrade to a newer version of vSphere.

Final Considerations

From a Veeam Availability perspective, the above steps are the areas that we can help and make sure that you are constantly protected against failure during the process. Each environment is going to be different and other considerations will need to be made.

Another useful link that should be used as part of your planning: Update sequence for vSphere 5.5 and its compatible VMware products (2057795)

One last thing is a shout out to one of my colleagues who has done an in-depth look at the vSphere upgrade process.


This article was provided by our service partner : Veeam.com 

Good Bye, VMware vSphere Web Client

VMware has announced to deprecate the Flash-based vSphere Web Client with the next numbered release (not update release) of vSphere. The next version of vSphere will be the terminal release for which vSphere Web Client will be available.

Since vSphere web client is based on Adobe flash technology, It results in less than ideal performance as compared to HTML5 based vSphere client and also has constant update requirements. Additionally, Adobe also has recently announced plans to deprecate Flash.

vsphere web client

Currently we have two variants of the vSphere GUIs which includes the vSphere Web Client and HTML5-based vSphere Client in vSphere 6.5 to manage the operation of virtual datacenter.

With the decommissioning of windows based vSphere client, VMware also introduced the HTML5 based vSphere client with vSphere 6.5. Which provides the solid performance as compared to the vSphere web client. The vSphere Client was introduced first in the Fling, then supported with vSphere 6.5. Since its introduction, the vSphere Client has received positive responses from the vSphere community and customer base.

With the recently released vSphere 6.5 Update 1, the vSphere Client got even better and is now able to support most of the frequently performed operations. With each iteration of the vSphere Client additional improvements and functionality are being added.

By the time the vSphere Web Client is deprecated, the vSphere Client will be full featured but with significantly better responsiveness and usability.

The HTML based vSphere Client will be the primary GUI administration tool for vSphere environments starting in the next release. It is recommended that customers should start transitioning over to the HTML5 based vSphere Client as the vSphere Web Client will no longer be available after the next vSphere release. This announcement from VMware gives ample time to customers to prepare for the eventual vSphere Web Client deprecation.

VMware vCenter Converter

VMware vCenter Converter : Tips and Best Practices

Vmware vCenter converter can convert Windows and Linux based physical machine and Microsoft hyper-v systems into Vmware virtual machines.
Here are some tips and suggested best practices

Tasks to perform before conversion :

  • Make sure you know the local Administrator password! If the computer account gets locked out of the domain – you are likely going to need to login locally to recover
  • Ensure you are using the latest version of Vmware vCenter converter.
  • If possible, install Vmware vCenter Converter locally on the source (physical machine) operating system.
  • Make a note of the source machine IP addresses. The conversion will create a new NIC and having those IP details handy will help.
  • Disable any anti-virus
  • Disable SSL encryption – this should speed up the conversion ( described here )
  • If you have stopped and disabled any services – make sure to take a note of their state beforehand. A simple screenshot goes a long way here!
  • If converting from hyper-v -> vmware. Install the Converter on the host and power down the converter before starting the conversion.
  • Uninstall any hardware specific software utilies from the source server
  • If the source system has any redundant NICs – I would suggest removing them in the Edit screen on the converter ui.
  • For existing NICs – use the VMXNET3 driver and set it to not connected.

Special considerations for Domain Controllers, MS exchange and SQL servers.

Although – You tend to get warned off converting Domain controllers, they do work OK if you take some sensible precautions:

  • Move FSMO roles to Another Domain Controller
  • Make another Domain Controller PDC
  • Stop Active Directory services
  • Stop DHCP service ( if applicable )
  • Stop DNS service ( if applicable )

For SQL and Exchange, you should stop and disable all Exchange and SQL services on the source machine and only start them back up on the target VM once you are happy the server is successfully back on the domain.

( note these steps are not necessary for V2V conversations and you should have the system powered off!)

________________________________________________

Tasks to perform after conversion :

  • Once the conversion has successfully completed, get the source physical machine off the network. You can disable the NIC, pull the cable and/or power it down. It should not come up again.
  • For V2V conversion, delete the NIC from the systems hardware properties completely.
  • Once the physical machine is off the network, bring the virtual machine up (ensure network is not connected initially )
  • Install VMwares and set the ip config ( that you noted during the pre-conversion steps )
  • Shutdown and connect the network and bring your Virtual system back up
  • Uninstall VMware vCenter Converter from the newly converted Virtual macine

Special considerations for Domain Controllers, MS exchange and SQL servers.

  • Create test user on DC and ensure he gets replicated to the other ones.
  • Delete this test and ensure that gets replicated
  • Create test GPO policy and ensure it replicates across all domain controllers
  • Check system, application and importantly the File Replication Service logs to ensure that their is no issues with replication.


For SQL and Exchange : double check that their is no trust issues on the virtual machine. Try connecting to the ADMIN$ share from multiple locations. If you do find the computer account locked out. Taking the machine in and out of the domain normally fixes it.

Once happy the machine is on your domain without any trust issues – restart and reconfigure the SQL/Exchange services as per how they originally were.