Posts

certificates

Why you should get a handle on Certificates

Many companies (especially smaller ones) feel they do not have the work force or time to deal with properly implementing signed TLS certificates across their organization.  This can lead to potentially serious problem because of the user’s perception while browsing the company intranet sites. If something potentially is hacked and everyone is accustomed to clicking through certificate warnings, then company accounts and data can easily be compromised.

Organizations that deploy Microsoft Certificate Services or even their own Certificate Authority (CA) using the OpenSSL toolkit are in a much better position to handle attacks and organize their application infrastructure.

Think twice about clicking through Pop-ups. What is the cost of a breech? Get a recognized root CA deployed to your clients and install the associated server certificates on all of your user facing systems.

server RAM

Choose the best server RAM configuration

Watch your machine memory configurations – always be care to implement the best server RAM configuration! You can’t just throw RAM at a physical server and expect it to work the best it possibly can. Depending on your DIMM configuration, you might unwittingly slow down your memory speed, which will ultimately slow down your application servers. This speed decrease is virtually undetectable at the OS level – but – anything that leverages lots of RAM to function, including application servers such as a database server, can take a substantial performance hit on performance.

An example of this is if you wish to configure 384GB of RAM on a new server. The server has 24 memory slots. You could populate each of the memory slots with 16GB sticks of memory to get to the 384GB total. Or, you could spend a bit more money to buy 32GB sticks of memory and only fill up half of the memory slots. Your outcome is the same amount of RAM. Your price tag on the memory is slightly higher than the relatively cheaper smaller sticks.

In this configuration, your 16GB DIMM configuration runs the memory 22% slower than if you buy the higher density sticks. The fully populated 16GB stick configuration runs the memory at 1866 MHz. If you only fill in the 32GB sticks on half the slots, the memory runs at 2400 MHz.

Database servers, both physical and virtual, use memory as an I/O cache, improving the performance of the database engine by reducing the dependency on slower storage and leveraging the speed of RAM to boost performance. If you are wanting to know how to quickly setup your own web server, then click the link above you will be able to create your own server very easily. If the memory is slower, your databases will perform worse. Validate your memory speed on your servers, both now and for upcoming hardware purchases. Ensure that your memory configuration yields the fastest possible performance – implement the best server RAM configuration -your applications will be better for it!

Intel igb/e1000 driver showing dropped packets on the interface

Recently I ran into a strange issue where the Intel NIC was showing dropped packets on the interface. This particular server was having other issues (performance-ish type) so we were eager to get to the bottom of this.

Symptoms and interesting finds…

  1. ifconfig shows dropped packets only for RX
  2. The sum of rx_flow_control_xon+rx_flow_control_xoff from ethtool -S exatly matched #1 above. The count was reset at some point and we didn’t figure this out until later. Rebooting the server helped getting our minds clear and reset this.
  3. While tcpdump is running the dropped packet count would never increase.
  4. tcpdump wouldn’t show whatever was being dropped. I guess this is why they are dropped, no?

A solution, though not perfect was finally discovered. Disable BPDU/STP on the switch. The environment only had one switch so it wasn’t huge issue. On the Cisco the command was:

no spanning-tree vlan 1,100,168,216

Some interesting resources on this:

  1. Title : #477 igb driver, flow control packets being dropped?https://sourceforge.net/p/e1000/bugs/477/
  2. Title : Mystery RX packet drops on SLES11 SP2 every 30 sec
    https://forums.suse.com/showthread.php?1320-Mystery-RX-packet-drops-on-SLES11-SP2-every-30-sec


client onboarding

6 Steps to Client Onboarding Success

Client onboarding is the first time new clients get to see how you operate. It’s when first impressions are formed; impressions that could have a lasting impact. And if you don’t deliver on promises that were made during the sales process, what impression do you think they’ll be left with?

To make sure your client relationship starts off on the right foot (sorry lefties), you just need to follow a few simple steps.

1. Have a Plan

I’m always surprised to learn just how many people fail to use a project plan. I can’t stress this enough; a templated project plan is key to transforming your client onboarding process from mass chaos to a seamless, automated process. Outline every step that has to take place from the date the contract is signed to service go-live.

2. Use Time-Saving Automation

Using an IT automation platform, such as ConnectWise Automate (formerly LabTech), can cut hours off of the manual engineering tasks many of us still do today. Let’s look at some of the places you can shave a few hours from the client onboarding process.

3. Optimize and Secure Endpoints

Automate detects more than 40 different antivirus (AV) vendors, so let it handle the AV rip and replace process. As part of the security rollout, you’ll also want to deploy a second opinion scanner, such as HitmanPro, to automatically scan for and remediate any security issues your AV software might miss. Follow that up by deploying desktop optimization software, such as CCleaner, to get those systems running smoothly without a technician ever having to touch a single desktop.

4. Software Deployment

You’ll need to make sure common applications, such as Adobe and Java, are installed and updated. You can automate this task. Using some simple logic, the Automate script engine can easily search for missing or outdated software and then install or update accordingly. No more combing through reports or visiting each desktop to find out what’s there and what’s not.

5. Policy Deployment

Missing a critical error at any stage of the game can be detrimental; missing it during onboarding is simply unacceptable. Automate intuitively detects a machine’s role, determines which policies should be applied and automatically applies the right ones. Never again get that awkward phone call from your new client asking why their email isn’t working, and you didn’t know about it because someone forgot to apply a monitor template.

6. Educate Your Sales Team

After your project plan is in place and your automated processes are built, it’s time to educate your sales team. Let them see how the onboarding process works and how long it really takes, so they can set realistic expectations from the start.

Best Practices

8 Essential Steps to Implement IT Best Practices

In the past, we’ve defined best practices and looked at how they benefit your business. Now let’s talk about how to implement best practices so you’ll start seeing results.

Implementing best practices is just like any other project you take on. Success comes from accounting for every detail. Make sure you have these 8 things covered when implementing best practices in your IT business:

  1. Do Your Homework: What companies come to mind when you think of great employees or stellar customer service? Think about companies both inside and outside your industry that you admire and find out how they do what they do: hire employees, provide customer service, or anything else that catches your attention.
  2. Share Your Information: Make sure your employees understand the best practice you’re implementing―what it is, why it matters, and how they will benefit.
  3. Define Your Metrics: Know what you’re measuring so you can monitor and report on progress. Want to cut response time by two minutes? That’s your metric.
  4. Manage Change: Most people resist change. Make sure you have a plan in place to mitigate people’s fears. This applies to all stakeholders, including customers.
  5. Modify for Your Business: Your business is unique. Don’t be afraid to take the best of what you find and make adjustments to fit your specific needs.
  6. Involve Everyone: Your employees will be most affected by best practice implementation, so make sure they’re on board. Ask for input and be open about feedback.
  7. Align Business and Customer Needs: Even if you call on outside consultants or other experts to help you select and implement best practices, you know your business best. Don’t implement any best practice unless it aligns with your business objectives and customer needs.
  8. Evaluate and Refine: Your work isn’t done once you implement a new best practice. You have to continually evaluate progress even after implementation is over. As your business changes, refine your best practices to make sure your business and customer needs remain aligned.

Growing your business with best practices means happier customers, more productive employees and a better bottom line. Use these 8 tips to streamline best practice implementation, so you’ll see results fast.

Top 5 Best Practices for your Help Desk

A Help Desk is designed to be the first point of contact for customers when they have requests or problems with their technology services. And you, as the technology service provider are responsible for addressing those issues as quickly and efficiently as possible. It is essential, then, to ensure a strategic method of managing this single point of contact for requests and issues. This will include tracking inbound and outbound ticket processes, escalation procedures, and ticket resolution.

Good luck finding clients that are ok with issues slipping through the cracks and hanging out there for extended periods of time. People just won’t stand for it, so to ensure this doesn’t happen, check out our Top 5 Best Practices for your Help Desk.

Everything is a Ticket – All incidents and requests must be a ticket to properly capture all work performed, regardless of length, nature, or severity of the request.

Keep Customers in the Loop – Leverage Closed Loop to communicate with the customers. You should be updating them on progress and the status of their service requests.

All Roads Lead to Rome – Rome being your service boards, everything ends up as a service ticket on your service boards regardless of the source. The service board is what then controls your next step through workflows.

My Life is My Service Board – Help Desk employees work service tickets on their assigned service boards in order of assignment and the service level agreement’s priority, urgency, and impact.

All Time, All of the Time, On Time – All employees must enter all time worked, on everything they work (all of the time), as it happens (on time).

Microsoft enhances troubleshooting support for Office365

There’s a new tool from Microsoft for Office365 that scans files for headache-inducing problems in OneDrive for Business

It appears that last week Microsoft added a new and largely unheralded capability to the Office 365 checker tool.

A change to Microsoft’s main troubleshooting article for OneDrive for Business, KB 3125202, added a reference to an option in the Microsoft Support and Recovery Assistant for Office 365 tool that can be used to scan for files that are too big, file and folder names that have invalid characters, for path names that exceed the length limit, and several other headache-inducing problems. This appears to be a new capability for the Office 365 checker tool.

Here’s what the new information says:

Microsoft Support and Recovery Assistant for Office 365

The Microsoft Support and Recovery Assistant for Office 365 is a tool that can diagnose and fix many common Office 365 problems. The OneDrive for Business option “I’m having a problem with OneDrive for Business” now scans for the following issues:

  • Checks the option to manually or automatically update the NGSC+B to its latest version.
  • Reports all files that have sizes exceeding the limit.
  • Reports all files that have invalid characters in the names.
  • Reports all folders that have invalid characters or strings in the names.
  • Reports all paths exceeding the limit and provides a link to this KB article.

The tool is available from http://diagnostics.outlook.com. When you run this tool, the initial page will display several options, including the new option for OneDrive for Business: “I’m having a problem with OneDrive for Business.”

This looks like an excellent tool for anyone troubleshooting OneDrive for Business problems.


This is a repost from InfoWorld

The power user’s guide to PowerShell

PowerShell is a powerful tool to master. Here’s our step-by-step guide to getting familiar with Windows’ über language.

If you’ve wrestled with Windows 10, you’ve undoubtedly heard of PowerShell. If you’ve tried to do something fancy with Win7/8.1 recently, PowerShell’s probably come up, too. After years of relying on the Windows command line and tossed-together batch files, it’s time to set your sights on something more powerful, more adaptive — better.
PowerShell is an enormous addition to the Windows toolbox, and it can provoke a bit of fear given that enormity. Is it a scripting language, a command shell, a floor wax? Do you have to link a cmdlet with an instantiated .Net class to run with providers? And why do all the support docs talk about administrators — do I have to be a professional Windows admin to make use of it?

Relax. PowerShell is powerful, but it needn’t be intimidating.
The following guide is aimed at those who have run a Windows command or two or jimmied a batch file. Consider it a step-by-step transformation from PowerShell curious to PowerShell capable.

Step 1: Crank it up

The first thing you’ll need is PowerShell itself. If you’re using Windows 10, you already have PowerShell 5 — the latest version — installed. (Win10 Anniversary Update has 5.1, but you won’t know the difference with the Fall Update’s 5.0.) Windows 8 and 8.1 ship with PowerShell 4, which is good enough for getting your feet wet. Installing PowerShell on Windows 7 isn’t difficult, but it takes extra care — and you need to install .Net Framework separately. JuanPablo Jofre details how to install WMF 5.0 (Windows Management Framework), which includes PowerShell, in addition to tools you won’t likely use when starting out, on MSDN.

PowerShell offers two interfaces. Advanced users will go for the full-blown GUI, known as the Integrated Scripting Environment (ISE). Beginners, though, are best served by the PowerShell Console, a simple text interface reminiscent of the Windows command line, or even DOS 3.2.

To start PowerShell as an Administrator from Windows 10, click Start and scroll down the list of apps to Windows PowerShell. Click on that line, right-click Windows PowerShell, and choose Run as Administrator. In Windows 8.1, look for Windows PowerShell in the Windows System folder. In Win7, it’s in the Accessories folder. You can run PowerShell as a “normal” user by following the same sequence but with a left click.

In any version of Windows, you can use Windows search to look for PowerShell. In Windows 8.1 and Windows 10, you can put it on your Ctrl-X “Power menu” (right-click a blank spot on the taskbar and choose Properties; on the Navigation tab, check the box to Replace Command Prompt). Once you have it open, it’s a good idea to pin PowerShell to your taskbar. Yes, you’re going to like it that much.

Step 2: Type old-fashioned Windows commands

You’d be amazed how much Windows command-line syntax works as expected in PowerShell.
For example, cd changes directories (aka folders), and dir still lists all the files and folders included in the current folder.
Depending on how you start the PowerShell console, you may start at c:\Windows\system32 or at c:\Users\<username>. In the screenshot example, I use cd .. (note the space) to move up one level at a time, then run dir to list all files and subfolders in the C:\ directory.

Step 3: Install the help files

Commands like cd and dir aren’t native PowerShell commands. They’re aliases — substitutes for real PowerShell commands. Aliases can be handy for those of us with finger memory that’s hard to overcome. But they don’t even begin to touch the most important parts of PowerShell.

To start getting a feel for PowerShell itself, type help followed by a command you know. For example, in the screenshot, I type help dir.

PowerShell help tells me that dir is an alias for the PowerShell command Get-ChildItem. Sure enough, if you type get-childitem at the PS C:\> prompt, you see exactly what you saw with the dir command.

As noted at the bottom of the screenshot, help files for PowerShell aren’t installed automatically. To retrieve them (you do want to get them), log on to PowerShell in Administrator mode, then type update-help. Installing the help files will take several minutes, and you may be missing a few modules — Help for NetWNV and SecureBoot failed to install on my test machine. But when you’re done, the full help system will be at your beck and call.

From that point on, type get-help followed by the command (“cmdlet” in PowerShell speak, pronounced “command-let”) that concerns you and see all of the help for that item. For example, get-help get-childitem produces a summary of the get-childitem options. It also prompts you to type in variations on the theme. Thus, the following:

get-help get-childitem -examples

produces seven detailed examples of how to use get-childitem. The PowerShell command

get-help get-childitem -detailed

includes those seven examples, as well as a detailed explanation of every parameter available for the get-childitem cmdlet.

Step 4: Get help on the parameters

In the help dir screenshot, you might have noticed there are two listings under SYNTAX for get-childitem. The fact that there are two separate syntaxes for the cmdlet means there are two ways of running the cmdlet. How do you keep the syntaxes separate — and what do the parameters mean? The answer’s easy, if you know the trick.
To get all the details about parameters for the get-childitem cmdlet, or any other cmdlet, use the -full parameter, like this:

get-help get-childitem -full

That produces a line-by-line listing of what you can do with the cmdlet and what may (or may not!) happen. See the screenshot.

Sifting through the parameter details, it’s reasonably easy to see that get-childitem can be used to retrieve “child” items (such as the names of subfolders or filenames) in a location that you specify, with or without specific character matches. For example:

get-childItem “*.txt” -recurse

retrieves a list of all of the “*.txt” files in the current folder and all subfolders (due to the -recurse parameter). Whereas the following:

get-childitem “HKLM:\Software”

returns a list of all of the high-level registry keys in HKEY_LOCAL_MACHINE\Software.
If you’ve ever tried to get inside the registry using a Windows command line or a batch file, I’m sure you can see how powerful this kind of access must be.

Step 5: Nail down the names
There’s a reason why the cmdlets we’ve seen so far look the same: get-childitem, update-help, and get-help all follow the same verb-noun convention. Mercifully, all of PowerShell’s cmdlets use this convention, with a verb preceding a (singular) noun. Those of you who spent weeks struggling over inconsistently named VB and VBA commands can breathe a sigh of relief.
To see where we’re going, take a look at some of the most common cmdlets (thanks to Ed Wilson’s Hey, Scripting Guy! blog). Start with the cmdlets that reach into your system and pull out useful information, like the following:

set-location: Sets the current working location to a specified location
get-content: Gets the contents of a file
get-item: Gets files and folders
copy-item: Copies an item from one location to another
remove-item: Deletes files and folders
get-process: Gets the processes that are running on a local or remote computer
get-service: Gets the services running on a local or remote computer
invoke-webrequest: Gets content from a web page on the internet

To see how a particular cmdlet works, use get-help, as in
get-help copy-item -full

Based on its help description, you can readily figure out what the cmdlet wants. For example, if you want to copy all your files and folders from Documents to c:\temp, you would use:
copy-item c:\users\[username] \documents\* c:\temp

As you type in that command, you’ll see a few nice touches built into the PowerShell environment. For example, if you type copy-i and press the Tab key, PowerShell fills in Copy-Item and a space.

If you mistype a cmdlet and PowerShell can’t figure it out, you get a very thorough description of what went wrong.
Try this cmdlet. (It may try to get you to install a program to read the “about” box. If so, ignore it.)
invoke-webrequest netcal.com

You get a succinct list of the web page’s content declarations, headers, images, links, and more. See how that works? Notice in the get-help listing for invoke-webrequest that the invoke-webrequest cmdlet “returns collections of forms, links, images, and other significant HTML elements” — exactly what you should see on your screen.
Some cmdlets help you control or grok PowerShell itself:
get-command: Lists all available cmdlets (it’s a long list!)
get-verb: Lists all available verbs (the left halves of cmdlets)
clear-host: Clears the display in the host program

Various parameters (remember, get-help) let you whittle down the commands and narrow in on options that may be of use to you. For example, to see a list of all the cmdlets that work with Windows services, try this:
get-command *-service
It lists all the verbs that are available with service as the noun. Here’s the result:

Get-Service
New-Service
Restart-Service
Resume-Service
Set-Service
Start-Service
Stop-Service
Suspend-Service
You can combine these cmdlets with other cmdlets to dig down into almost any part of PowerShell. That’s where pipes come into the picture.

Step 6: Bring in the pipes

If you’ve ever used the Windows command line or slogged through a batch file, you know about redirection and pipes. In simple terms, both redirection (the > character) and pipes (the | character) take the output from an action and stick it someplace else. You can, for example, redirect the output of a dir command to a text file, or “pipe” the result of a ping command into a find, to filter out interesting results, like so:

dir > temp.txt
ping askwoody.com | find “packets” > temp2.txt

In the second command above, the find command looks for the string packets in the piped output of an askwoody.com ping and sticks all the lines that match in a file called temp2.txt.
Perhaps surprisingly, the first of those commands works fine in PowerShell. To run the second command, you want something like this:

ping askwoody.com | select-string packets | out-file temp2.txt

Using redirection and pipes greatly expands the Windows command line’s capabilities: Instead of scrolling endlessly down a screen looking for a text string, for example, you can put together a piped Windows command that does the vetting for you.

PowerShell has a piping capability, but it isn’t restricted to text. Instead, PowerShell lets you pass an entire object from one cmdlet to the next, where an “object” is a combination of data (called properties) and the actions (methods) that can be used on the data.

The hard part, however, lies in aligning the objects. The kind of object delivered by one cmdlet has to match up with the kinds of objects accepted by the receiving cmdlet. Text is a very simple kind of object, so if you’re working with text, lining up items is easy. Other objects aren’t so rudimentary.

How to figure it out? Welcome to the get-member cmdlet. If you want to know what type of object a cmdlet produces, pipe it through get-member. For example, if you’re trying to figure out the processes running on your computer, and you’ve narrowed down the options to the get-process cmdlet, here’s how you find out what the get-process cmdlet produces:
get-process | get-member

Running that command produces a long list of properties and methods for get-process, but at the very beginning of the list you can see the type of object that get-process creates:

TypeName: System.Diagnostics.Process

The below screenshot also tells you that get-process has properties called Handles, Name, NPM, PM, SI, VM, and WS.
If you want to manipulate the output of get-process so that you can work with it (as opposed to having it display a long list of active processes on the monitor), you need to find another cmdlet that will work with System.Diagnostics.Process as input. To find a willing cmdlet, you simply use … wait for it … PowerShell:
get-command -Parametertype System.Diagnostics.Process

That produces a list of all of the cmdlets that can handle System.Diagnostics.Process.
Some cmdlets are notorious for taking nearly any kind of input. Chief among them: where-object. Perhaps confusingly, where-object loops through each item sent down the pipeline, one by one, and applies whatever selection criteria you request. There’s a special marker called $_. that lets you step through each item in the pipe, one at a time.
Say you wanted to come up with a list of all of the processes running on your machine that are called “svchost” — in PowerShell speak, you want to match on a Name property of svchost. Try this PowerShell command:

get-process | where-object {$_.Name -eq “svchost”}

The where-object cmdlet looks at each System.Diagnostics.Process item, compares the .Name of that item to “svchost”; if the item matches, it gets spit out the end of the pipe and typed on your monitor.


Windows Server 2016

The next version of windows server is here and its packed with a lineup of great new features. From software-defined storage, network improvements and Docker-driven containers.

True to type with the new version of Windows Server 2016, we are presented with a multitude of new features. Added networking and storage capabilities build on the software defined infrastructure which began its initiation in Windows Server 2012. Microsoft’s focus on the cloud is apparent with capabilities such as containers and Nano Server. Security is still priority with the shielded VMs features.

 Docker- Driven Containers

 Microsoft has worked together with Docker to bring full support for the Docker ecosystem to Windows Server 2016. Docker containers wrap a piece of software in a complete filesystem that contains everything needed to run: code, runtime, system tools, system libraries – anything that can be installed on a server. This guarantees that the software will always run the same, regardless of its environment. Containers represent a huge step for Microsoft as it embraces the open source world. You install support for Containers using the standard method to enable Windows features through Control Panel or via the PowerShell command:

Install-WindowsFeature containers

You must also download and install the Docker engine to get all of the Docker utilities. This line of PowerShell will download a Zip file with everything you need to install Docker on Windows Server 2016:

Invoke-WebRequest “https://get.docker.com/builds/Windows/x86_64/docker-1.12.1.zip” -OutFile “$env:TEMP\docker-1.12.1.zip” -UseBasicParsing

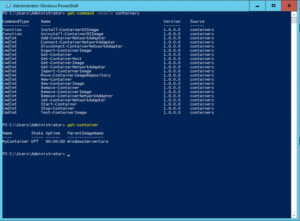
Full documentation for getting started with containers can be found on the Microsoft MSDN website. New PowerShell cmdlets provide an alternative to Docker commands to manage your containers (see Figure 1).

pwrshell

Figure 1: You can manage both Windows Server Containers and Hyper-V Containers through native Docker commands or through PowerShell (shown).

It’s important to note that Microsoft supports two different container models: Windows Server Containers and Hyper-V Containers. Windows Server Containers are based on the typical Docker concepts, running each container as an application on top of the host OS. On an opposite note, Hyper-V Containers are completely isolated virtual machines, incorporating their own copy of the Windows kernel, but more lightweight than traditional VMs.

Windows containers are built against a specific operating system and are crosscomplied with Linux to provide the same experience and common Docker engine. For you, this means that Windows containers supports the Docker experience including the Docker command structure, Docker repositories, Docker datacenter and Orchestration. In addition, Windows containers extends the Docker Community to provide Windows innovations such as PowerShell to manage Windows or Linux containers.

Nano Server

Nano Server is another key component of Microsoft’s strategy to be highly competitive in the private cloud market. Nano Server is stripped-down version of Windows Server 2016. It’s so stripped down, in fact, that it doesn’t have any direct user interface besides the new Emergency Management console. You will manage your Nano instances remotely using either Windows PowerShell or the new Remote Server Administration Tools. The first benefit is Infrastructure host, that can runs Hyper-V, File Server, Failover Clustering and it will be a great container host as well.

Figure 2: Nano Server not only boots faster, it consumes less memory and less disk than any other version of Windows Server.

Figure 2: Nano Server not only boots faster, it consumes less memory and less disk than any other version of Windows Server.


Storage Qos Updates


Storage QoS enables administrators to provide virtual machines, and their applications by extension, predictable performance to an organization’s networked storage resources. Storage QoS helps level the playing field while virtual machines jockey for storage resources. According to a related Microsoft support document, the feature helps reduce “noisy neighbor” issues caused by resource-intensive virtual machines. “By default, Storage QoS ensures that a single virtual machine cannot consume all storage resources and starve other virtual machines of storage bandwidth,” stated the company.

It also offers administrators the confidence to load up on virtual machines by providing better visibility into their virtual machine storage setups. “Storage QoS policies define performance minimums and maximums for virtual machines and ensures that they are met. This provides consistent performance to virtual machines, even in dense and overprovisioned environments,” Microsoft wrote.

Windows Server 2016 allows you to centrally manage Storage QoS policies for groups of virtual machines and enforce those policies at the cluster level. This could come into play in the case where multiple VMs make up a service and should be managed together. PowerShell cmdlets have been added in support of these new features, including Get-StorageQosFlow, which provides a number of options to monitor the performance related to Storage QoS; Get-StorageQosPolicy, which will retrieve the current policy settings; and New-StorageQosPolicy, which creates a new policy.


Shielded VMs

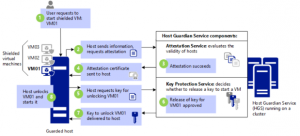
 Shielded VMs, or Shielded Virtual Machines, are a security feature introduced in Windows Server 2016 for protecting Hyper-V Generation 2 virtual machines (VMs) from unauthorized access or manipulating. Shielded VMs use a centralized certificate store and VHD encryption to authorize the activation of a VM when it matches an entry on a list of permitted and verified images. VMs use a virtual TPM to enable the use of disk encryption with BitLocker. Live migrations and VM-state are also encrypted to prevent man-in-the-middle attacks.

The HGS – Host Guardian Service (HGS) (typically, a cluster of 3 nodes) supports two different attestation modes for a guarded fabric:

TPM-trusted attestation (Hardware based)

Admin-trusted attestation (AD based)

TPM-trusted attestation is recommended because it offers stronger assurances, as explained in the following table, but it requires that your Hyper-V hosts have TPM 2.0. If you currently do not have TPM 2.0, you can use Admin-trusted attestation. If you decide to move to TPM-trusted attestation when you acquire new hardware, you can switch the attestation mode on the Host Guardian Service with little or no interruption to your fabric.

Figure 3: Shielded VMs are encrypted at rest using BitLocker. They can be run by an authorized administrator only on known, secure, and healthy hosts.

Figure 3: Shielded VMs are encrypted at rest using BitLocker. They can be run by an authorized administrator only on known, secure, and healthy hosts.

Fast Hyper-V Storage with ReFS

The Resilient File System (ReFS) is another feature introduced with Windows Server 2012. ReFS has huge performance implications for Hyper-V. New virtual machines with a fixed-size VHDX are created instantly. The same advantages apply to creating checkpoint files and to merging VHDX files created when you make a backup. These capabilities resemble what Offload Data Transfers (ODX) can do on larger storage appliances.

RemoteFX

Microsoft also did some improvements on Windows Server 2016 RemoteFX which now includes support for OpenGL 4.4 and OpenCL 1.1 API. It also allows you to use larger dedicated VRAM and VRAM in now finally configurable.

Hyper-V rolling upgrades

Windows Server 2016 enables you to upgrade to a new operating system without taking down the cluster or migrating to new hardware. In previous versions of Windows Server, it was not possible to upgrade a cluster without downtime, this caused significant issues for production systems. This new process is is similar in that individual nodes in the cluster must have all active roles moved to another node in order to upgrade the host operating system. The difference is that all members of the cluster will continue to operate at the Windows Server 2012 R2 functional level (and support migrations between old and upgraded hosts) until all hosts are running the new operating system and you explicitly upgrade the cluster functional level (by issuing a PowerShell command).

Hyper-V hot add NICs and memory

Previous versions of Hyper-V did not allow you to add a network interface or more memory to a running virtual machine. Microsoft now allows you to make some critical machine configuration changes without taking the virtual machine offline. The two most important changes involve networking and memory.

In the Windows Server 2016 version of Hyper-V Manager, you’ll find that the Network Adapter entry in the Add Hardware dialog is no longer grayed out. The benefit is that an administrator may now add network adapters and memory to VMs originally configured with fixed amounts of memory, while the VM is running.

Storage Replica

Storage Replica is a new feature that enables storage-agnostic, block-level, synchronous replication between clusters or servers for disaster preparedness and recovery, as well as stretching of a failover cluster across sites for high availability. Synchronous replication enables mi Storage Space Direct (S2D), formally known as “Shared Nothing”.WS2016 introduces the second iteration of the software-defined storage feature known as Storage Spaces to bring cloud inspired capabilities to the data center with advances in computing, networking, storage, and security. This S2D local storage architecture takes each storage node and pools it together using Storage Spaces for data protection (two- or three-way mirroring as well as parity). The local storage can be SAS or SATA (SATA SSDs provide a significant cost savings) or NVMe for increased performance.

Enabling this feature can be accomplished with a single PowerShell command:

Enable-ClusterStorageSpacesDirect

This command will initiate a process that claims all available disk space on each node in the cluster, then enables caching, tiering, resiliency, and erasure coding across columns for one shared storage pool.

storing of data in physical sites with crash-consistent volumes, ensuring zero data loss at the file system level. Asynchronous replication allows site extension beyond metropolitan ranges.


Networking enhancements

Converged Network Interface Card (NIC). The converged NIC allows you to use a single network adapter for management, Remote Direct Memory Access (RDMA)-enabled storage, and tenant traffic. This reduces the capital expenditures that are associated with each server in your datacenter, because you need fewer network adapters to manage different types of traffic per server.

Another facility is Packet Direct. Packet Direct provides a high network traffic throughput and low-latency packet processing infrastructure.

Windows Server 2016 includes a new server role called Network Controller, which provides a central point for monitoring and managing network infrastructure and services. Other enhancements supporting the software-defined network capabilities include an L4 load balancer, enhanced gateways for connecting to Azure and other remote sites, and a converged network fabric supporting both RDMA and tenant traffic.

As we move to virtualized instances in the cloud, it becomes important to reduce the footprint of each instance, to increase the security around them, and to bring more automation to the mix. In Windows Server 2016, Microsoft is pushing ahead on all of these fronts at once. Windows Server 2016 makes it easier to pick up the cloud way of functioning so you can change the way your server apps work as quickly as you want, even if you’re not using the cloud.


Windows 10 Anniversary Update

Late last month, Microsoft announced a major update to Windows 10 would be made available on August 9th.

In a post on the Windows Experience Blog, Microsoft revealed a list of new features and security upgrades, improvements to Cortana and a set of features aimed at making the Windows 10 experience better on smartphones and tablets.

This news arrives almost exactly a yeat to the day of the consumer launch of Windows 10. The new operating system has seen massive adoption by both business and consumers users in the past year, and Microsoft hope these upgrades spur further adoption by any stragglers.

Security

  • Windows Hello will now have integration with biometrics.  This will allow users to embrace security without compromising convenience.
  • Improvements to Windows Defender (MS Antimalware software)
    • Windows Defender Advanced Threat Protection — cloud based antimalware software for enterprise
  • Windows Information Protection (more information here)

Cortana

This update will include updates to Cortana, the Microsoft virtual assistant, to hopefully make her more useful. The assistant is now available to take commands on users’ lock screens, so they can do things like ask questions and play music without having to unlock their devices.  Cortana can also remember things for users, such as their shopping lists or important to do item so that people do not have to refer to other platforms to retrieve them.

Windows Ink

Microsoft is also introducing new tools that make it easier to jot down notes using a touchscreen-enabled tablet or laptop. The Windows Ink features give users a virtual notepad to doodle, sketch or scribble down notes without having to wait for an app to launch.  Furthermore, key apps have new ink-specific features, like using handwriting in Office, ink annotations in Microsoft Edge or drawing custom routes in Maps.

Thats only to touch on a few of the key items in the update, there will be further secuirty enhancements and improved xbox integration. Microsoft Edge also received a handful of updates, including support for browser extensions which should make it more of a credible alternative to Chrome or Firefox.

Edge Browser

  • Battery usage efficiency gains — up to 3 hours compared to Google Chrome
  • Extensions available
  • Accessibility with HTML5, CSS3, Aria