DNS Security – Your New Secret Weapon in The Fight Against Cybercrime

It’s time to use the internet to your security advantage. Did you know more than 91% of malware uses DNS to gain command and control, exfiltrate data, or redirect web traffic?

But when internet requests are resolved by a recursive DNS service, they become the perfect place to check for and block malicious or inappropriate domains and IPs. DNS is one of the most valuable sources of data within an organization. It should be mined regularly and cross-referenced against threat intelligence. It’s easier to do than you might think. Security teams that are not monitoring DNS for indications of compromise are missing an important opportunity.

Don’t believe us? New analysis shows widespread DNS protection could save organizations as much as $200 billion in losses every year. Check out the full report  The Economic Value of DNS Security,” recently published by the Global Cyber Alliance (GCA). According to their findings, DNS firewalls could prevent between $19 billion and $37 billion in annual losses in the US and between $150 billion and $200 billion in losses globally. That’s a lot of bang for your buck. If organizations around the globe were to make this simple addition to their security stack, the savings could add up into billions of dollars.  Translation: an easy way to prevent one-third of total losses due to cybercrime.

About Cisco Umbrella

Cisco Umbrella uses the internet’s infrastructure to stop threats over all ports and protocols before it reaches your endpoints or network. Using statistical and machine learning models to uncover both known and emerging threats, Umbrella proactively blocks connections to malicious destinations at the DNS and IP layers. And because DNS is a protocol used by all devices that connect to the internet, you simply point your DNS to the Umbrella global network, and any device that joins your network is protected. So when your users roam, your network stays secure.


This article was provided by our service partner : Cisco Umbrella

Offering Security Services: Should You Build, Buy, or Partner?

One size DOES NOT fit all.

Let’s consider the ‘build, buy, partner’ framework for security services, which offers three very different approaches you could take. There is no absolute right or wrong way, only what is best for your business. Explore the pros and cons of each so you can determine the right way for you.

Building Security

Utilizing this approach means you create/develop the solution with the resources you own, control, or contract to.

Strategy of Things gives us deeper insight into what is required to pull this off.

When to consider this approach:

  • You have the requisite skill sets and resources to do it
  • You can offer security faster, cheaper, and at lower risk
  • This is a strategic competence you own or want to own
  • There is strategic knowledge or critical intellectual property to protect
  • You are fully committed throughout the company

Pros

  • Most product control
  • Most profit opportunity

Cons

  • Longest time to market
  • High development cost

The Challenge: Hiring security resources to monitor 24/7 (emphasis on 24/7)

According to PayScale, the average salary for a cybersecurity analyst is $75,924. How much revenue would you need to earn to bring on just one analyst? Security talent is a hot commodity. Even if you can hire them, keeping them on will be a challenge when you’re fighting bigger businesses or one that specializes in cybersecurity who will pay more and offer more benefits.

Buying Security

This approach could also be referred to as ‘acquiring’ where you are seeking to acquire another company that specializes in a particular area (for example cybersecurity or physical security) to get the missing skill set you’re looking for under your umbrella.

Let’s take a look at the requirements needed for this approach courtesy of Strategy of Things.

When to consider this approach:

  • You don’t have the skills or resources to build, maintain, and support security
  • There is some or all of a solution in the marketplace and no need to reinvent the wheel
  • Someone can do it faster, better, and cheaper
  • You want to focus limited resources in other areas that make more sense
  • Time is critical, and you want to get to market faster
  • There is a solution in the marketplace that gives you mostly what you want

Pros

  • Shortened time to market
  • Acquiring skill sets

Cons

  • Can be costly to acquire
  • Integration takes time

The Challenge: The MSP M&A market is hot, AND it’s a seller’s market
Jim Schleckser, CEO, Inc. CEO Project and author of Great CEOs Are Lazy states in an article on Inc.com, “Many acquisitions fail to live up to their financial or performance expectations because the acquiring company hasn’t done its proper homework.” Take the time to do some serious research on how to take advantage of a seller’s market and find the expertise you need for M&A success. We have a couple of webinars to help you get started:

Bonus for ConnectWise partners: We’re fully invested in helping you throughout the M&A process every step of the way, including technical assistance post-acquisition from our M&A specialist.

Partnering for Security

Strategy of Things gives us insight into this approach. Cybersecurity is a specialized field that many vendors cannot address on their own and must buy or license for their solution.

The company allies itself with a complementary solution or service provider to integrate and offer a joint solution. This option enables both companies to enter a market neither can alone, access to specialized knowledge neither has, and a faster time to market.

Companies consider this approach when neither party has the full offering to get to market on their own.

Pros

  • Shortest time to market
  • Each party brings specialized knowledge or capabilities, including technology, market access, and credibility
  • It lowers the cost, time, and risk to pursue new opportunities
  • Conserves resources
  • Opportunity to learn the skill set before building something of your own

Cons

  • Least control
  • Integration cost
  • Shared gross margins

Many vendors today offer a lot more flexibility today to make partnering an easy choice. A great example is Perch Security threat detection and response.

No matter where you are in your security journey, Perch enables you to choose your level of involvement:

  • Fully managed by Perch SOC

If you’re more of a ‘hands-off, I trust you to do your thing’ type of person/company, then you have the freedom to sit back and relax while the Perch team does their thing. They’ll only involve you when absolutely necessary and equip you with the tools to look good in front of the customer while they do all the heavy lifting.

  • Mostly managed by Perch SOC, your team reviewing or jumping in on specific issues

If you want to be aware on a high level of what’s going on in the world of threat detection but not to the level of fully geeking out, then this level of involvement is right up your alley and 100% possible with the Perch team. Get updates on the things you care about without being inundated with the things you don’t.

  • Fully manage alerts yourself

If you want to geek out on threat reports side by side with the Perch flock, you’re more than welcome to. If you have a person on your team that’s interested in security but not able to dedicate 100% of their time to it, feel free to carve out a portion of their daily responsibilities to working hand-in-hand with the Perch team. Should things change along the way, and you need more or less involvement, you’re free to leverage the Perch team as needed.

Conclusion

Security isn’t solved by one single tool. It’s an ongoing journey that requires continuous assessment and refinement. Everyone has to start somewhere, but keep in mind that the starting line for you might look different than the starting line for someone else, and that’s okay. Carefully review the options at your disposal and determine which path is best for you.

“The journey of a thousand miles begins with a single step.” Lao Tzu


This article was provided by our service partner Connectwise

vcenter server

Decoding the vCenter Server Lifecycle: Update and Versioning Explained

Have you ever wondered what the difference is between a vCenter Server update and a patch? Or between an upgrade and a migration? Why don’t some vCenter Server versions align? Keep reading for the answers!

Version Numbering

The first thing you should understand is vCenter Server versioning. When reviewing your vCenter Server version’s you may see many different references to versions or builds.

One of the first places you will notice a version identifier, is in our release notes. Here you will see the product version listed as vCenter Server 6.7 Update 2a and the build number listed as 13643870.


Once you have upgraded or deployed your vCenter Server you will see version identifiers such as 6.7.0.31000 listed in the VMware Appliance Management Interface (VAMI). You will also see a build number, such as 13643870.

If you review the version information within your vSphere Client you will see the version listed as 6.7.0 and the build as 13639324.

The reason you will see differing versions among these places are because the release notes show the vCenter Server build and full release name, in the VAMI it will show the vCenter Server Appliance version in addition to the build and in the vSphere Client it will show the vCenter Server version and the build of the vSphere Client.

KB2143838 is a great resource that will explain the breakdown of versioning and builds for all vCenter Server versions.

Now that we have  explained the way versioning works, let’s jump into the different scenarios where VMware will increment a version.

vCenter Server Updates and Patches

What is a vCenter Server Update and how does It differ from a patch?

A vCenter Server Update is one that applies to the vCenter Server application. An update can include new features, bug fixes or updates for additional functionality. vCenter Server updates will have a dedicated set of release notes and will be hosted on the my.vmware.com download portal.

A vCenter Server patch is more much streamlined as these are associated with operating system and security level updates. There are no application related changes, and these can target Photon OS, the Postgres DB, Java versions and any other supporting Linux libraries on the vCenter Server Appliance.

A vCenter Server patch also has no dedicated release notes as these are part of the rolled up VMware vCenter Server Appliance Photon OS Security Patches. Patches are also not stored on the my.vmware.com download portal but on the alternate VMware Patch Portal. It is also very important to note as listed in the release notes, these should not be used for any deployment or upgrade. The only reason the vCenter Server ISO’s are hosted on the VMware Patch Portal is to be used to restore your vCenter Server Appliance if using the built-in File-Based Backup. Patches can also only be applied within one and the same update release. So for example if you are currently on 6.7 Update 1 you would not be able to patch directly to 6.7 Update 2b , you would first update to 6.7 Update  2a and then patch to 6.7 Update 2b.

Now that we have explained the differences between a vCenter Server update and patch we can review the differences between an upgrade and migration.

vCenter Server Upgrades and Migrations

In its simplest form a vCenter Server Upgrade is defined as doing a major version change between vCenter Server Appliance versions. If you are running the vCenter Server Appliance 6.5  in your environment and move to vCenter Server Appliance 6.7 this would be considered an upgrade.

A vCenter Server migration is defined as doing a major version change between vCenter Server for Windows and the vCenter Server Appliance. If you are running vCenter Server for Windows 6.5 and move to the vCenter Server Appliance 6.7 this would be considered a migration. It is not supported to do a migration between the same major version as it consists of both a change of platform and an upgrade together.

In vSphere 6.5 and 6.7 an upgrade or migration of the vCenter Server is not completed in place. During the upgrade process a brand new appliance of the newer version is deployed, and based on the settings defined the data is exported from the old version and imported into the new one retaining the same FQDN, IP, Certs and UUIDs.

A back-in-time upgrade restriction is when you are unable to upgrade from one 6.5 release to another 6.7 release. For example, Upgrade from vSphere 6.5 Update 2d to vSphere 6.7 Update 1 is not supported due to the back-in-time nature of vSphere 6.7 Update 1. vSphere 6.5 Update 2d contains code and security fixes that are not in vSphere 6.7 Update 1 and might cause regression. When performing vCenter Server upgrades and migrations it’s also very important to pay attention to unsupported upgrade paths which are normally restricted due to being a back-in-time upgrade. It is also important to note that just because two releases might have the same release date, does not mean that they will be compatible. The best resource to review supported upgrade paths will be in the vCenter Server Release Notes section titled Upgrade Notes for this Release.

Resource Wrap-Up

 Conclusion

Versioning of a complex product can be difficult, but hopefully you now have a better understanding of what these numbers mean. If you have any questions feel free to post a comment below or check out any of the resources linked.


This article was provided by our service partner : Vmware

How to create a Failover Cluster in Windows Server 2019

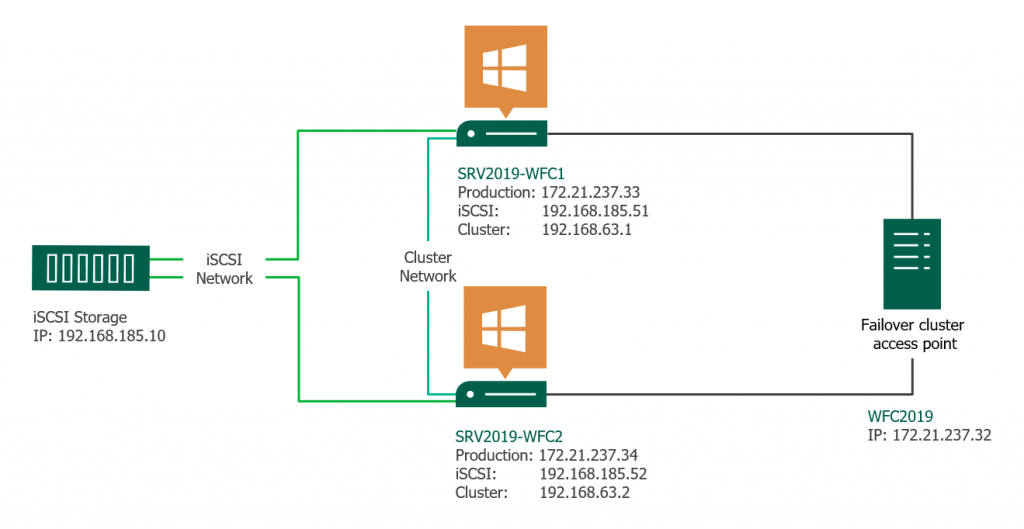
This article gives a short overview of how to create a Microsoft Windows Failover Cluster (WFC) with Windows Server 2019 or 2016. The result will be a two-node cluster with one shared disk and a cluster compute resource (computer object in Active Directory).

Windows server 2019 failover cluster

Preparation

It does not matter whether you use physical or virtual machines, just make sure your technology is suitable for Windows clusters. Before you start, make sure you meet the following prerequisites:

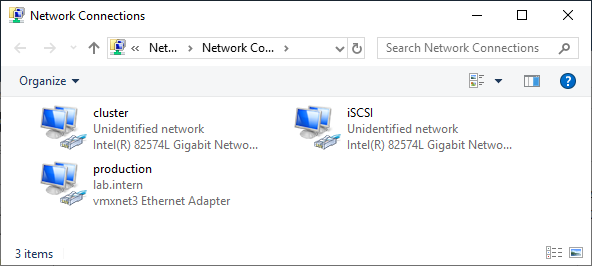
Two Windows 2019 machines with the latest updates installed. The machines have at least two network interfaces: one for production traffic, one for cluster traffic. In my example, there are three network interfaces (one additional for iSCSI traffic). I prefer static IP addresses, but you can also use DHCP.

failover cluster 02

Join both servers to your Microsoft Active Directory domain and make sure that both servers see the shared storage device available in disk management. Don’t bring the disk online yet.

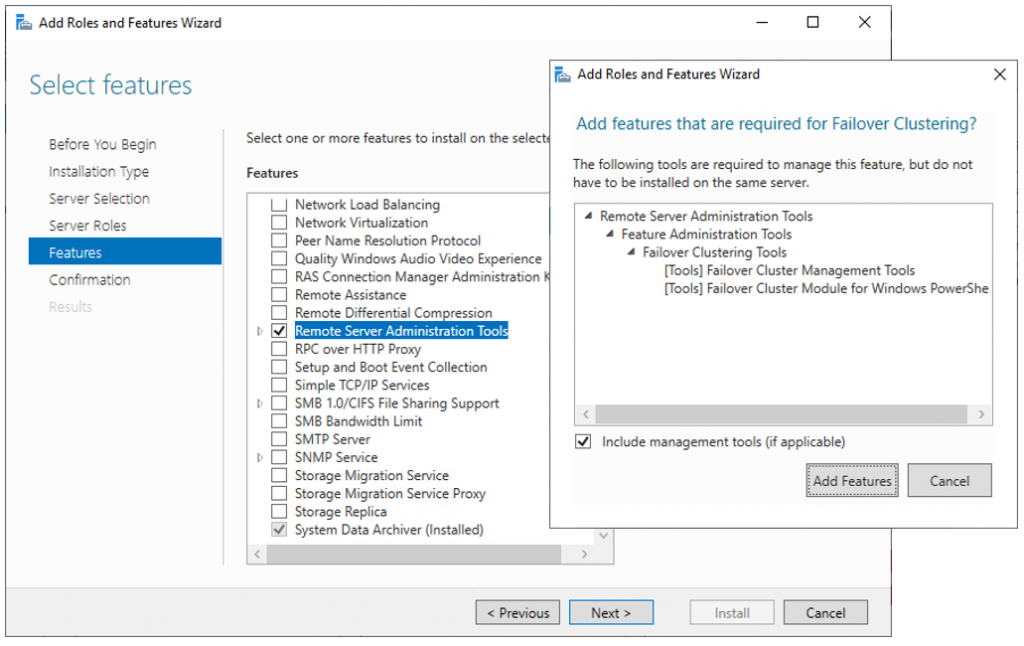
The next step before we can really start is to add the “Failover clustering” feature (Server Manager > add roles and features).

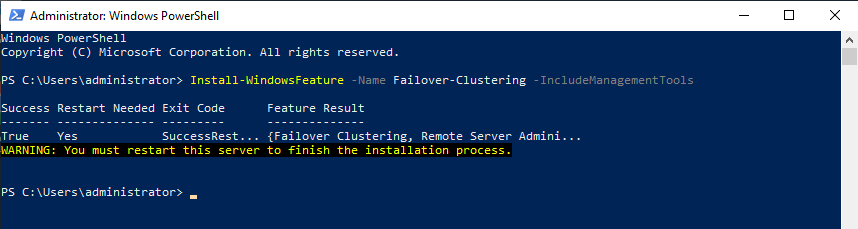
Reboot your server if required. As an alternative, you can also use the following PowerShell command:

Install-WindowsFeature -Name Failover-Clustering –IncludeManagementTools

After a successful installation, the Failover Cluster Manager appears in the start menu in the Windows Administrative Tools.

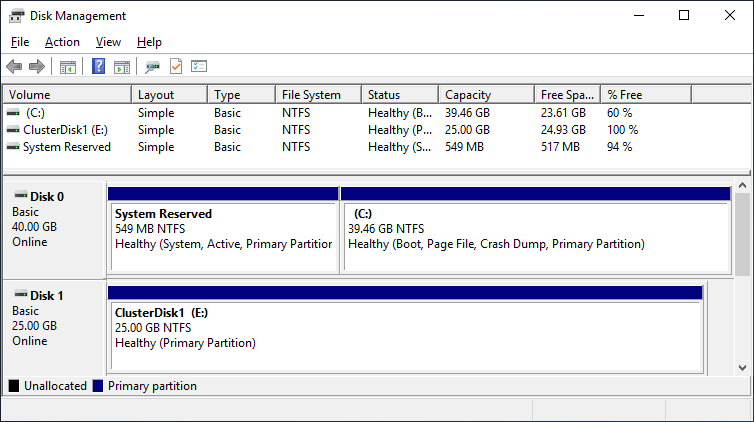
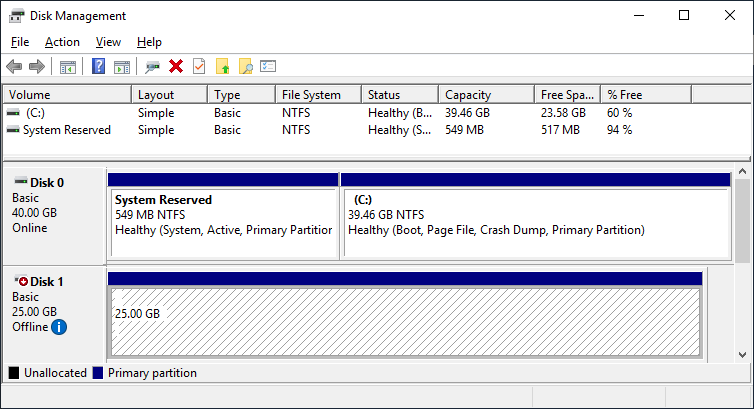
After you installed the Failover-Clustering feature, you can bring the shared disk online and format it on one of the servers. Don’t change anything on the second server. On the second server, the disk stays offline.

After a refresh of the disk management, you can see something similar to this:

Server 1 Disk Management (disk status online)


Server 2 Disk Management (disk status offline)

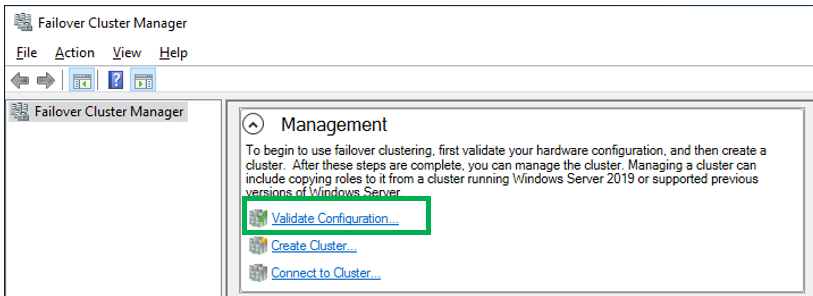
Failover Cluster readiness check

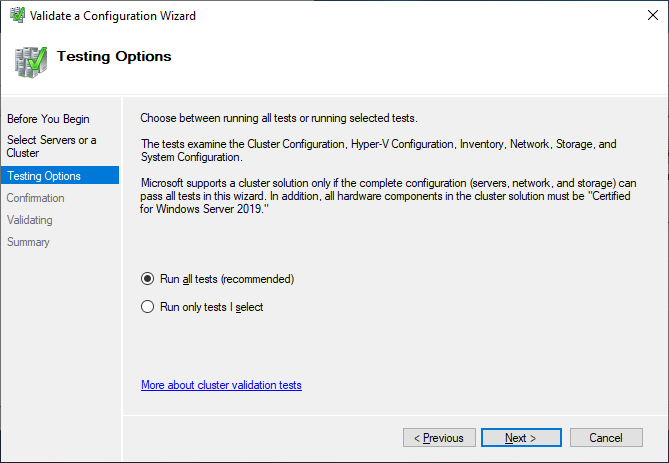
Before we create the cluster, we need to make sure that everything is set up properly. Start the Failover Cluster Manager from the start menu and scroll down to the management section and click Validate Configuration.

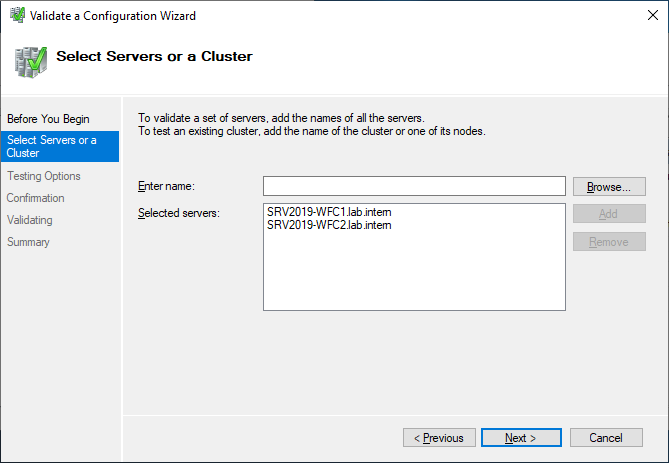
Select the two servers for validation.

Run all tests. There is also a description of which solutions Microsoft supports.

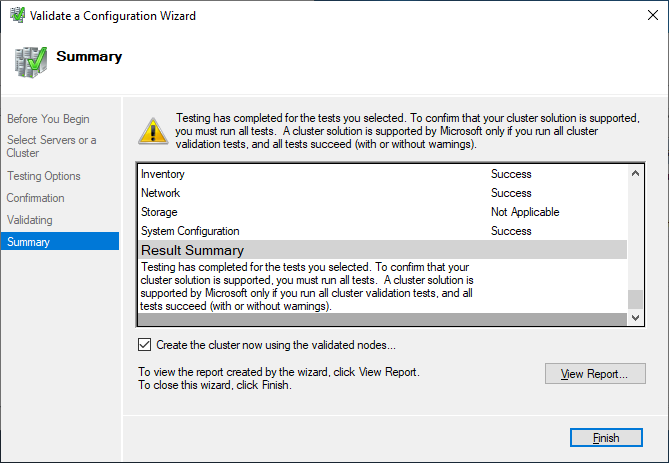
After you made sure that every applicable test passed with the status “successful,” you can create the cluster by using the checkbox Create the cluster now using the validated nodes, or you can do that later. If you have errors or warnings, you can use the detailed report by clicking on View Report.

Create the cluster

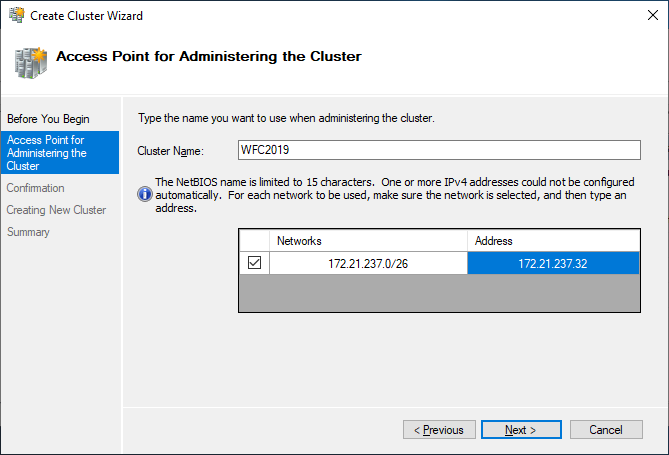
If you choose to create the cluster by clicking on Create Cluster in the Failover Cluster Manager, you will be prompted again to select the cluster nodes. If you use the Create the cluster now using the validated nodes checkbox from the cluster validation wizard, then you will skip that step. The next relevant step is to create the Access Point for Administering the Cluster. This will be the virtual object that clients will communicate with later. It is a computer object in Active Directory.

The wizard asks for the Cluster Name and IP address configuration.

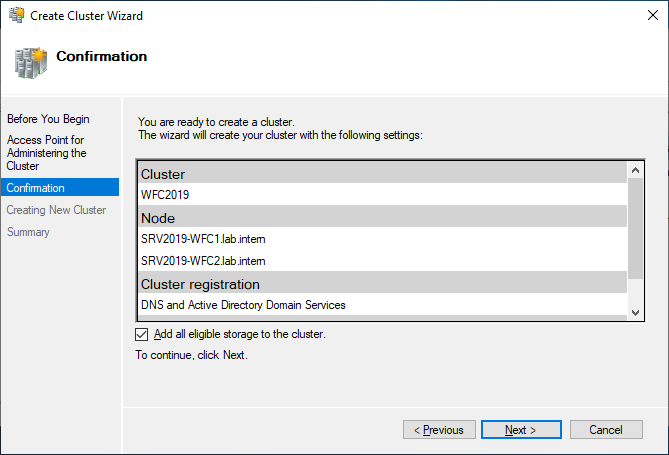
As a last step, confirm everything and wait for the cluster to be created.

The wizard will add the shared disk automatically to the cluster per default. If you did not configure it yet, then it is also possible afterwards.

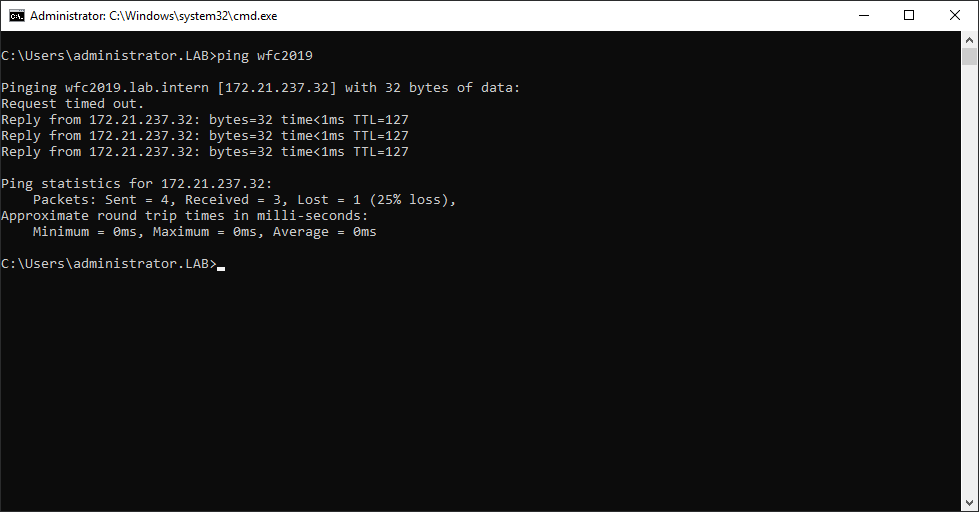
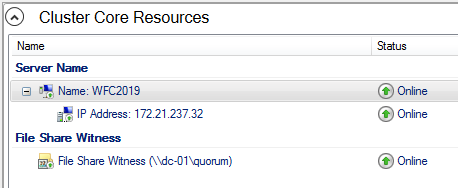
As a result, you can see a new Active Directory computer object named WFC2019.

You can ping the new computer to check whether it is online (if you allow ping on the Windows firewall).

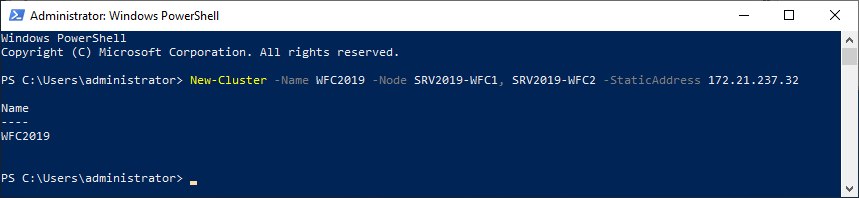
As an alternative, you can create the cluster also with PowerShell. The following command will also add all eligible storage automatically:

New-Cluster -Name WFC2019 -Node SRV2019-WFC1, SRV2019-WFC2 -StaticAddress 172.21.237.32

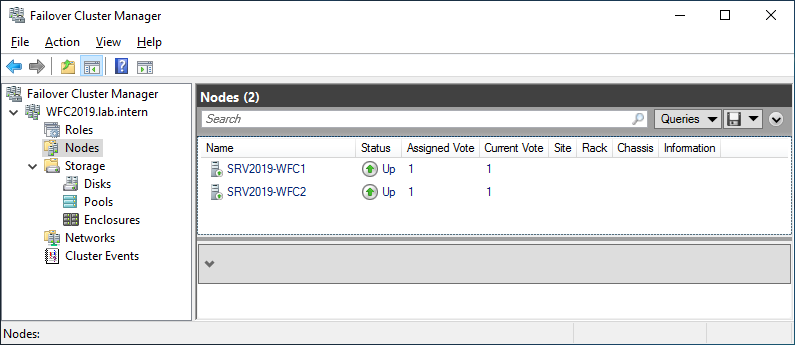
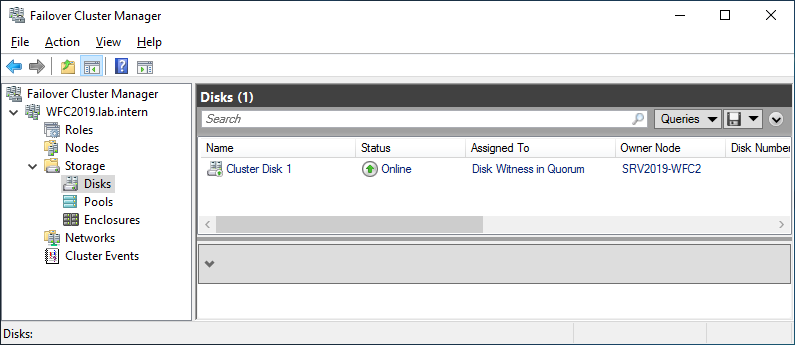
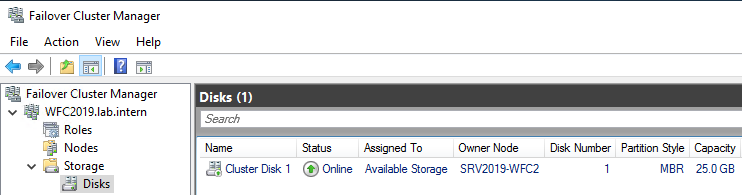
You can see the result in the Failover Cluster Manager in the Nodes and Storage > Disks sections.

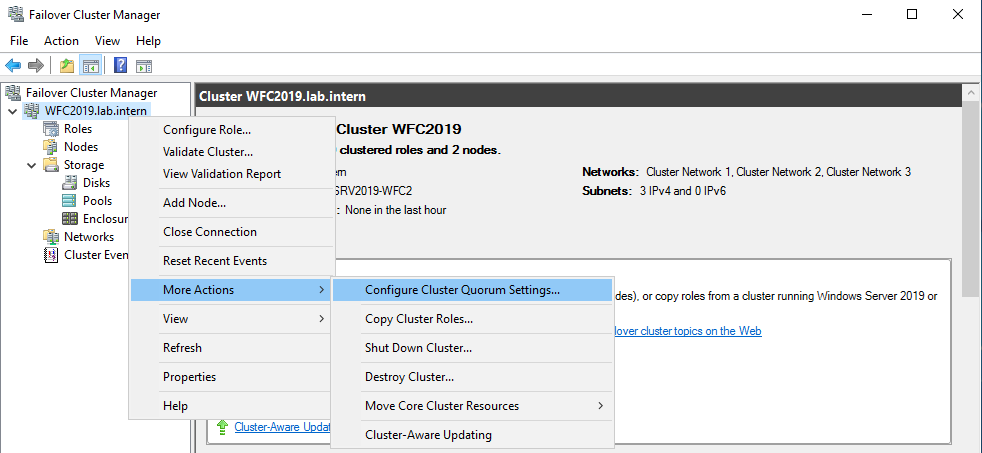
The picture shows that the disk is currently used as a quorum. As we want to use that disk for data, we need to configure the quorum manually. From the cluster context menu, choose More Actions > Configure Cluster Quorum Settings.

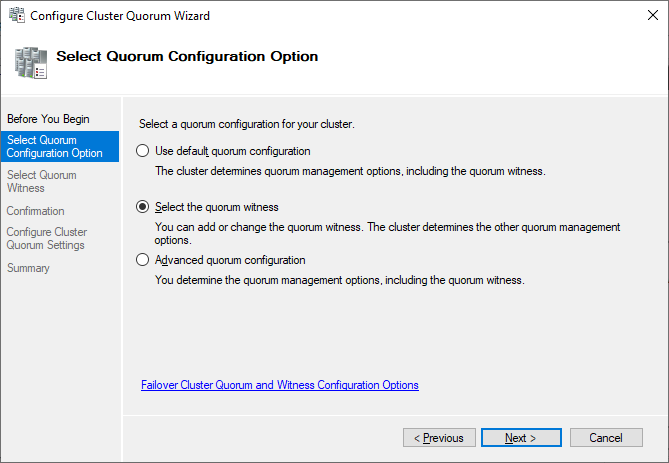
Here, we want to select the quorum witness manually.

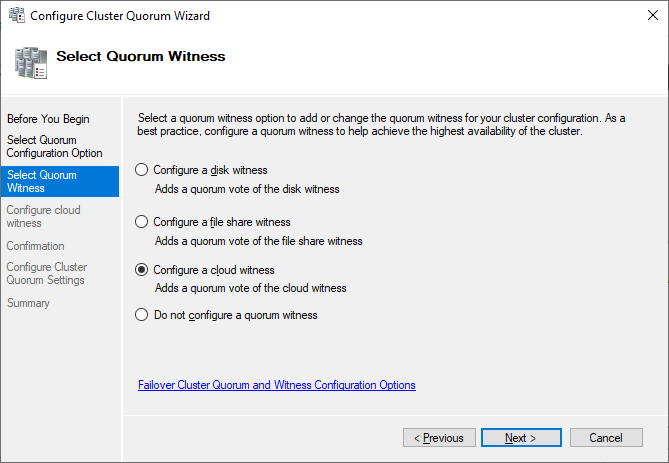
Currently, the cluster is using the disk configured earlier as a disk witness. Alternative options are the file share witness or an Azure storage account as witness. We will use the file share witness in this example. There is a step-by-step how-to on the Microsoft website for the cloud witness. I always recommend configuring a quorum witness for proper operations. So, the last option is not really an option for production.

Just point to the path and finish the wizard.

After that, the shared disk is available for use for data.

Congratulations, you have set up a Microsoft failover cluster with one shared disk.

Next steps and backup

One of the next steps would be to add a role to the cluster, which is out of scope of this article. As soon as the cluster contains data, it is also time to think about backing up the cluster. Veeam Agent for Microsoft Windows can back up Windows failover clusters with shared disks. We also recommend doing backups of the “entire system” of the cluster. This also backs up the operating systems of the cluster members. This helps to speed up restore of a failed cluster node, as you don’t need to search for drivers, etc. in case of a restore.


This article was provided by our service partner : Veeam

Security

Is Being Secure and Being Compliant the Same Thing?

Often times, when I ask a partner if they’re offering security to their SMB customers, their answer revolves around consulting on compliance. Verticals like healthcare, financial, government, and retail are low-hanging fruit for security revenue opportunities because compliance is a requirement of being in business.

However, being secure and being compliant are NOT the same. Did you know that you can be compliant without being fully secure? While being compliant increases data protection and keeps organizations from paying hefty fines, it’s simply not enough. If that’s what you’re relying on to keep you and your customers safe, you’d be sorely mistaken.

Being compliant is like following a strict nutritionist-approved diet to stay healthy.

While that’s a good practice, and it will certainly help, it’s also very important that you know your family’s medical history and how that could impact your health in the future (your risks) so you can make necessary, and maybe even lifesaving decisions. If you ignored your risks and only stuck to a good diet, you might be blindsided at a doctor’s appointment to learn that you have a certain hereditary disease.

“If we had only caught this sooner…”

Many MSPs are approaching security when an incident occurs, while others are being proactive to meet their customer’s compliance requirements. They’re not thinking of the broader picture of risk. You need to fully understand your risks to ensure that you and your customers are secure. Don’t wait until disaster strikes.

Let’s dive into the differences between the two phrases.

Being Compliant

What does it mean to be compliant? Is that enough? Go on reading and see now what it is.

Regulatory compliance describes the goal that organizations aspire to achieve in their efforts to ensure they are aware of and take steps to comply with relevant laws, policies, and regulations, such as PCI, HIPAA, GDPR, and DFARS.

We’ve heard of several companies making news headlines regarding security breaches. The court will determine if there was negligence in adhering to regulations and taking the proper legally required steps to protect their data properly. If the company is found not to be compliant, there are heavy financial consequences.

How much are we talking? Yahoo’s loss of 3 billion user accounts cost them an estimated $350 million off their sales price.

Needless to say, there’s a big incentive for companies to cover the basics when it comes to security. However, if you stop at just being compliant, you’re essentially only doing the bare minimum, whatever is legally required.

It’s a starting point.

Being Secure

The next step is to ensure security. Go above and beyond.

According to Cisco, “Cybersecurity is the practice of protecting systems, networks, and programs from digital attacks. These cyberattacks are usually aimed at accessing, changing, or destroying sensitive information; extorting money from users; or interrupting normal business processes.”

When hackers attack your business, it’s not just your business that’s at stake. By getting access to your database, hackers gain access to all your customers. So, we could consider ensuring cybersecurity as a social responsibility (not just a legal one).

We believe in doing business this way, going above and beyond, and have adopted the NIST Cybersecurity Framework. It consists of standards, guidelines, and best practices to manage cybersecurity-related risks as an ongoing practice.

As leaders in the IT industry, we’re all constantly looking to others who are doing things well and subscribe to best practices in several other areas of business. Cybersecurity is no different.

The framework encourages identifying your risks proactively, so you can take the necessary steps in reducing and managing your risks.

How to Assess Risks

We know what you’re thinking, “Easier said than done, though, right? Just another thing to add to my to-do list.”

This process doesn’t have to be overwhelming. Knowing where to start is half the battle. Smart security offerings start with a risk assessment that allows you to proactively identify security risks across your entire business as well as your customers, not just on their network. The result is an easy-to-understand, customized risk report showing your customer their most critical risks and recommendations for how to remediate those risks.

Next Steps

The bottom line: be compliant AND secure. Start by understanding your legal compliance responsibilities to protect yourself and your customers during a disaster. Then, take it a step further—assess and fully understand your security risks and develop a plan to reduce your risks.


This article was provided by our service partner : Connectwise