Posts

How to create a file server cluster with Windows 2019

High Availability of data and applications has been an important topic in IT for decades. One of the critical services in many companies is the file servers, which serve file shares where users or applications store their data. If the file server is offline, then people cannot work. Downtime means additional costs, which organizations try to avoid. Windows Server 2019 (and earlier versions) allow you to create highly available file services.

Prerequisites

Before we can start with the file server cluster configuration, the file server role must be installed and permissions must be set in Active Directory for the failover cluster computer object.

There are two ways to install the file server role on the two cluster nodes:

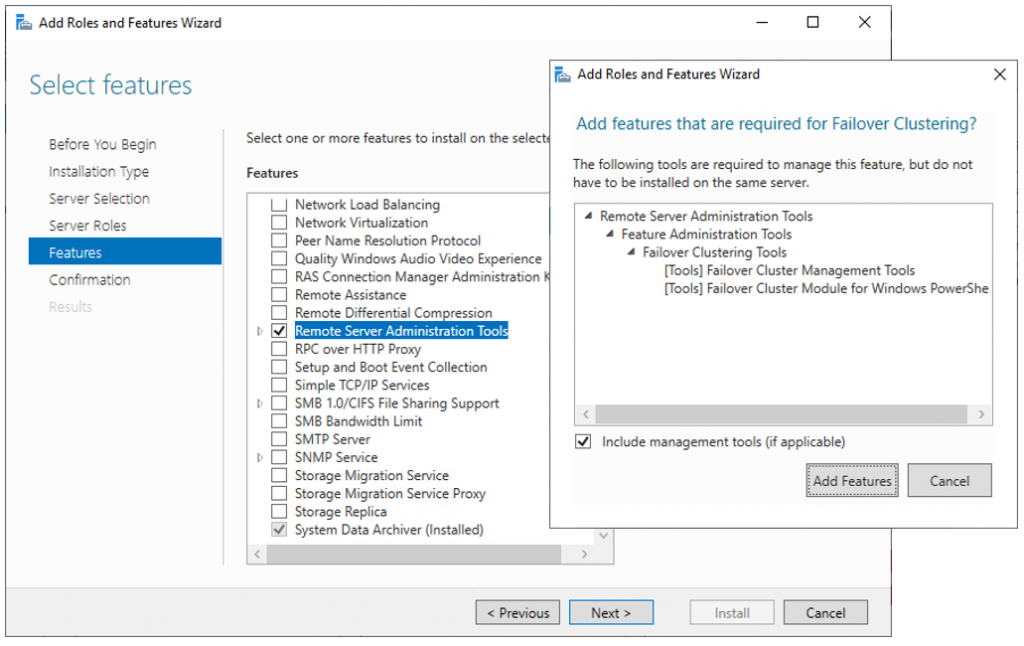
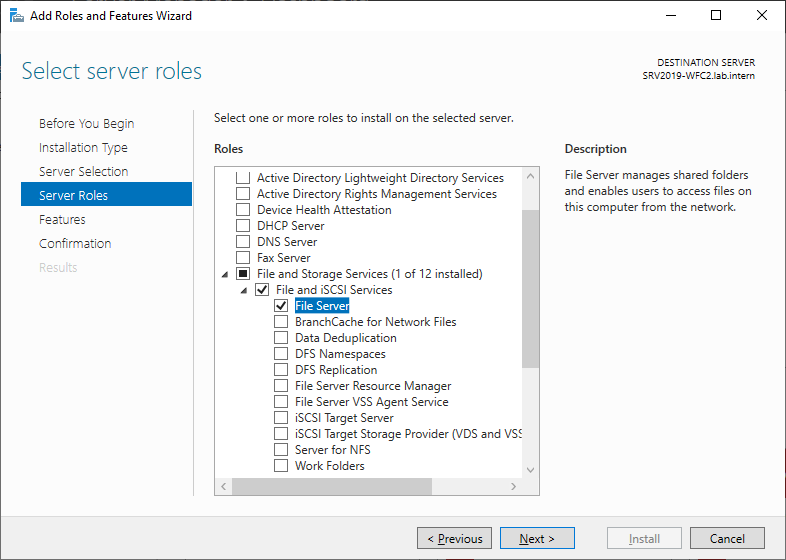
  • Via the Add Roles and Features Wizard of the server manager
  • Via PowerShell

In Server manager, click Add roles and features and follow the wizard. Select the File Server role and install it. A reboot is not required.

server 2019 cluster 1

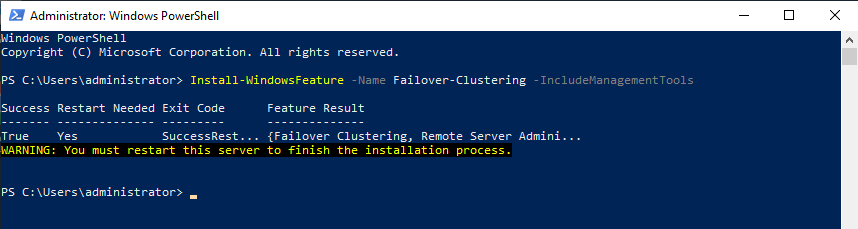
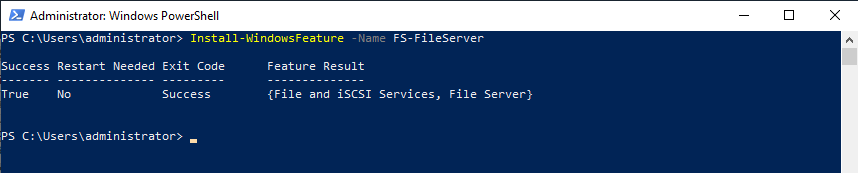
As an alternative, you can use the following PowerShell command to install the file server feature:

Install-WindowsFeature -Name FS-FileServer

server 2019 cluster 2

To avoid errors at later steps, first configure Active Directory permissions for the failover cluster computer object. The computer object of the cluster (in my case, WFC2019) must have the Create Computer Objects permissions in the Active Directory Organizational Unit (OU).

If you forget about this, the role will fail to start later. Errors and event IDs 1069, 1205 and 1254 will show up in the Windows event log and failover cluster manager.

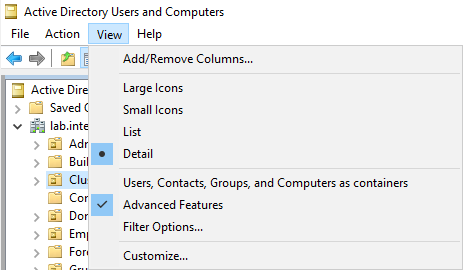
Open the Active Directory Users and Computers console and switch to Advanced Features in the View menu.

server 2019 cluster 3

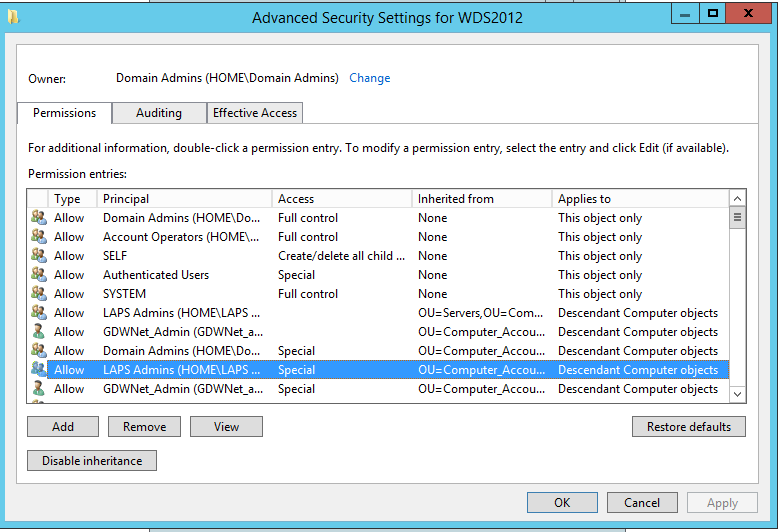
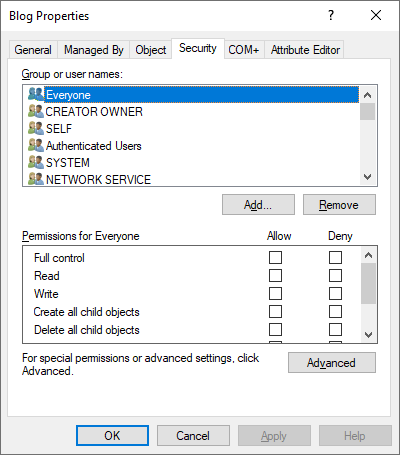
Go the OU where your cluster object is located (in my case the OU is Blog). Go to the Security tab (in properties) and click Advanced.

server 2019 cluster 4

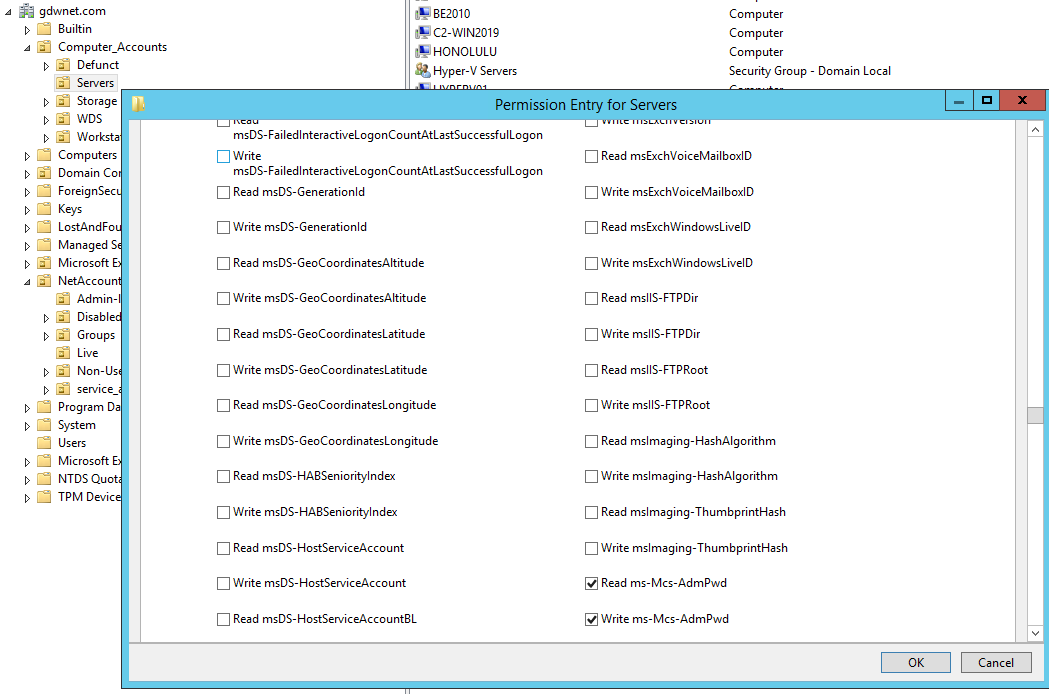
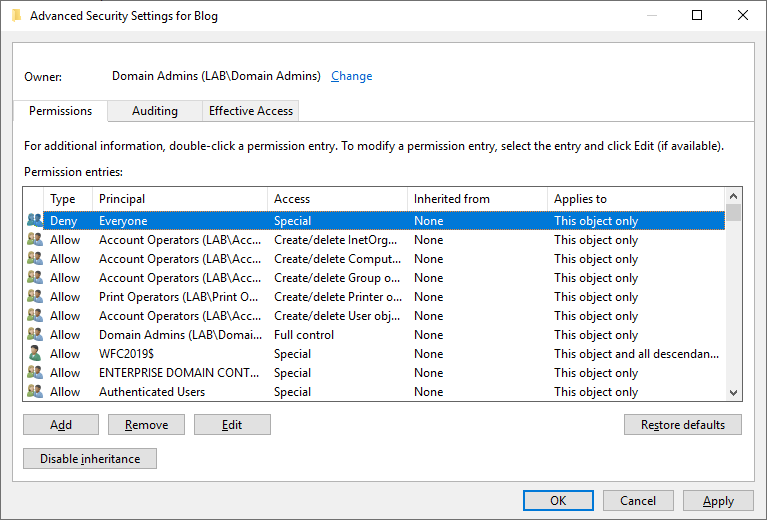
In the new window click Add and select your cluster computer object as principal (in my case WFC2019).

server 2019 cluster 5

In the Permissions list select Create Computer objects

server 2019 cluster 6

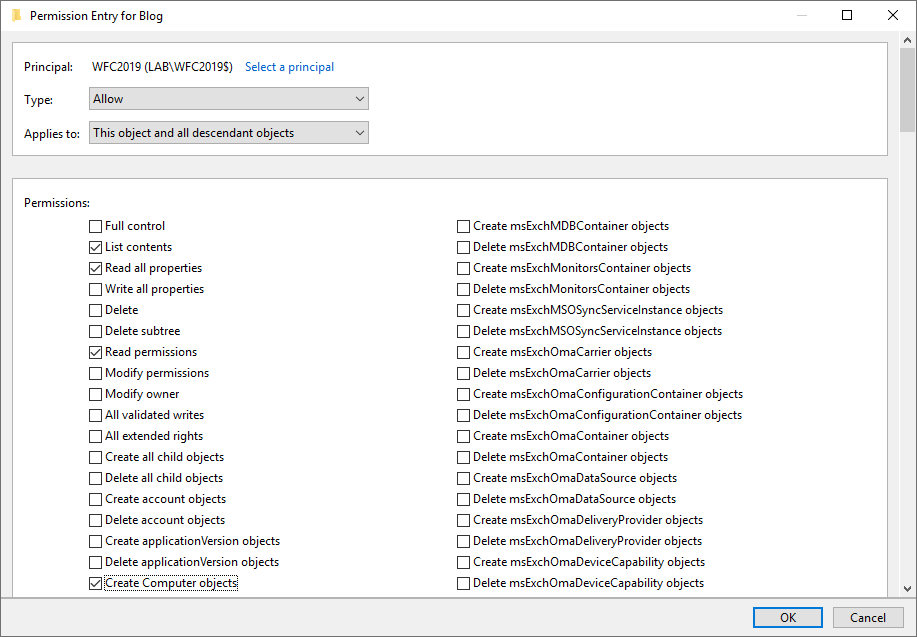
Click OK in all windows to confirm everything

Configure the file server cluster role

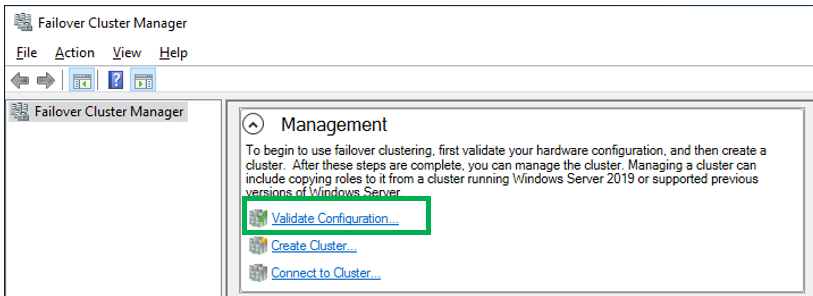
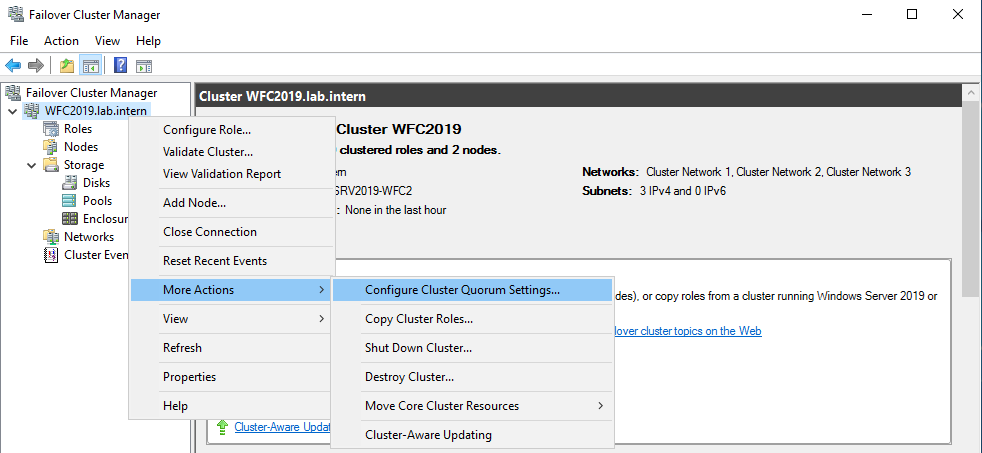
Because all pre-requisites are now met, we can configure the file server cluster role. Open the Failover Cluster manager and add the role to your cluster (right-click on Roles of your cluster -> configure role -> and select the File Server role).

server 2019 cluster 7

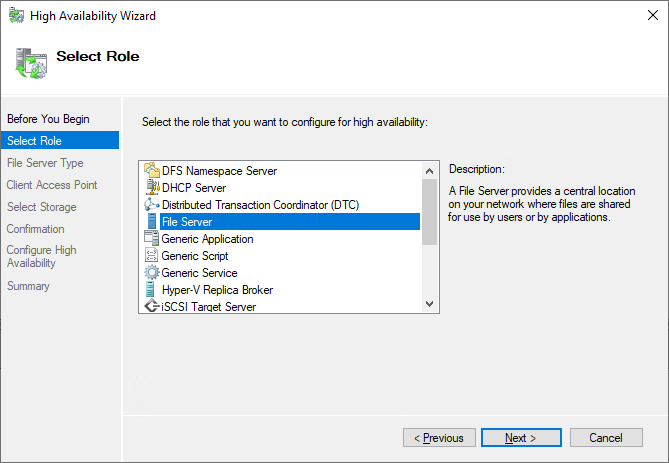
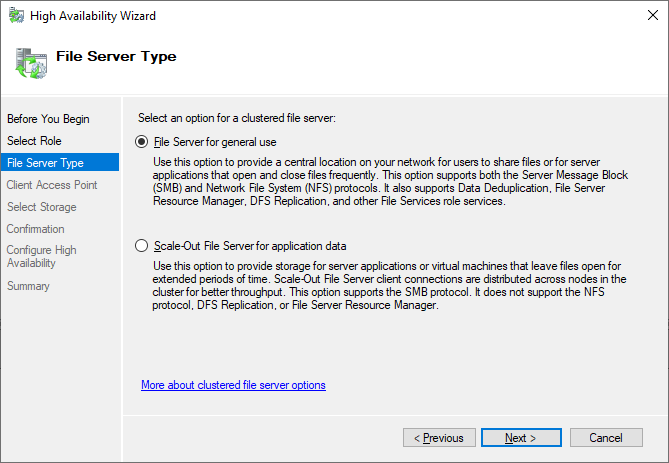
We will create a file server for general use as we plan to host file shares for end users.

server 2019 cluster 8

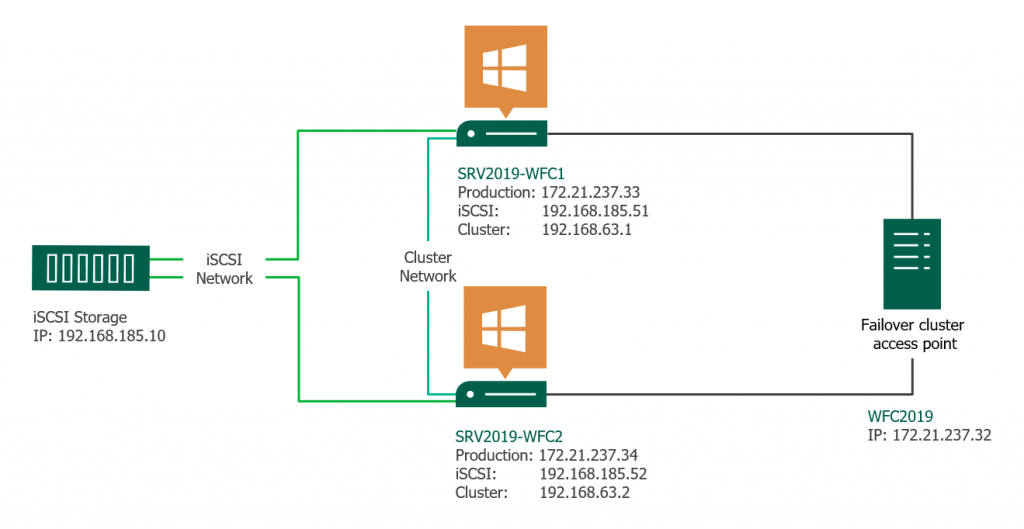
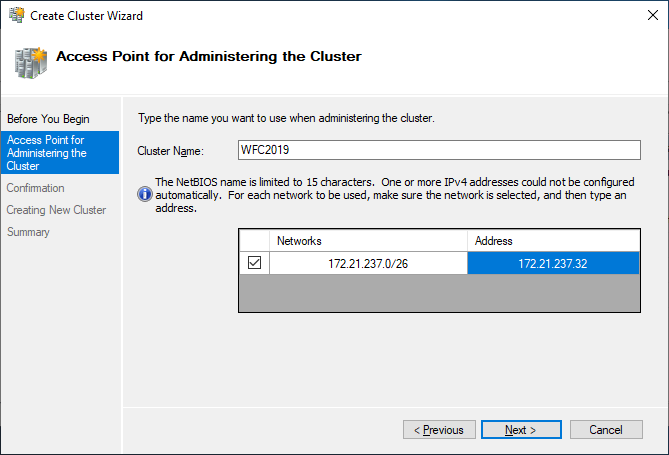
In the next step we define how clients can access the file server cluster. Select a name for your file server and assign an additional IP address.

server 2019 cluster 9

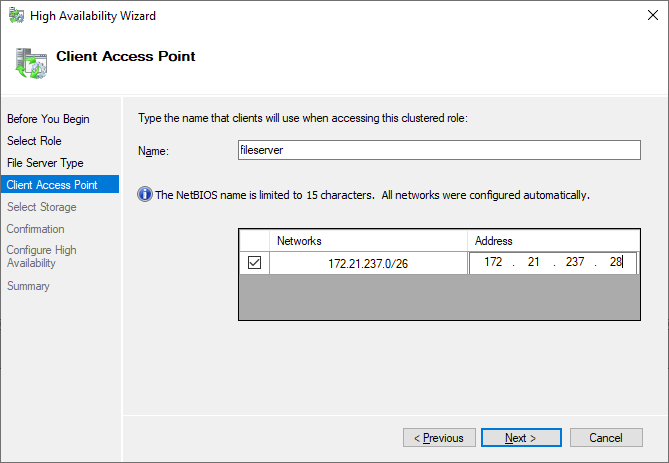
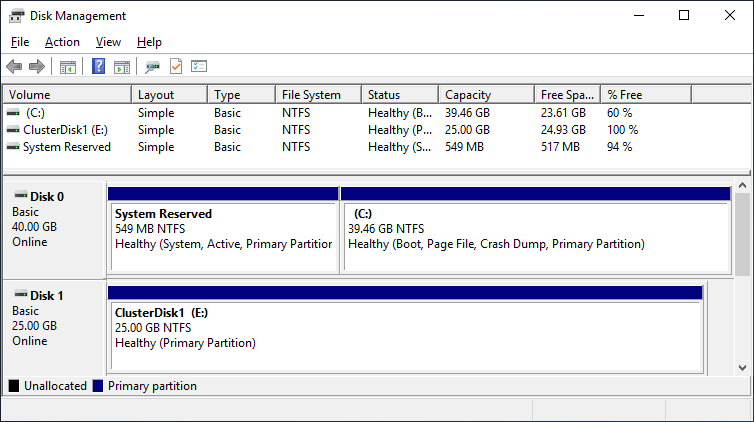
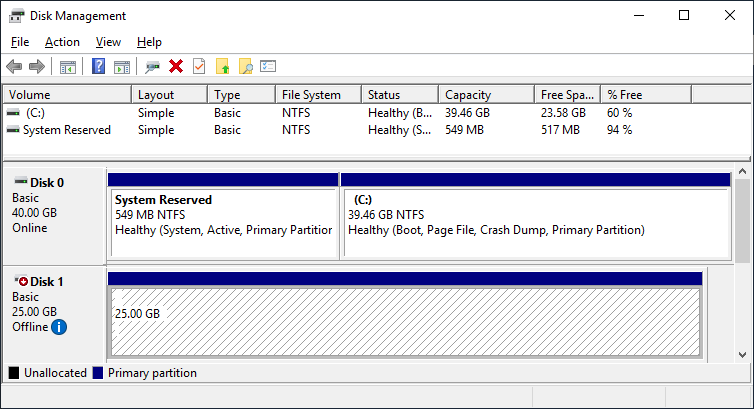
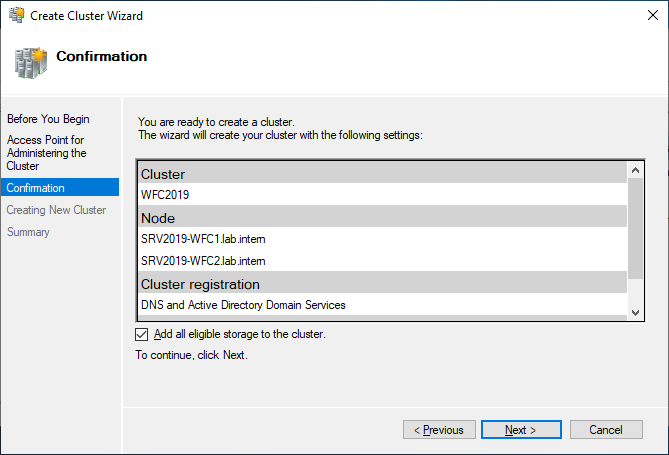
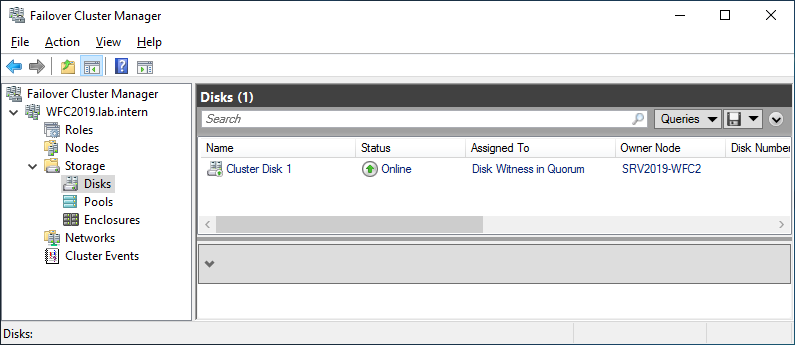
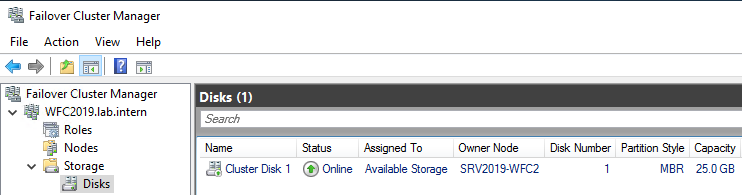
Use the storage configured earlier.

server 2019 cluster 10

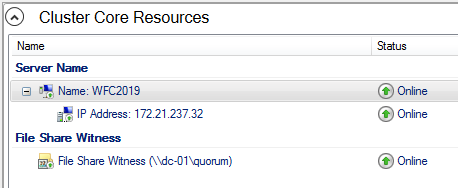
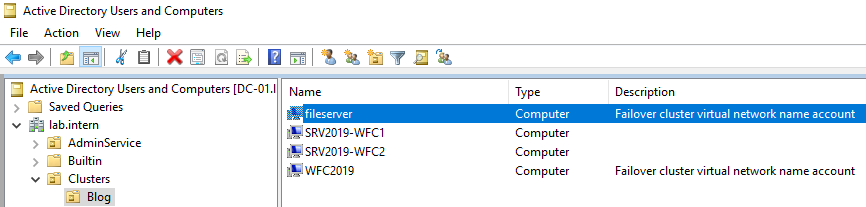
After you finish the wizard, you can see the File Server role up and running in the Failover Cluster Manager. If you see errors here, check the create computer objects permissions described earlier.

server 2019 cluster 10

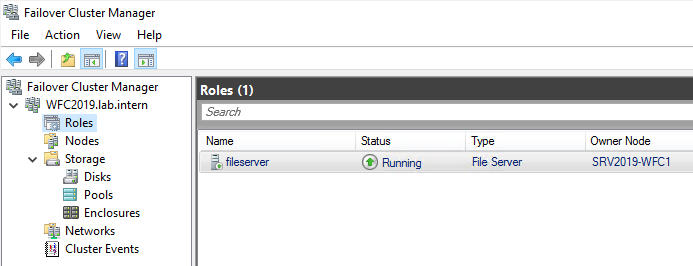
A new Active Directory object also appears in Active Directory Users and Computers, including a new DNS entry

server 2019 cluster 11

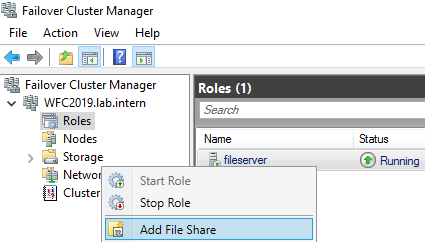
Now it’s time to create file shares for users. You can right-click on the file server role or use the actions panel on the right hand side.
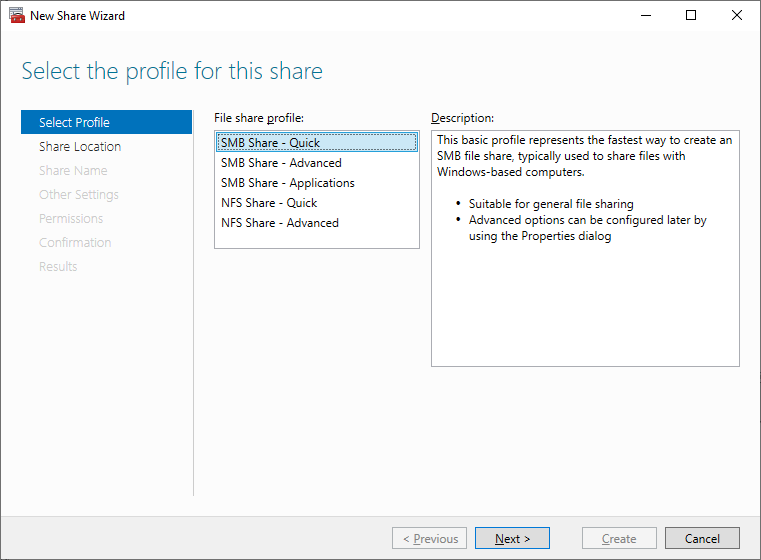
server 2019 cluster 12

I select the SMB Share  Quick as I plan a general purpose file server for end users.

server 2019 cluster 13

I also keep the default permissions because this is just an example. After you have finished the wizard, the new file share is ready to use.

In the following video I show the advances of a continuous available file share. The upload of the file will continue even during a cluster failover. The client is a Windows 10 1809. I upload an iso to the file share I created earlier. My upload speed it about 10-20Mbit/s WAN connection. During failover to a different cluster node, the upload stops for some seconds. After successful failover it continues uploading the ISO file.

Next steps and backup

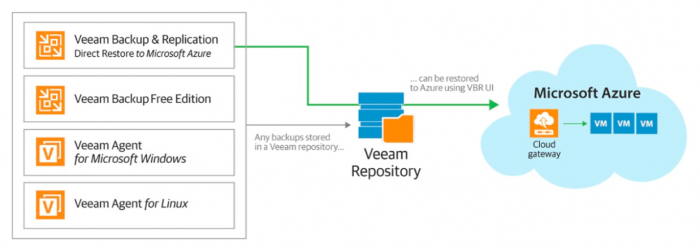
As soon as the file server contains data, it is also time to think about backing up the file server. Veeam Agent for Microsoft Windows can back up Windows failover clusters with shared disks. We also recommend doing backups of the entire system of the cluster. This also backs up the operating systems of the cluster members and helps to speed up restore of a failed cluster node because you don’t need to search for drivers, etc. in case of a restore.


This article was provided by our service partner : Veeam

How to create a Failover Cluster in Windows Server 2019

This article gives a short overview of how to create a Microsoft Windows Failover Cluster (WFC) with Windows Server 2019 or 2016. The result will be a two-node cluster with one shared disk and a cluster compute resource (computer object in Active Directory).

Windows server 2019 failover cluster

Preparation

It does not matter whether you use physical or virtual machines, just make sure your technology is suitable for Windows clusters. Before you start, make sure you meet the following prerequisites:

Two Windows 2019 machines with the latest updates installed. The machines have at least two network interfaces: one for production traffic, one for cluster traffic. In my example, there are three network interfaces (one additional for iSCSI traffic). I prefer static IP addresses, but you can also use DHCP.

failover cluster 02

Join both servers to your Microsoft Active Directory domain and make sure that both servers see the shared storage device available in disk management. Don’t bring the disk online yet.

The next step before we can really start is to add the “Failover clustering” feature (Server Manager > add roles and features).

Reboot your server if required. As an alternative, you can also use the following PowerShell command:

Install-WindowsFeature -Name Failover-Clustering –IncludeManagementTools

After a successful installation, the Failover Cluster Manager appears in the start menu in the Windows Administrative Tools.

After you installed the Failover-Clustering feature, you can bring the shared disk online and format it on one of the servers. Don’t change anything on the second server. On the second server, the disk stays offline.

After a refresh of the disk management, you can see something similar to this:

Server 1 Disk Management (disk status online)


Server 2 Disk Management (disk status offline)

Failover Cluster readiness check

Before we create the cluster, we need to make sure that everything is set up properly. Start the Failover Cluster Manager from the start menu and scroll down to the management section and click Validate Configuration.

Select the two servers for validation.

Run all tests. There is also a description of which solutions Microsoft supports.

After you made sure that every applicable test passed with the status “successful,” you can create the cluster by using the checkbox Create the cluster now using the validated nodes, or you can do that later. If you have errors or warnings, you can use the detailed report by clicking on View Report.

Create the cluster

If you choose to create the cluster by clicking on Create Cluster in the Failover Cluster Manager, you will be prompted again to select the cluster nodes. If you use the Create the cluster now using the validated nodes checkbox from the cluster validation wizard, then you will skip that step. The next relevant step is to create the Access Point for Administering the Cluster. This will be the virtual object that clients will communicate with later. It is a computer object in Active Directory.

The wizard asks for the Cluster Name and IP address configuration.

As a last step, confirm everything and wait for the cluster to be created.

The wizard will add the shared disk automatically to the cluster per default. If you did not configure it yet, then it is also possible afterwards.

As a result, you can see a new Active Directory computer object named WFC2019.

You can ping the new computer to check whether it is online (if you allow ping on the Windows firewall).

As an alternative, you can create the cluster also with PowerShell. The following command will also add all eligible storage automatically:

New-Cluster -Name WFC2019 -Node SRV2019-WFC1, SRV2019-WFC2 -StaticAddress 172.21.237.32

You can see the result in the Failover Cluster Manager in the Nodes and Storage > Disks sections.

The picture shows that the disk is currently used as a quorum. As we want to use that disk for data, we need to configure the quorum manually. From the cluster context menu, choose More Actions > Configure Cluster Quorum Settings.

Here, we want to select the quorum witness manually.

Currently, the cluster is using the disk configured earlier as a disk witness. Alternative options are the file share witness or an Azure storage account as witness. We will use the file share witness in this example. There is a step-by-step how-to on the Microsoft website for the cloud witness. I always recommend configuring a quorum witness for proper operations. So, the last option is not really an option for production.

Just point to the path and finish the wizard.

After that, the shared disk is available for use for data.

Congratulations, you have set up a Microsoft failover cluster with one shared disk.

Next steps and backup

One of the next steps would be to add a role to the cluster, which is out of scope of this article. As soon as the cluster contains data, it is also time to think about backing up the cluster. Veeam Agent for Microsoft Windows can back up Windows failover clusters with shared disks. We also recommend doing backups of the “entire system” of the cluster. This also backs up the operating systems of the cluster members. This helps to speed up restore of a failed cluster node, as you don’t need to search for drivers, etc. in case of a restore.


This article was provided by our service partner : Veeam

Windows Server 2019

Windows Server 2019 and what we need to do now: Migrate and Upgrade!

IT pros around the world were happy to hear that Windows Server 2019 is now generally available and since there have been some changes to the release. This is a huge milestone, and I would like to offer congratulations to the Microsoft team for launching the latest release of this amazing platform as a big highlight of Microsoft Ignite.

As important as this new operating system is now, there is an important subtle point that I think needs to be raised now (and don’t worry – Veeam can help). This is the fact that both SQL Server 2008 R2 and Windows Server 2008 R2 will soon have extended support ending. This can be a significant topic to tackle as many organizations have applications deployed on these systems.

What is the right thing to do today to prepare for leveraging Windows Server 2019? I’m convinced there is no single answer on the best way to address these systems; rather the right approach is to identify options that are suitable for each workload. This may also match some questions you may have. Should I move the workload to Azure? How do I safely upgrade my domain functional level? Should I use Azure SQL? Should I take physical Windows Server 2008 R2 systems and virtualize them or move to Azure? Should I migrate to the latest Hyper-V platform? What do I do if I don’t have the source code? These are all indeed natural questions to have now.

These are questions we need to ask today to move to Windows Server 2019, but how do we get there without any surprises? Let me re-introduce you to the Veeam DataLab. This technology was first launched by Veeam in 2010 and has evolved in every release and update since. Today, this technology is just what many organizations need to safely perform tests in an isolated environment to ensure that there are no surprises in production. The figure below shows a data lab:

windows 2008 eol

Let’s deconstruct this a bit first. An application group is an application you care about — and it can include multiple VMs. The proxy appliance isolates the DataLab from the production network yet reproduces the IP space in the private network without interference via a masquerade IP address. With this configuration, the DataLab allows Veeam users to test changes to systems without risk to production. This can include upgrading to Windows Server 2019, changing database versions, and more. Over the next weeks and month or so, I’ll be writing a more comprehensive document in whitepaper format that will take you through the process of setting up a DataLab and doing specific task-like upgrading to Windows Server 2019 or a newer version of SQL Server as well as migrating to Azure.

Another key technology where Veeam can help is the ability to restore Veeam backups to Microsoft Azure. This technology has been available for a long while and is now built into Veeam Backup & Replication. This is a great way to get workloads into Azure with ease starting from a Veeam backup. Additionally, you can easily test other changes to Windows and SQL Server with this process — put it into an Azure test environment to test the migration process, connectivity and more. If that’s a success, repeat the process as part of a planned migration to Azure. This cloud mobility technique is very powerful and is shown below for Azure:

Windows 2008 EOL

Why Azure?

This is because Microsoft announced that Extended Security Updates will be available for FREE in Azure for Windows server 2008 R2 for an additional three years after the end of the support deadline. Customers can rehost these workloads to Azure with no application code changes, giving them more time to plan for their future upgrades. Read more here.

What also is great about moving workloads to Azure is that this applies to almost anything that Veeam can back up. Windows Servers, Linux Agents, vSphere VMs, Hyper-V VMs and more!

Migrating to the latest platforms are a great way to stay in a supported configuration for critical applications in the data center. The difference is being able to do the migration without any surprises and with complete confidence. This is where Veeam’s DataLabs and Veeam Recovery to Microsoft Azure can work in conjunction to provide you a seamless experience in migrating to the latest SQL and Windows Server platforms.

Have you started testing Windows Server 2019? How many Windows Server 2008 R2 and SQL Server 2008 systems do you have? Let’s get DataLabbing!

Windows 10 October 2018 Update

Earlier today, Yusuf Mehdi announced the Windows 10 October 2018 Update, the newest feature update for Windows 10. I’m excited to share our October 2018 Update rollout plans, how you can get the update today, plus some new update experience enhancements.

How to get the Windows 10 October 2018 Update

As with prior Windows 10 feature rollouts, our goal is to deliver the October 2018 Update in a phased and controlled rollout to provide a great update experience for all. We are beginning the global rollout out via Windows Update in the coming weeks.  As with previous rollouts, we will use real-time feedback and telemetry to update your device when data shows your device is ready and will have a great experience. You don’t have to do anything to get the update; it will roll out automatically to you through Windows Update.

Once the update is downloaded to your device and ready to be installed we’ll notify you.  You are then able to pick a time that won’t disrupt you to finish the installation and reboot.   We are continually working to improve the update experience with each new release of Windows 10.

Windows updates

The last Windows 10 feature update rollout, the April 2018 Update, utilized machine learning (ML) to identify devices that were ready to update, incorporating key attributes like compatibility data. By leveraging machine learning we were able to safely rollout quickly, and as a result the April 2018 Update is now the most widely used version of Windows 10.  Further, our artificial intelligence/ML targeted rollout approach led to the lowest call and online support requests for any release of Windows 10.

With the October 2018 Update, we are expanding our use of machine learning and intelligently selecting devices that our data and feedback predict will have a smooth update experience. We will be further enhancing the performance of our machine learning model by incorporating more device signals such as improved driver telemetry and weighting of key features such as anti-malware software as we broaden the phased rollout. As we did with the April 2018 Update, we will be proactively monitoring all available feedback and update experience data, making the appropriate product updates when we detect issues, and adjusting the rate of rollout as needed to assure all devices have the best possible update experience.

Want the Windows 10 October 2018 Update today? Start by manually checking for updates

While we encourage you to wait until the update is offered to your device, if you’re an advanced user on an actively serviced version of Windows 10 and would like to install the Windows 10 October 2018 Update now, you can do so by manually checking for updates. In the Search box in the taskbar, type “Check for updates.” Once there, simply click “Check for updates” to begin the download and installation process. We are also streamlining the ability for users who seek to manually check for updates by limiting this to devices with no known key blocking issues, based on our ML model.  If we detect that your device has a compatibility issue, we will not install the update until that issue is resolved, even if you “Check for updates.”  You can also watch this video that outlines how to get the October 2018 Update.

windows 10 update settingswindows 10 update settings 2

If you’re using a Windows 10 PC at work, you will need to check with your IT administrator for details on your organization’s specific plans to update.

Improving the update experience

We have heard clear feedback that while our users appreciate that updates keep their devices secure, they find the update experience can sometimes be disruptive.  The October Update includes several improvements to the update experience to offer more control and further reduce disruptions.

Intelligent scheduling of update activity: For our many mobile users on laptops and 2-in-1 devices, we have improved Window’s ability to know when a device will not be in use and perform certain update activities then, so as not to disrupt the user. This ability to update at night when plugged in and not on battery power will help hide update activity and minimize user disruption from updates. To further minimize disruption (in case your system is updating overnight), Windows also silences audio when it wakes for Windows Updates.   If your device hasn’t updated for several nights, we will then suggest you plug in your device so that we can update at night.

windows 10 update nightime

Intelligent reboot scheduling:  Windows Update will now automatically determine the least disruptive opportunity, outside of Active Hours, and will use an enhanced machine-learning-powered activity check that can determine if a user is going to be away for a while or is only stepping away temporarily.

Faster updates, less down time:  We’ve also made further improvements to the feature update installation process and are targeting to further shorten the amount of time your device is offline during updates by up to 31% compared to the Windows 10 April 2018 Update (based on results from the Windows Insider Program) during the rollout of the October Update.

Smaller downloads:  In the October Update we are introducing a new update package delivery design for monthly quality updates that creates a compact update package for easier and faster deployment.  Users will benefit from the new small update size when installing applicable quality updates as they are 40% more efficient.

Enhanced privacy controls

We continue to focus on putting our customers in control so in the October Update we are enhancing the privacy choice and controls available to users to manage their privacy.  We are now enabling each new account on a device to personally tailor the main privacy settings, instead of only the initial user who sets up the device.   Furthermore, during new device setup, we now offer an activity history page that allows users the opportunity to opt in to sending activity history to Microsoft, to help improve cross device experiences.  This allows users to pick up where they left off in various activities (such as a working on a Word document) on their other devices (Learn more about activity history).

Additionally, we are splitting Inking & typing personalization out from the Speech privacy page.  This enables more granular control of your inking and typing personalization data by managing it separately from your online speech recognition data. Learn more about online speech recognition and inking & typing personalization.

nking typing personalization.

Semi-Annual Channel (Targeted) released

For our commercial customers, the release of the Windows 10, version 1809 on October 2, 2018 marks the start of the servicing timeline for the Semi-Annual Channel (“Targeted”) release; and beginning with this release, all future feature updates of Windows 10 Enterprise and Education editions that release around September will have a 30 month servicing timeline.  Just as we’re immediately beginning rolling out the October Update in phases to consumers, we recommend IT administrators do the same within their organizations to validate that apps, devices, and infrastructure used by their organization work well with the new release before broadly deploying. We use data to guide our phased consumer rollout and encourage commercial customers to do the same through Windows AnalyticsThe update is now available through Windows Server Update Services (WSUS)Windows Update for Business (WUfB) and System Center Configuration Manager’s (SCCM) phased deployment.  For an overview of what’s new and what’s changed, please see What’s new for IT pros in Windows 10, version 1809.

Continuously evolving Windows 10 and the update experience

We’re excited to bring you the latest Windows 10 Features and improvements and hope that you enjoy the improved update experience.    Please provide us feedback as we continue our journey to evolve the update experience, so that our great new product and security features and other enhancements arrive without disruption.


This article was provided by our service partner : Microsoft.com


Unsecure RDP Connections are a Widespread Security Failure

While ransomware, last year’s dominant threat, has taken a backseat to cryptomining attacks in 2018, it has by no means disappeared. Instead, ransomware has become a more targeted business model for cybercriminals, with unsecured remote desktop protocol (RDP) connections becoming the favorite port of entry for ransomware campaigns.

RDP connections first gained popularity as attack vectors back in 2016, and early success has translated into further adoption by cybercriminals. The SamSam ransomware group has made millions of dollars by exploiting the RDP attack vector, earning the group headlines when they shut down government sectors of Atlanta and Colorado, along with the medical testing giant LabCorp this year.

Think of unsecure RDP like the thermal exhaust port on the Death Star—an unfortunate security gap that can quickly lead to catastrophe if properly exploited. Organizations are inadequately setting up remote desktop solutions, leaving their environment wide open for criminals to penetrate with brute force tools. Cybercriminals can easily find and target these organizations by scanning for open RPD connections using engines like Shodan. Even lesser-skilled criminals can simply buy RDP access to already-hacked machines on the dark web.

Once a criminal has desktop access to a corporate computer or server, it’s essentially game over from a security standpoint. An attacker with access can then easily disable endpoint protection or leverage exploits to verify their malicious payloads will execute. There are a variety of payload options available to the criminal for extracting profit from the victim as well.

Common RDP-enabled threats

Ransomware is the most obvious choice, since it’s business model is proven and allows the perpetrator to “case the joint” by browsing all data on system or shared drives to determine how valuable it is and, by extension, how large of a ransom can be requested.

Cryptominers are another payload option, emerging more recently, criminals use via the RDP attack vector. When criminals breach a system, they can see all hardware installed and, if substantial CPU and GPU hardware are available, they can use it mine cryptocurrencies such as Monero on the hardware. This often leads to instant profitability that doesn’t require any payment action from the victim, and can therefore go by undetected indefinitely.

secure password

Solving the RDP Problem

The underlying problem that opens up RDP to exploitation is poor education. If more IT professionals were aware of this attack vector (and the severity of damage it could lead to), the proper precautions could be followed to secure the gap. Beyond the tips mentioned in my tweet above, one of the best solutions we recommend is simply restricting RDP to a whitelisted IP range.

However, the reality is that too many IT departments are leaving default ports open, maintaining lax password policies, or not training their employees on how to avoid phishing attacks that could compromise their system’s credentials. Security awareness education should be paramount as employees are often the weakest link, but can also be a powerful defense in preventing your organization from compromise.


This article was provided by our service partner : webroot.com

LAPS

Microsoft LAPS deployment and configuration guide

If you haven’t come across the term “LAPS” before, you might wonder what it is. The acronym stands for the “Local Administrator Password Solution.” The idea behind LAPS is that it allows for a piece of software to generate a password for the local administrator and then store that password in plain text in an Active Directory (AD) attribute.

Storing passwords in plain text may sound counter to all good security practices, but because LAPS using Active Directory permissions, those passwords can only be seen by users that have been given the rights to see them or those in a group with rights to see them.

The main use case here shows that you can freely give out the local admin password to someone who is travelling and might have problems logging in using cached account credentials. You can then have LAPS request a new password the next time they want to talk to an on-site AD over a VPN.

The tool is also useful for applications that have an auto login capability. The recently released Windows Admin Center is a great example of this:

LAPS

To set up LAPS, there are a few things you will need to do to get it working properly.

  1. Download the LAPS MSI file
  2. Schema change
  3. Install the LAPS Group Policy files
  4. Assign permissions to groups
  5. Install the LAPS DLL

Download LAPS

LAPS comes as an MSI file, which you’ll need to download and install onto a client machine, you can download it from Microsoft.

Schema change

LAPS needs to add two attributes to Active Directory, the administrator password and the expiration time. Changing the schema requires the LAPS PowerShell component to be installed. When done, launch PowerShell and run the commands:

Import-module AdmPwd.PS

Update-AdmPwdADSchema

You need to run these commands while logged in to the network as a schema admin.

Install the LAPS group policy files

The group policy needs to be installed onto your AD servers. The *.admx file goes into the “windows\policydefintions” folder and the *.adml file goes into “\windows\policydefinitions\[language]”

LAPS 02

Once installed, you should see a LAPS section in GPMC under Computer configuration -> Policies -> Administrative Templates -> LAPS

LAPS 03

The four options are as follows:

Password settings — This lets you set the complexity of the password and how often it is required to be changed.

Name of administrator account to manage — This is only required if you rename the administrator to something else. If you do not rename the local administrator, then leave it as “not configured.”

Do not allow password expiration time longer than required by policy — On some occasions (e.g. if the machine is remote), the device may not be on the network when the password expiration time is up. In those cases, LAPS will wait to change the password. If you set this to FALSE, then the password will be changed regardless of it can talk to AD or not.

Enable local password management — Turns on the group policy (GPO) and allows the computer to push the password into Active Directory.

The only option that needs to be altered from “not configured” is the “Enable local admin password management,” which enables the LAPS policy. Without this setting, you can deploy a LAPS GPO to a client machine and it will not work.

Assign permissions to groups

Now that the schema has been extended, the LAPS group policy needs to be configured and permissions need to be allocated. The way I do this is to setup an organizational until (OU), where computers will get the LAPS policy and a read-only group and a read/write group.

Because LAPS is a push process, (i.e. because the LAPS client on the computer is the one to set the password and push it to AD) the computer’s SELF object in AD needs to have permission to write to AD.

The PowerShell command to allow this to happen is:

Set-AdmPwdComputerSelfPermission -OrgUnit <name of the OU to delegate permissions>

To allow helpdesk admins to read LAPS set passwords, we need to allow a group to have that permission. I always setup a “LAPS Password Readers” group in AD, as it makes future administration easier. I do that with this line of PowerShell:

Set-AdmPwdReadPasswordPermission -OrgUnit <name of the OU to delegate permissions> -AllowedPrincipals <users or groups>

The last group I set up is a “LAPS Admins” group. This group can tell LAPS to reset a password the next time that computer connects to AD. This is also set by PowerShell and the command to set it is:

Set-AdmPwdResetPasswordPermission -OrgUnit <name of the OU to delegate permissions> -AllowedPrincipals <users or groups>

LAPS 04

Once the necessary permissions have been set up, you can move computers into the LAPS enabled OU and install the LAPS DLL onto those machines.

LAPS DLL

Now that the OU and permissions have been set up, the admpwd.dll file needs to be installed onto all the machines in the OU that have the LAPS GPO assigned to it. There are two ways of doing this. First, you can simply select the admpwd dll extension from the LAPS MSI file.

LAPS 05


Or, you can copy the DLL (admpwd.dll) to a location on the path, such as “%windir%\system32”, and then issue a regsvr32.exe AdmPwd.dll command. This process can also be included into a GPO start-up script or a golden image for future deployments.

Now that the DLL has been installed on the client, a gpupdate /force should allow the locally installed DLL to do its job and push the password into AD for future retrieval.

Retrieving passwords is straight forward. If the user in question has at least the LAPS read permission, they can use the LAPS GUI to retrieve the password.

The LAPS GUI can be installed by running the setup process and ensuring that “Fat Client UI” is selected. Once installed, it can be run just by launching the “LAPS UI.” Once launched, just enter the name of the computer you want the local admin password for and, if the permissions are set up correctly, you will see the password displayed.

LAPS 06

If you do not, check that that the GPO is being applied and that the permissions are set for the OU where the user account is configured.

Troubleshooting

Like anything, LAPS can cause a few quirks. The two most common quirks I see include when staff with permissions cannot view passwords and client machines do not update the password as required.

The first thing to check is that the admpwd.dll file is installed and registered. Then, check that the GPO is applying to the server that you’re trying to change the local admin password on with the command gpresult /r. I always like to give applications like LAPS their own GPO to make this sort of troubleshooting much easier.

Next, check that the GPO is actually turned on. One of the oddities of LAPS is that it is perfectly possible to set everything in the GPO and assign the GPO to an OU, but it will not do anything unless the “Enable Local password management” option is enabled.

If there are still problems, double check that the permissions that have been assigned. LAPS won’t error out, but the LAPS GUI will just show a blank for the password, which could mean that either the password has not been set or that the permissions have not been set correctly.

You can double check permissions using the extended attribute section of windows permissions. You can access this by launching Active Directory users and computers -> Browse to the computer object -> Properties -> Security -> Advanced

LAPS 07

Double click on the security principal:

LAPS 08

Scroll down and check that both Read ms-Mcs-AdmPwd and Write ms-Mcs-admpwd are ticked.

In summary, LAPS works very well and it is a great tool for deployment to servers, especially laptops and the like. It can be a little tricky to get working, but it is certainly worth the time investment.

Windows 10 quality updates explained & the end of delta updates

With Windows 10, quality updates are cumulative. Installing the most recent update ensures that you receive any previous updates you may have missed. We used a cumulative update model to reduce ecosystem fragmentation, and to make it easier for IT admins and end users to stay up to date and secure. However, cumulative updates can prove challenging when it comes to the size of the update and the impact that size can have on your organization’s valuable network bandwidth.

When a new Windows 10 feature update is released, the first cumulative update is generally between 100-200 MB in size. Across all versions of Windows 10, cumulative updates grow as additional components and features get serviced, pushing the size to somewhere between 1-1.2 GB. Generally, this happens within the first 6-8 months after the release of a feature update.

To help you reduce the burden on your network bandwidth, yet still receive the same equivalent update, Microsoft designed three different update types:

  • Full updates have all the necessary components and files that have changed since the last feature update. We refer to this as the latest cumulative update, or LCU. It can quickly grow to a little over 1 GB in size, but typically stays that size for the lifetime of that supported version of Windows 10.
  • Express updates generate differential downloads for every component in the full update based on several historical bases. For example, the latest May LCU contains tcpip.sys. We will generate a differential for all tcpip.sys file changes from April to May, March to May, and from the original feature release to May. A device leveraging express updates will use network protocol to determine optimal differentials, then download only what is needed, which is typically around 150-200 MB in size each month. Ultimately, the more up to date a device is, the smaller the size of the differential download. Devices connected directly to Windows Server Update Services (WSUS), System Center Configuration Manager, or a third-party update manager that supports express updates will receive these smaller payloads.
  • Delta updates include only the components that changed in the most recent quality update. Delta updates will only install if a device already has the previous month’s update installed. For example, assume in May that we changed tcpip.sys and ntfs.sys, but did not change notepad.exe. A device that downloads the delta update will get the latest version of tcpip.sys and ntfs.sys, but not notepad.exe. Delta updates include the full component (not just the individual files) that changed. As a result, they are larger than express updates, often around 300-500 MB in size.

Regardless of which type of update is installed on a device, that update is fully cumulative and installing the latest update will ensure that the device has all the necessary quality and security improvements.

Windows 10

This raises an important question: why make delta updates available if express updates are more optimized and don’t require the previous month’s update already be installed? Delta updates were originally created because the express update protocol was only available to devices connecting directly to Windows Update or Windows Server Update Services. In January 2017, the express protocol was extended to all 3rd party update management systems; however, we continued to ship delta updates to give companies and third-party update management tools time to implement support for express updates.

Currently delta updates are available for the following versions of Windows 10:

  • Windows 10, version 1607
  • Windows 10, version 1703
  • Windows 10, version 1709
  • Windows 10, version 1803

Now that express update support for third-party update managers has been available for over a year, we plan to stop shipping delta updates. Beginning February 12, 2019 Microsoft will end its practice of creating delta updates for all versions of Windows 10. Express updates are much smaller in size, and simplifying the cumulative options available will reduce complexity for IT administrators.

For more information on optimizing update bandwidth and more details about express updates, see Optimize Windows 10 update delivery. To learn more about Windows as a service, check out the new Windows as a service page on the Windows IT Pro Center.


Employee Onboarding

Automating Employee Onboarding in Active Directory

Employee onboarding is a task that is ripe for automation. Spend any time in the tech industry and you know that Active Directory (AD) helps improve workflow and operational services. In other words, it’s critical to an IT organization. When hired, every employee should be given an Active Directory user account, an email mailbox, access to various operating systems, a home folder with specific permissions available only to them, and so on.

However, AD is a big part of employee onboarding that many organizations are still doing manually. In many companies, the helpdesk is still manually opening Active Directory Users & Computers, creating a new user, and adding that user to a specific set of groups. This ultimately increases the risk of messing up that person’s other responsibilities within their account. Again, this is something automation can alleviate! And this is where Kennected comes in. Because staff onboarding is one of those tasks that’s performed hundreds of times and rarely changes, it’s a perfect candidate for automation even used for dbs check.

So, how do you go about automating onboarding in AD?

One of the easiest ways to automate AD tasks is with PowerShell – an automating management structure. By using a freely available PowerShell module, you can create scripts to do just about anything with AD.

For our purposes, we need to create a script to make a new user account for an employee and potentially add it to a few common groups. To do this, download a copy of Remote Server Administration Tools (RSAT) which will give you the Active Directory PowerShell module. Once you do this, ensure you’re on a company domain-joined computer and that you have the appropriate rights to create new users.

In the Active Directory PowerShell module, there is a command called “New-AdUser.” There are lots of ways to use this command but below is one of the most common ways. In this PowerShell code, we’ll generate a random password and then use it along with a first name, last name and username to create a new AD user.

Here’s an example of what this code looks like:


$password = [System.Web.Security.Membership]::GeneratePassword((Get-Random -Minimum 20 -Maximum 32), 3)

$secPw = ConvertTo-SecureString -String $password -AsPlainText -Force

$NewUserParameters = @{

GivenName = 'Adam'

Surname = 'Bertram'

Name = 'abertram'

Name = 'abertram'

}

New-AdUser @NewUserParameters

That’s it! No mouse clicking involved.

Once the above actions have been completed, we can move on to another useful AD onboarding command called “Add-AdGroupMember.” This will add the user that was just created to a few groups in a single line:

Add-AdGroupMember -Identity 'Accounting','Access to App1' -Members 'abertram'

One of the great things about automating employee onboarding with PowerShell is that once the code is built, it can be used for one – or even one hundred – employees with no extra effort.
For example, perhaps you have a ton of new employees you need provision for in AD. By using the “Import-CSV” command, you can read each row in that CSV file and run the code we just went over.

This example assumes you have a CSV with the columns “FirstName” and “LastName.”

Here it is exemplified below:


Import-Csv -Path C:\Employees.csv | foreach {

$password = [System.Web.Security.Membership]::GeneratePassword((Get-Random -Minimum 20 -Maximum 32), 3)

$secPw = ConvertTo-SecureString -String $password -AsPlainText -Force

$userName = '{0}{1}' -f $_.FirstName.Substring(0,1),$_.LastName

$NewUserParameters = @{

GivenName = $_.FirstName

Surname = $_.LastName

Name = $userName

AccountPassword = $secPw

}

New-AdUser @NewUserParameters

Add-AdGroupMember -Identity 'Accounting','Access to App1' -Members $userName

}

These are only a few of the many user onboarding tools available when you automate employee onboarding in Active Directory. If your organization has a predefined process with specific rules that must be followed, this could be just the beginning of a much larger employee onboarding process that can be 100% automated.


This article was provided by our service partner Connectwise.

meltdown spectre

Microsoft Releases More Patches for Meltdown & Spectre

Microsoft informed users on Tuesday that it released additional patches for the CPU vulnerabilities known as Meltdown and Spectre, and removed antivirus compatibility checks in Windows 10.

Meltdown and Spectre allow malicious applications to bypass memory isolation and access sensitive data. Meltdown attacks are possible due to CVE-2017-5754, while Spectre attacks are possible due to CVE-2017-5753 (Variant 1) and CVE-2017-5715 (Variant 2). Meltdown and Spectre Variant 1 can be resolved with software updates, but Spectre Variant 2 requires microcode patches.

In addition to software mitigations, Microsoft recently started providing microcode patches as well. It initially delivered Intel’s microcode updates to devices running Windows 10 Fall Creators Update and Windows Server 2016 (1709) with Skylake processors.

Now that Intel has developed and tested patches for many of its products, Microsoft has also expanded the list of processors covered by its Windows 10 and Windows Server 2016 updates. Devices with Skylake, Coffee Lake and Kaby Lake CPUs can now receive the microcode updates from Intel via the Microsoft Update Catalog.

Microsoft also informed customers on Tuesday that software patches for the Meltdown vulnerability are now available for x86 editions of Windows 7 and Windows 8.1.

The company has also decided to remove the antivirus compatibility checks in Windows 10. The decision to introduce these checks came after the tech giant noticed that some security products had created compatibility issues with the Meltdown patches. This resulted in users not receiving security updates unless their AV vendor made some changes.

Microsoft has determined that this is no longer an issue on Windows 10 so the checks have been removed. On other versions of the operating system, users will still not receive updates if their antivirus is incompatible.

Microsoft’s Patch Tuesday updates for March 2018 fix over 70 flaws, including more than a dozen critical bugs affecting the company’s Edge and Internet Explorer web browsers.

office365

Introducing the Office 365 Secure Score

Ever wonder how secure your Office 365 organization really is? Time to stop wondering – the Office 365 Secure Score is here to help. Secure Score analyzes your Office 365 organization’s security based on your regular activities and security settings and assigns a score. Think of it as a credit score for security.

How do I get to Secure Score?

Anyone who has admin permissions (global admin or a custom admin role) for an Office 365 Business Premium or Enterprise subscription can access the Secure Score at https://securescore.office.com. Users who aren’t assigned an admin role won’t be able to access Secure Score. However, admins can use the tool to share their results with other people in their organization.

How does it work?

Secure Score figures out what Office 365 services you’re using (like OneDrive, SharePoint, and Exchange) then looks at your settings and activities and compares them to a baseline established by Microsoft. You’ll get a score based on how aligned you are with best security practices.

office365 secure score

If you want to improve your score, review the action queue to see what you can do to help increase security and reduce risks.

secure score 1

Expand an action to learn about what threats it’ll help protect you from and how you’ll get the job done.

To see the impact of your actions on your organization’s security, go to the Score Analyzer page and review your history.

Click any data point to see a breakdown of your score for that day. You can scroll down to see which controls were enabled and how many points you earned that day for each control.

How will it help me?

Using Secure Score helps increase your organization’s security by encouraging you to use the built-in security features in Office 365 (many of which you already purchased but might not be aware of). Learning more about these features as you use the tool will help give you piece of mind that you’re taking the right steps to protect your organization from threats.

But don’t just take our word for it. Customers who are using Secure Score have seen their score increase 5 times more than customers who aren’t using it. (The increase in score corresponds with the security features being used in their organizations.)

Check out this Microsoft blog post to learn more.