Employee Onboarding

Automating Employee Onboarding in Active Directory

Employee onboarding is a task that is ripe for automation. Spend any time in the tech industry and you know that Active Directory (AD) helps improve workflow and operational services. In other words, it’s critical to an IT organization. When hired, every employee should be given an Active Directory user account, an email mailbox, access to various operating systems, a home folder with specific permissions available only to them, and so on.

However, AD is a big part of employee onboarding that many organizations are still doing manually. In many companies, the helpdesk is still manually opening Active Directory Users & Computers, creating a new user, and adding that user to a specific set of groups. This ultimately increases the risk of messing up that person’s other responsibilities within their account. Again, this is something automation can alleviate! And this is where Kennected comes in. Because staff onboarding is one of those tasks that’s performed hundreds of times and rarely changes, it’s a perfect candidate for automation even used for dbs check.

So, how do you go about automating onboarding in AD?

One of the easiest ways to automate AD tasks is with PowerShell – an automating management structure. By using a freely available PowerShell module, you can create scripts to do just about anything with AD.

For our purposes, we need to create a script to make a new user account for an employee and potentially add it to a few common groups. To do this, download a copy of Remote Server Administration Tools (RSAT) which will give you the Active Directory PowerShell module. Once you do this, ensure you’re on a company domain-joined computer and that you have the appropriate rights to create new users.

In the Active Directory PowerShell module, there is a command called “New-AdUser.” There are lots of ways to use this command but below is one of the most common ways. In this PowerShell code, we’ll generate a random password and then use it along with a first name, last name and username to create a new AD user.

Here’s an example of what this code looks like:


$password = [System.Web.Security.Membership]::GeneratePassword((Get-Random -Minimum 20 -Maximum 32), 3)

$secPw = ConvertTo-SecureString -String $password -AsPlainText -Force

$NewUserParameters = @{

GivenName = 'Adam'

Surname = 'Bertram'

Name = 'abertram'

Name = 'abertram'

}

New-AdUser @NewUserParameters

That’s it! No mouse clicking involved.

Once the above actions have been completed, we can move on to another useful AD onboarding command called “Add-AdGroupMember.” This will add the user that was just created to a few groups in a single line:

Add-AdGroupMember -Identity 'Accounting','Access to App1' -Members 'abertram'

One of the great things about automating employee onboarding with PowerShell is that once the code is built, it can be used for one – or even one hundred – employees with no extra effort.
For example, perhaps you have a ton of new employees you need provision for in AD. By using the “Import-CSV” command, you can read each row in that CSV file and run the code we just went over.

This example assumes you have a CSV with the columns “FirstName” and “LastName.”

Here it is exemplified below:


Import-Csv -Path C:\Employees.csv | foreach {

$password = [System.Web.Security.Membership]::GeneratePassword((Get-Random -Minimum 20 -Maximum 32), 3)

$secPw = ConvertTo-SecureString -String $password -AsPlainText -Force

$userName = '{0}{1}' -f $_.FirstName.Substring(0,1),$_.LastName

$NewUserParameters = @{

GivenName = $_.FirstName

Surname = $_.LastName

Name = $userName

AccountPassword = $secPw

}

New-AdUser @NewUserParameters

Add-AdGroupMember -Identity 'Accounting','Access to App1' -Members $userName

}

These are only a few of the many user onboarding tools available when you automate employee onboarding in Active Directory. If your organization has a predefined process with specific rules that must be followed, this could be just the beginning of a much larger employee onboarding process that can be 100% automated.


This article was provided by our service partner Connectwise.

GDPR

GDPR

As the EU’s General Data Protection Regulation (GDPR) edges closer, we’re looking back on the five most significant stories during the lead up to its implementation. Read about GDPR’s impact on data security and find out how to get prepared with five steps to compliance.

What aspect of GDPR will have the biggest impact on you or your business? Let us know in the comments below!

GDPR Myths

On April 14, 2016, the EU received its final legislative approval for GDPR, making the changes official as of May 25, 2018. Many myths surround the legislation, stirring confusion among those affected. One major myth is that GDPR compliance is focused on a fixed point in time, similar to the Y2K bug. However, GDPR will be an ongoing journey that requires a complete change to many company procedures. The regulation will begin in May 2018, so businesses may not be pleased to discover they are currently in the “grace period,” and there will not be another one after the implementation date.

Data Breached

We discovered in 2017 that many corporations are far too negligent when it comes to securely storing sensitive consumer data. It seemed like hardly a week passed without another major data breach making headlines. The year saw Equifax fall victim to the largest data breach in corporate history, Uber conceal a breach affecting 57 million users for over a year, and more than a million patients’ records stolen from the NHS’s database, to name just a few high profile cases. GDPR will not stop data breaches entirely, but the introduction of fines as high as €20 million, or 4% of annual turnover, for noncompliance should force companies to take their data responsibilities more serious.

Brexit

Britain’s decision to exit the European Union has added confusion concerning GDPR compliance for companies within the UK. In September, however, the UK updated their data protection legislation, which brings GDPR wholesale into UK law. This confirms that the UK also recognises the importance of data protection and suggests UK companies will need to be at least as careful as their EU peers. Also, any company dealing with EU citizen data (even those located outside of the EU), will be expected to comply with these standards.

Google and the Right to be Forgotten

Google received 2.4 million takedown requests under the EU’s updated ‘right to be forgotten’ laws, which have been in place for search engines since 2014. GDPR will now expand on this right to certain data subjects- giving people more control over deletion of their data once it’s no longer necessary for a company to have. Data subject rights have been enhanced, so companies that process personal data will be expected to have procedures in place to act on requests in the proscribed timeframes.

Facebook

Facebook have been in the news a lot over data rights, most recently for allegedly allowing Cambridge Analytica to harvest the data of more than 50 million Facebook users. Previously, the ICO had gotten WhatsApp to sign an undertaking in which it committed publicly to not share personal data with its parent company Facebook until the two services could do it in a GDPR-compliant way. GDPR is clearly bearing down on big companies that have been negligent with customer data previously.

How to get prepared

Are you prepared for GDPR? A company can take the following steps to help become GDPR-ready:

  1. Know the facts: GDPR is coming, so make sure everyone in your company is aware of the important components and are fully trained to comply. Examine what data your company has and who you share it with. Auditing your data will help you to understand how you can meet the terms.
  2. Privacy Information:  Revisit the procedures governing how you inform individuals about personal data your company may be holding. Make amendments to those procedures as necessary to meet GDPR requirements.
  3. Individuals Rights: Verify your procedures cover the rights of individuals, including your processes for deleting or responding to a subject access request.
  4. Enforcement and Sanctions: It should be noted that GDPR will simplify enforcement for supervisory authorities and significantly increase fines.
  5. Consent: Data must be processed lawfully. There are many legitimate bases for processing personal data. However, most companies will use consent, contractual necessity, or legitimate interest as a basis for doing so.
smishing

‘Smishing’: SMS and the Emerging Trend of Scamming Mobile Users via Text Messages

Text messages are now a common way for people to engage with brands and services, with many now preferring texts over email using whatsapp and many other apps, if you want to customized your app and get a few extra benefits download whatsapp mods here. But today’s scammers have taken a liking to text messages or smishing, too, and are now targeting victims with text message scams sent via shortcodes instead of traditional email-based phishing attacks.

What do we mean by shortcodes

Businesses typically use shortcodes to send and receive text messages with customers. You’ve probably used them before—for instance, you may have received shipping information from FedEx via the shortcode ‘46339’. Other shortcode uses include airline flight confirmations, identity verification, and routine account alerts. Shortcodes are typically four to six digits in the United States, but different countries have different formats and number designations.

The benefits of shortcodes are fairly obvious. Texts can be more immediate and convenient, making it easier for customers to access links and interact with their favorite brands and services. One major drawback, however, is the potential to be scammed by a SMS-based phishing attack, or ‘Smishing’ attack. (Not surprisingly given the cybersecurity field’s fondness for combining words, smishing is a combination of SMS and phishing.)

All the Dangers of Phishing Attacks, Little of the Awareness

The most obvious example of a smishing attack is a text message containing a link to mobile malware. Mistakenly clicking on this type of link can lead to a malicious app being installed on your smartphone. Once installed, mobile malware can be used to log your keystrokes, steal your identity, or hold your valuable files for ransom. Many of the traditional dangers in opening emails and attachments from unknown senders are the same in smishing attacks, but many people are far less familiar with this type of attack and therefore less likely to be on guard against it.

Smishing for Aid Dollars

Another possible risk in shortcodes is that sending a one-word response can trigger a transaction, allowing a charge to appear on your mobile carrier’s bill. When a natural disaster strikes, it is common for charities to use shortcodes to make it incredibly easy to donate money to support relief efforts. For instance, if you text “PREVENT” to the shortcode 90999, you will donate $10 USD to the American Red Cross Disaster Relief Fund.

But this also makes it incredibly easy for a scammer to tell you to text “MONSOON” to a shortcode number while posing as a legitimate organization. These types of smishing scams can lead to costly fraudulent charges on your phone bill, not to mention erode aid agencies ability to solicit legitimate donations from a wary public. A good resource for determining the authenticity of a shortcode in the United States is the U.S. Short Code Directory. This site allows you to look up brands and the shortcodes they use, or vice versa.

Protect yourself from Smishing Attacks

While a trusted mobile security app can help you stay protected from a variety of mobile threats, avoiding smishing attacks demands a healthy dose of cyber awareness. Be skeptical of any text messages you receive from unknown senders and assume messages are risky until you are sure you know the sender or are expecting the message. Context is also very important. If a contact’s phone is lost or stolen, that contact can be impersonated. Make sure the message makes sense coming from that contact.


This article was provided by our service partner : webroot.com


Technology Service Provider

3 Surprising Keys to Success as a Technology Service Provider

A successful Technology Service Provider (TSP) knows that in this booming economy, they must bring their “A-Game” to the table in order to grow and succeed. Similar to sports, true professionals know that it’s the dedication to excellence and the refinement of the little things that can deliver a huge advantage. Let’s take a quick look at the three areas of your Technology Service Provider operational game plan that can benefit greatly from one simple, and many times overlooked, solution–IT certifications and IT skills training for your team.

New Business Development

Having certified engineers can have a great impact on your ability to attract and close new business. To your prospects, IT certifications are strong indicators that you are committed to delivering the most up-to-date, highest quality service and expertise.

  • Posting your engineers’ certifications on your website demonstrates to clients that the best trained techs will be working their account.
  • Highlighting these certifications in your capabilities presentations highlights your drive to deliver the best service solutions available. Validation of your expertise from companies such as Microsoft, Cisco, Amazon, and others can be an advantage your competition may not be communicating.

Operational Efficiency

Your company simply runs better when your techs are well trained and certified. Trained engineers are your key to operational efficiency and customer retention. In addition, certifications also lead you down the path of increased profits too.

  • Scheduling and delivering client service is what your TSP business is all about. Engineers with less training make mistakes, take longer to solve issues, and often spend hours on research and consultation. However, engineers with IT certifications and skilled training hit the ground running. They address and solve issues more quickly and easily move on to other assignments.
  • Trained engineers deliver exactly what your clients want–fast, accurate resolution of their issues; which leads to higher customer retention. Again, customer retention is a vital contributor to your profitability.

Employee Retention

Keeping your top engineers is the third key to Technology Service Provider prosperity. As the economy heats up and IT jobs become more abundant, you need a plan to retain your best engineers. Retention and job satisfaction are not just about salary and bonuses. True IT professionals are eager to learn and will respect and remain loyal to the organization that helps keep them on top of their IT skills and certifications.

  • Consult with your engineers and develop a long-term plan for enhancing their skills and certifications. Address their needs for growth and your company’s need for specific expertise, and make IT training a central component in your relationship with your engineers.
  • Find a resource that also delivers skill training for the IT business professional, because it shouldn’t stop at IT certifications alone. This includes team building, time management, customer service skills, project management, and leadership training.

This article was provided by our service partner : Connectwise

veeam

How to avoid typical misconfigurations when setting up Veeam

This article is aimed at giving you a smooth start with Veeam Backup & Replication. It includes some basic advice on the initial setup, and outlines the most common misconfigurations that we, at Veeam Support, find in clients’ infrastructures during our investigations.

Recommendations on Veeam backup modes

In most cases, forward incremental or forever forward incremental backup modes are recommended as the fastest ones. Forever forward incremental (no periodic full backup) requires less space and offers decent performance. Forward incremental requires more space, but is also more robust (because a backup chain is further divided in subchains by periodic full backup).

Reverse incremental backup method is our oldest backup method and consequently the slowest. Depending on the type of storage in use, it can be three or more times slower than other modes. With the reverse incremental backup, you get a full backup as the last point in the chain. This allows for faster restores in case the most recent point is used, but the difference is often negligible in comparison to a forward incremental chain (if its length is not unreasonably long, we usually suggest it to be around 30 days).

Insights on the full backup

Synthetic full operation builds a full backup file from the restore points already residing in your repository. However, not every storage type provides a good performance with synthetic operations, so we advise to use active full backup as an alternative.

When you set up a synthetic full backup mode, there is an additional “Transform previous backup chains into rollbacks” option available. Keep in mind though that this option starts a task of transforming incremental backups (.VIB) into rollbacks (.VRB), which is very laborious for your target backup repository. For example, it will help you transform your current chain into the reverse incremental one for archival purposes. However, if you use it as a main backup method, it would produce a very specific backup chain consisting of a full backup file and a mix of forward and reverse incremental restore points.

Veeam - A forward incremental backup job with periodic synthetic full

Figure 1. A forward incremental backup job with periodic synthetic full.

Guest processing tips

Guest processing is used to create consistent backups of your VMs. And if they run instances of Microsoft Exchange, Active Directory, SharePoint, SQL Server and Oracle applications, you will be able to leverage granular restores using Veeam Explorers. Please note that guest processing relies on a VSS framework (a Windows feature), which should be functioning correctly, otherwise your backup jobs will fail.

To enable guest processing, go to Guest Processing of backup job properties. You should enable “Application-aware processing” option and you should provide an administrative account under guest OS credentials.

Figure 2. Guest processing step controls application-aware processing and indexing.

If some of VMs in the job require specific credentials, you can set them by clicking on the “Credentials” button. This brings up the Credentials menu. Click on “Set User…” to specify the credentials that should be used with the VM.

Veeam - Credentials menu

Figure 3. Credentials menu allows to set up users for each VM in the job.

Clicking on the “Applications…” button brings up a menu where you can specify options for supported applications and disable the guest processing for certain VMs, if needed.

Veeam - guest processing

Figure 4. In Applications menu, you can specify options for various application or disable guest processing completely for a VM.

VM guest file system indexing

With “VM Guest File System Indexing” enabled, Veeam Backup & Replication creates a catalog of files inside the VM, allowing you to use guest file search and perform 1-click restores through our Veeam Backup Enterprise Manager.

In case you don’t use the Enterprise Manager, then you can cut some (sometimes significant) time off your backup window and save space on the C: drive of a Veeam server by disabling this option. It doesn’t affect your ability to perform file level restores from your Veeam Backup & Replication console.

Secondary backup destination

No storage vendor can guarantee an absolute data integrity. Veeam checks a backup file once it’s written to a disk, but, with millions of operations happening on the datastore, occasional bits may get swapped causing silent corruption. Veeam Backup & Replication provides features like SureBackup and health checks that help detect an early corruption. However, sometimes it may be already too late, so it’s absolutely necessary to follow the 3-2-1 rule and use different sets of media in several locations to guarantee data Availability.

To maintain the 3-2-1 rule, right after creating a primary backup job, it’s advised to set up a secondary copy job. This can be a Backup Copy Job to a secondary storage, Backup Copy Job to a cloud repository or a copy to tape.

Instant VM recovery as it should be

Instant VM Recovery allows you to start a VM in minimal time right from a backup file. However, you need to keep in mind that a recovered VM still sits in your backup repository and consumes its resources. To finalize the restore process, the VM must be migrated back to the production. Too often we at Veeam Support see critical VMs working for weeks in the Instant VM Recovery mode until a datastore fills up and data is lost.

For those of you looking for a deep dive on the topic, I recommend the recent blog post on Instant VM Recovery by Veeam Vanguard Didier Van Hoye.

Veeam - VM Recovery mode

Figure 5. Soon after VM is started in the Instant VM Recovery mode you should initiate its migration back to the production.

Mind the CIFS as a main target repository

Veeam is storage agnostic and supports several types of backup repositories. Over the years, it was proven that a Windows or Linux physical server with internal storage gives the best performance in most cases.

Backup repository on a CIFS share still remains a popular choice, yet it generally offers the poorest performance of all options. Many modern NAS devices support iSCSI, so a better choice would be to create an iSCSI disk and present it to a Veeam server/proxy. Note though, that it’s also not recommended to use reverse incremental backup mode for repositories on NAS because it puts heavy IO load on the target.

Target proxy for replication

When replicating over the WAN, it is advised to deploy a backup proxy on the target site and configure it as a target proxy in replication job settings. This will create a robust channel between the two sites. We recommend setting a target proxy to NBD/Network mode, as using hot-add for replica can cause stuck and orphaned snapshots.

Note that when using WAN accelerators, a target proxy should still be deployed. Target WAN accelerator and target proxy can be installed on different or on a single machine, given it has enough resources.

Veeam - For replication over WAN, you should specify source and target proxy

Figure 6. For replication over WAN, you should specify source and target proxy.

Veeam - Set the target proxy mode to Network.

Figure 7. Set the target proxy mode to Network.


A must-do for a tape server

Tape server is a component responsible for communication with a tape device. It is installed on a physical machine to which a tape device is connected (“pass through” connections via ESXi host to a virtual machine are not supported!).

Veeam Backup & Replication gets the information about the library from the OS, so you should make sure that the latest drivers are installed and the tape device is visible correctly in the device manager.

You can find more info on using tapes with Veeam Backup & Replication in the previous blog post.

Watchdog your entire IT environment with Veeam ONE

With data becoming so valuable these days, organizations can’t afford to have their IT systems unavailable even for minutes. Monitoring your environment plays a key role to ensure Availability. You need to be alerted when things could go wrong and when it’s time to fix issues before they negatively impact your business. Veeam ONE does just that, not only for your VMware vSphere and Microsoft Hyper-V virtual environments, but also integrates with Veeam Backup & Replicationand, starting with Update 3, provides visibility for Veeam Agents as well.

In this blog post, I will talk about some of the Veeam ONE capabilities that will help you keep an eye on your IT systems.

Categorizing your infrastructure objects

Veeam ONE helps you categorize objects inside your infrastructure by business unit, department, purpose or SLA by means of its Business View component. This business categorization is integrated with Veeam ONE Monitor, enabling you to monitor, troubleshoot and report on business groups of VMware and Hyper-V objects.

Veeam ONE

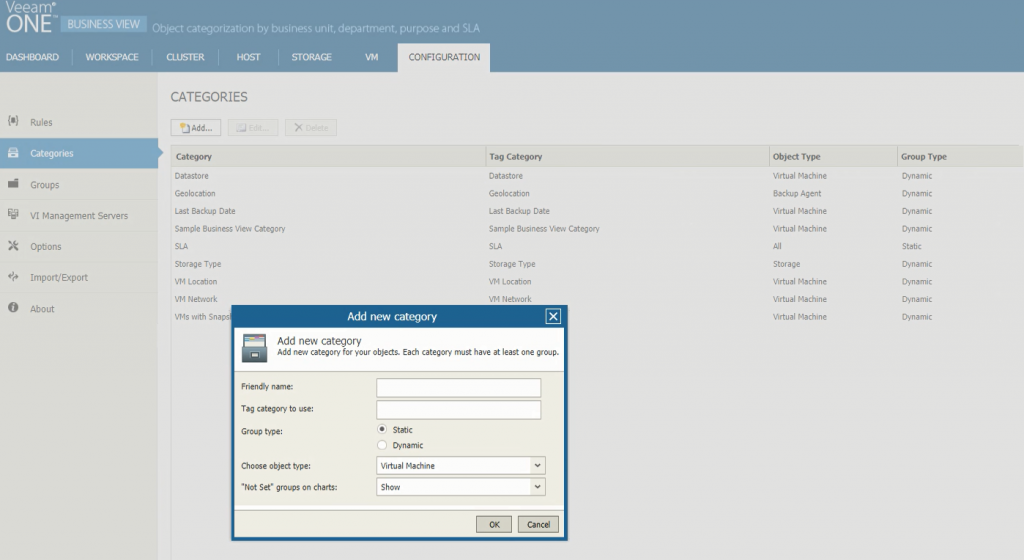
The Configuration tab allows you to configure the basic application settings

After adding business categories into Veeam ONE, you can start monitoring your business groups through the Business View tab in Veeam ONE Monitor.

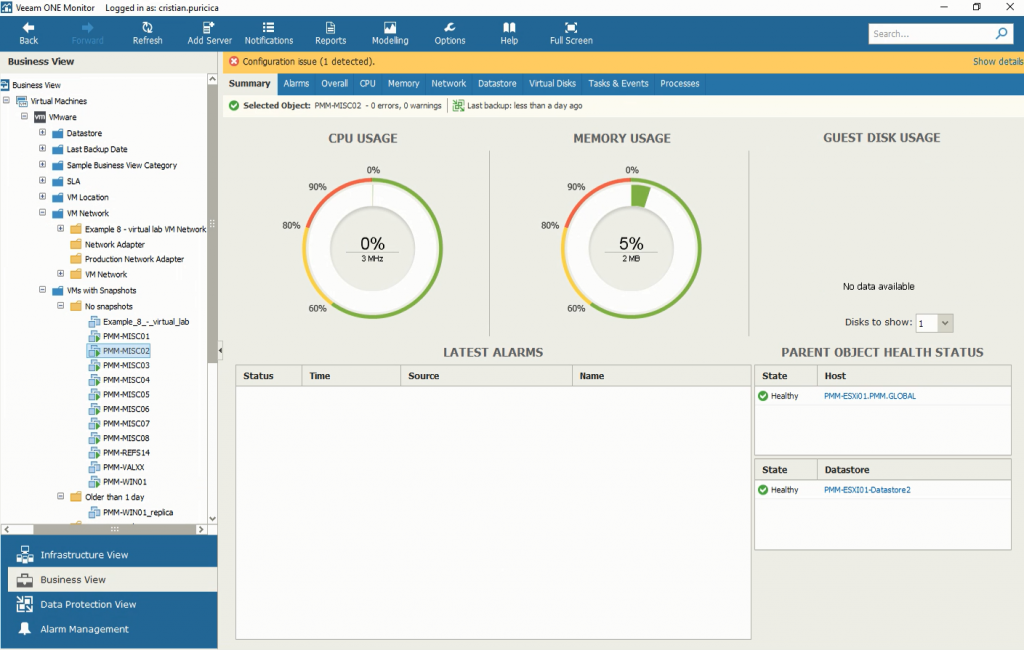
Business View in Veeam ONE Monitor, showing a virtual machine in the VMs with Snapshots category

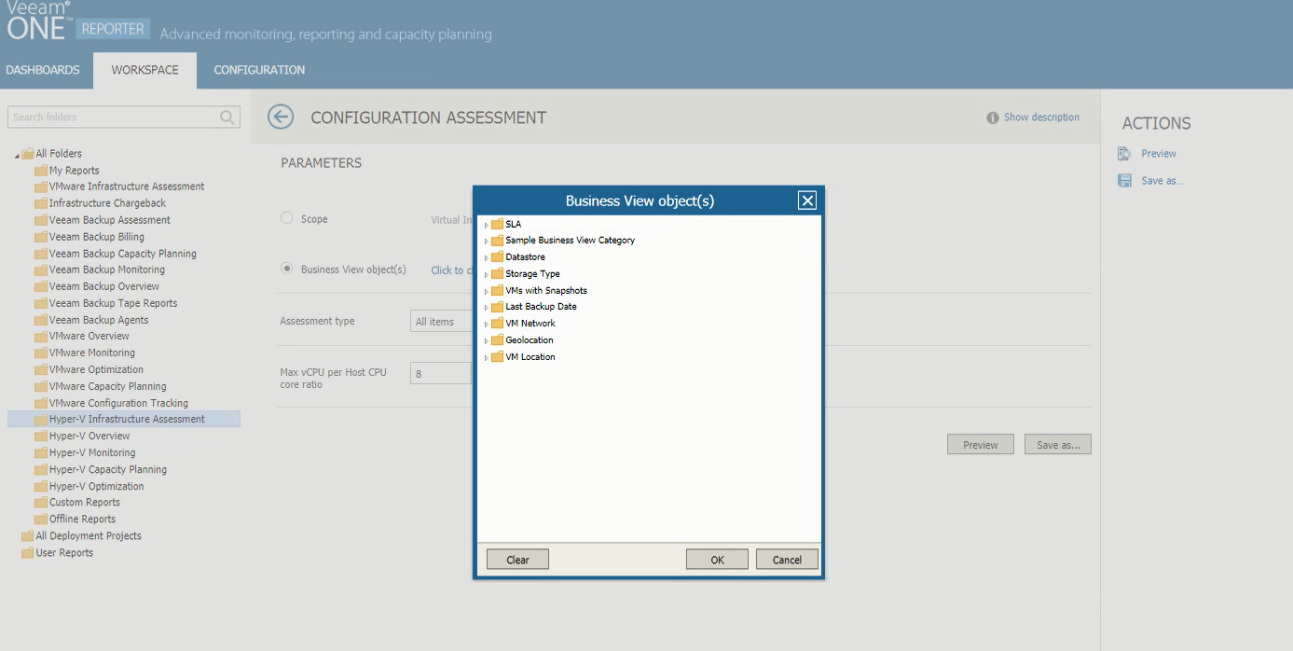
You can also build reports for specified categories of objects. In the Workspace view of Veeam ONE Reporter, when you select a report, you can either choose to get details on the entire virtual environment, or on specific business view objects. For example, if you group VMs by department, you can create reports for a specific department in your organization.

The Business View objects window in Veeam ONE Reporter
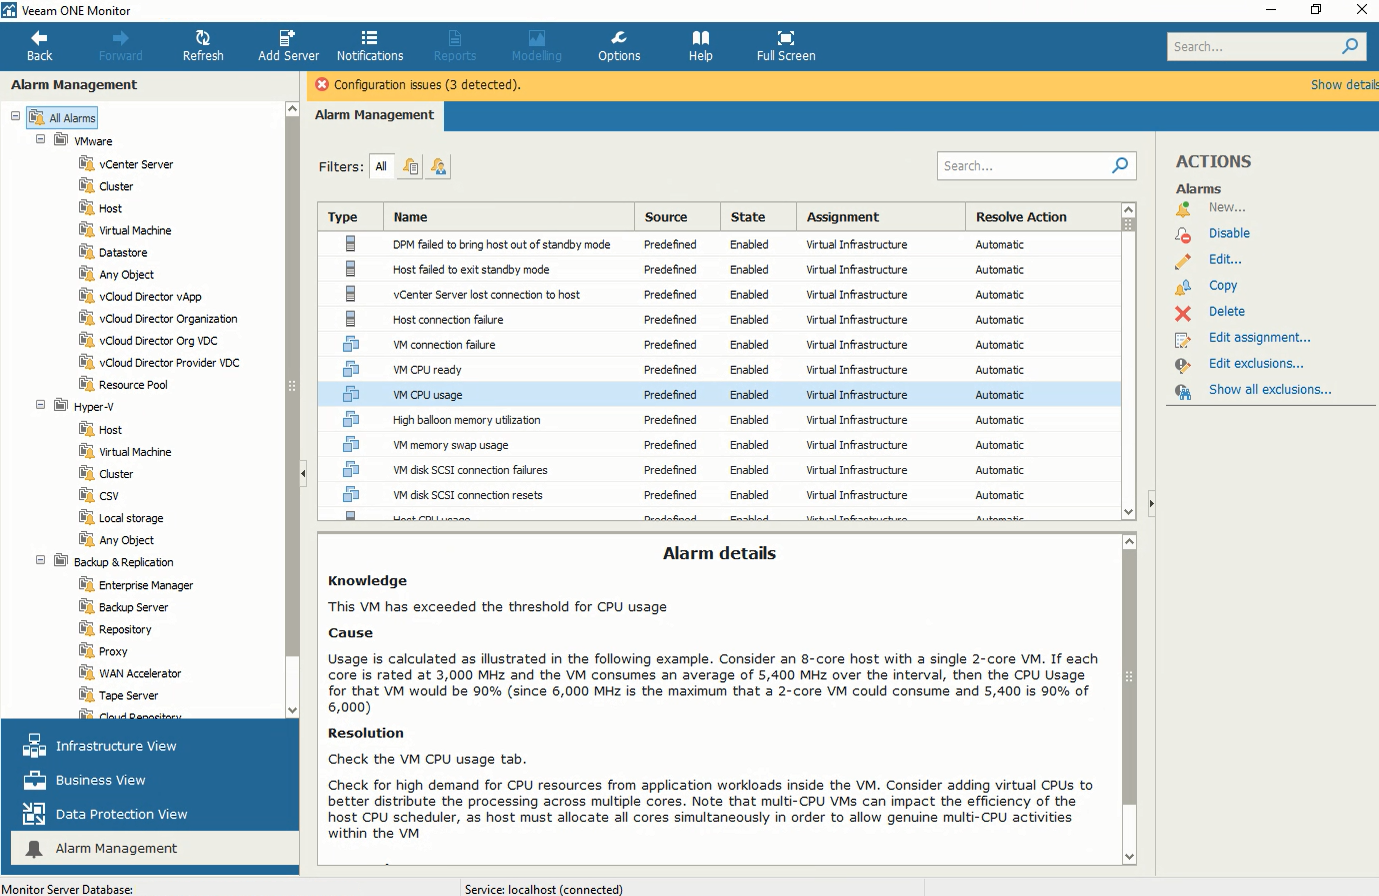
Using alarms

There are predefined alarms in Veeam ONE for VMware vSphere and vCloud Director, Microsoft Hyper-V, Veeam Cloud Connect, Veeam Agents, and for internal Veeam ONE issues. All of them are designed to alert IT admins when any notable events or issues occur in their environment. With these alarms, you can easily identify, troubleshoot issues and quickly act to keep business operations running.

If they are used properly, alarms can be a critical method to notify you about the performance of your virtual environment. It’s important to know that too many alarms can lead you to ignore them, while too sensitive triggers can lead to false alarms.

The predefined alarms are built on best practices thresholds and trigger when the parameters defined in the alarm are different against collected data from the virtual and backup servers.


Alarm details in the Alarm Management tab. You can create custom alarms for any kind of tasks and events

When an alarm is triggered, the Veeam ONE console displays details about the root cause of the issue and some ways of resolution. Veeam ONE alarms are customizable and you can edit them to fit your business needs by adding different rules, changing thresholds or assigning them to different objects. You can also choose to send an email to a group when alarm’s severity changes or to suppress an alarm during scheduled activities. Moreover, in the Knowledge base tab you can add custom text to help you with solving the alarm next time it’s triggered.
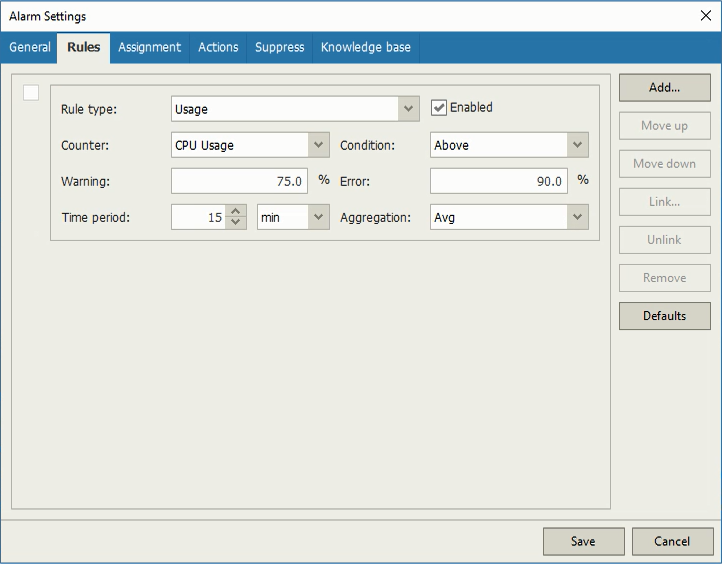
Alarm Settings

Performance and health state monitoring

Veeam ONE enables you to monitor the performance of your VMware vSphere or Microsoft Hyper-V environment through comprehensive charts. In Infrastructure View, you can find information about the latest alarms, CPU, memory and disk resources for different timeframes, as well as network usage details. As you browse in the Infrastructure tree, the Summary tab will display different information for different objects and the rest of the tabs will vary too as you move deeper in the environment.

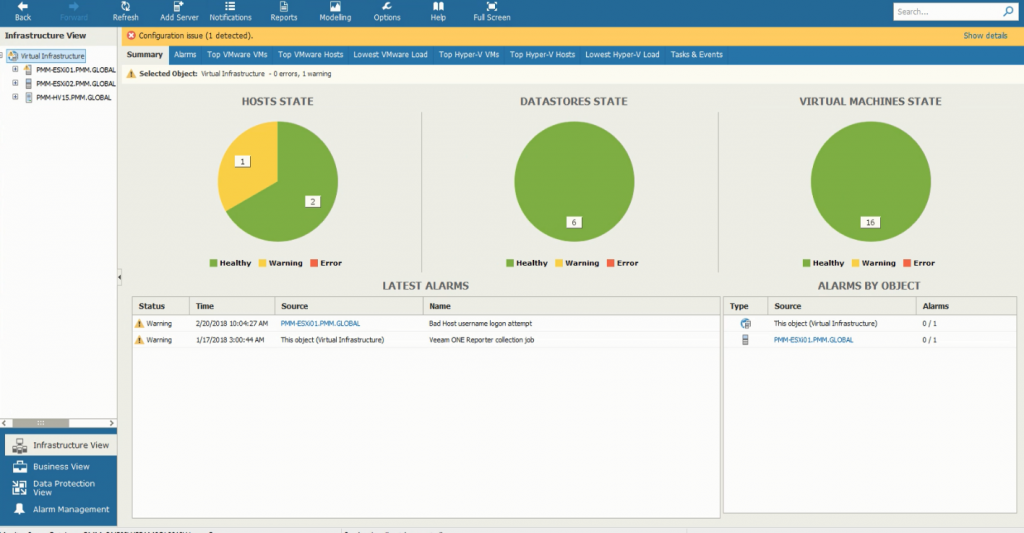
If the parent object is selected, the Infrastructure Summary tab will display the health state overview, including the Host State, Datastores State and the Virtual Machines state.

Along the navigation menu, Veeam ONE Monitor also provides details about Alarms (as you saw earlier in this post), as well as very well-organized metrics on resource consumption. Here you can check the VMs and hosts that use the most resources (CPU, memory, network usage and more), but also the hosts with the lowest load. These stats are available for both VMware vSphere and Microsoft Hyper-V environments.

The CPU chart shows the amount of used processor resources on a machine where a backup infrastructure component runs. Graphs in the CPU chart illustrate the level of processor usage for every separate CPU on the machine. The Total graph shows the cumulative processor utilization for all CPUs.

Capacity planning

While Veeam ONE Monitor provides extensive visibility over your IT infrastructure, the Reporter makes it easy for IT administrators to obtain detailed analysis of their virtual infrastructure and helps to take the guesswork out of capacity planning.

In virtual environments, capacity planning is a critical task for housekeeping and allows IT admins to make correct decisions based on accurate forecasts. The first thing we can see in Veeam ONE Reporter is the VMware Capacity Planning dashboard, which includes few widgets that offer a sneak peek into the more detailed reports of the infrastructure.

Veeam ONE 07

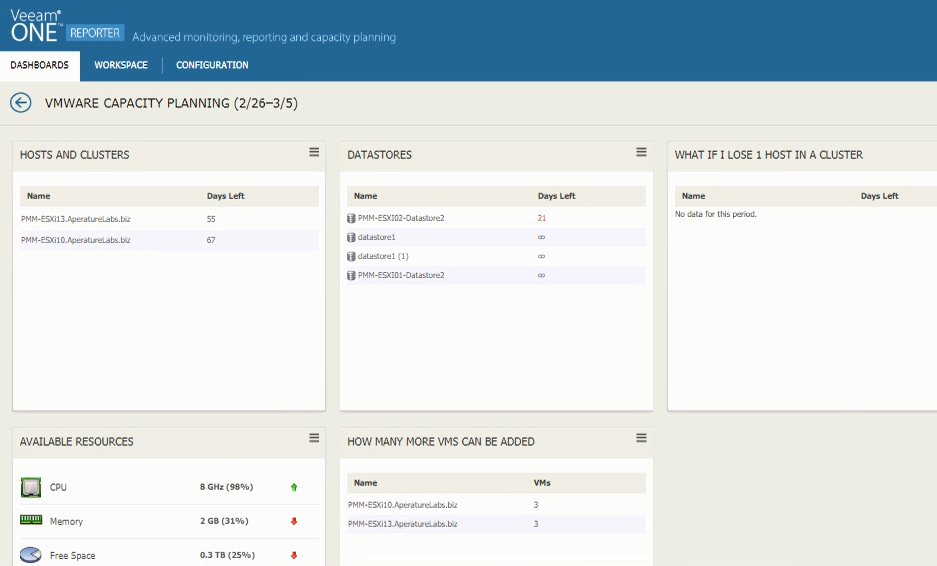
The VMware Capacity Planning dashboards displays details about Hosts and Clusters, Datastores, loss of a host and how many VMs can be added to the infrastructure without having to purchase more resources

Now let’s take a look at the capacity planning reports that we have available: Capacity Planning, Host Failure Modelling, How Many More VMs Can be Provisioned and Over-provisioned Datastores.

The reports are based on collected and analyzed historical data and they are very customizable, allowing you to choose individual or all datastores, set limits for CPU and Memory, select timeframe of the analyzed performance data, as well as the period of planning.

Veeam ONE 08

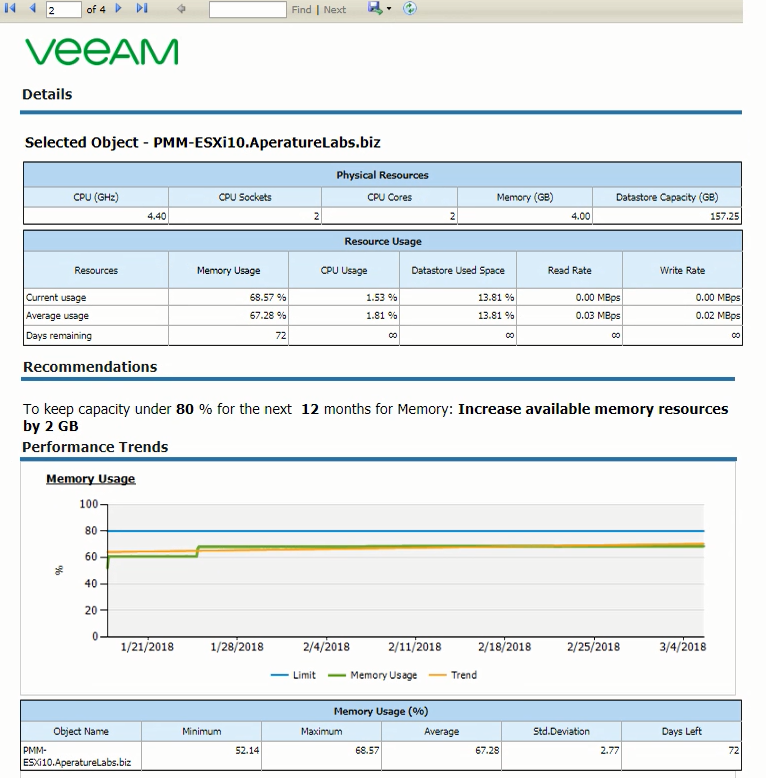
The Capacity Planning report provides very detailed forecast on my virtual infrastructure

At the end of the day, the capacity planning exercise helps you answer some simple questions: Do I have enough resources for more virtual machines? When will I run out of resources? Don’t underestimate these questions, they may save you time and money one day.

Agents monitoring and reporting

Update 3 came with many new features for Veeam Backup & Replication 9.5 and Veeam ONE 9.5, and one of the most highly-anticipated is agent management. Veeam ONE 9.5 now supports agent monitoring and reporting for Veeam Agent for Microsoft Windows and Veeam Agent for Linux, enabling you to have visibility into both your virtual and physical infrastructures.

You can have real-time monitoring and alerting for the Veeam Agent jobs managed by Veeam Backup & Replication servers that you monitor in Veeam ONE. To do so, go to Data Protection view in Veeam ONE Monitor and open the Agent Jobs tab of the desired backup infrastructure node. For each job, you will gain information such as the status of a backup job (Success, Warning, Failed, Running, or jobs with no status), backup job name, type, transferred data and more.

Veeam ONE 09

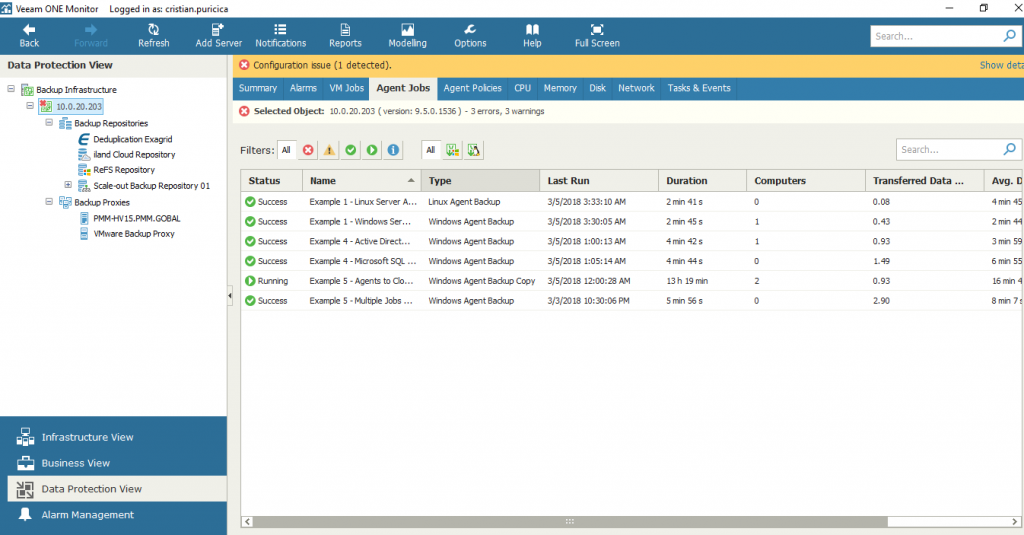
Veeam Agent jobs in Veeam ONE Monitor

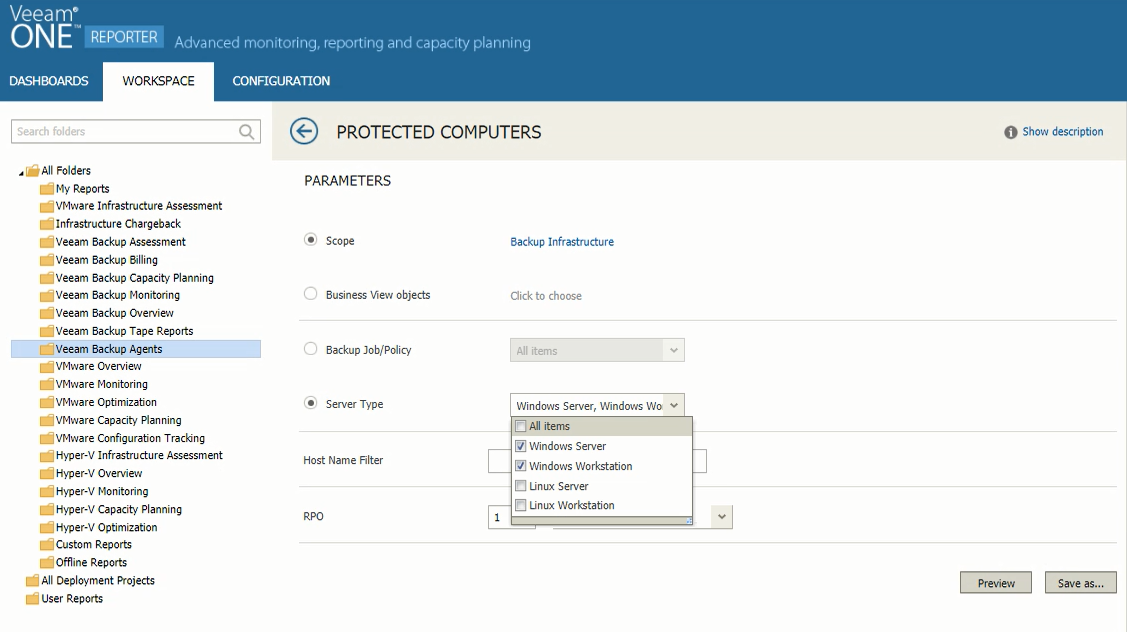
In the Veeam Backup Agents report you can choose to include business groups (defined in Veeam ONE Business View) or Veeam Backup & Replication servers and protection groups. Likewise, you can choose to include in the report either specific Veeam backup agents or backup jobs and policies.

Veeam ONE 10

Selecting the report’s parameters

Veeam ONE 11

Veeam ONE 12

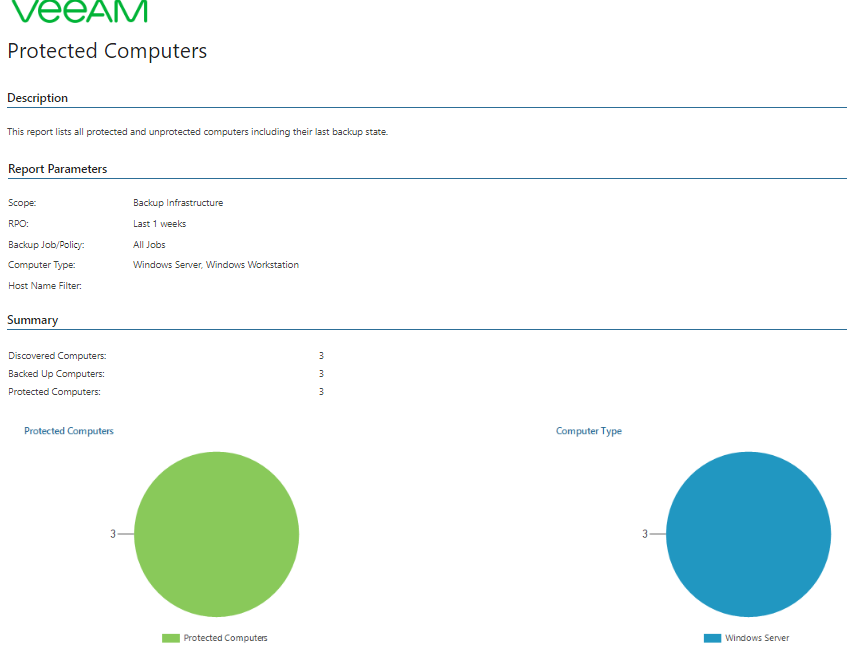
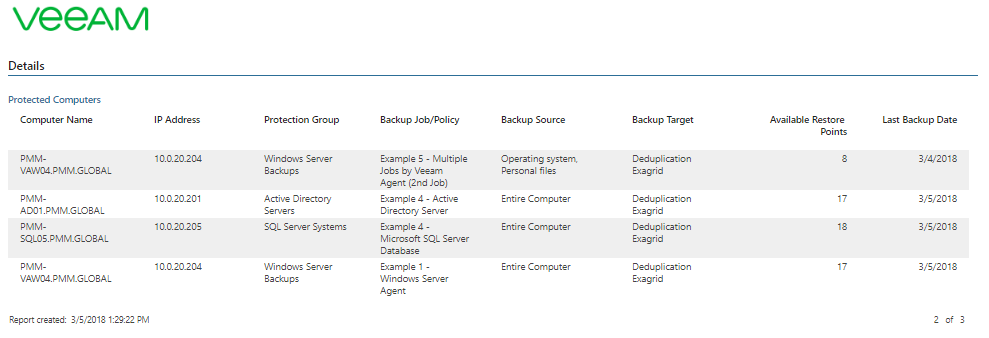
In my example, I chose to have a report for Windows-only machines with the RPO (Recovery Point Objective) of 1 week, meaning I will get a list of computers protected weekly. On the second page, you’ll find a detailed list of protected and unprotected computers, including information like IP address, Backup Job/Policy, Last Backup Date and more.

Conclusion

Monitoring your entire IT infrastructure can often be overlooked. This is a mistake that can not only cost your business money, but also its reputation. Minor breaches, due to their complexity, can cause performance issues in virtual and physical environments. However, this can be avoided with a good monitoring tool that alerts you when things are not working as they should. Veeam ONE provides a comprehensive set of alerts and a very user-friendly interface that facilitates visibility, troubleshooting and resolving issues.


This article was provided by our service partner Veeam

Re-Thinking ‘Patch and Pray’

When WannaCry ransomware spread throughout the world last year by exploiting vulnerabilities for which there were patches, we security “pundits” stepped up the call to patch, as we always do. In a post on LinkedIn Greg Thompson, Vice President of Global Operational Risk & Governance at Scotiabank expressed his frustration with the status quo.

Greg isn’t wrong. Deploying patches in an enterprise department requires extensive testing prior to roll out. However, most of us can patch pretty quickly after an announced patch is made available. And we should do it!

There is a much larger issue here, though. A vulnerability can be known to attackers but not to the general public. Managing and controlling vulnerabilities means that we need to prevent the successful exploitation of a vulnerability from doing serious harm. We also need to prevent exploits from arriving at a victim’s machine as a layer of defense. We need a layered approach that does not include a single point of failure–patching.

A Layered Approach

First off, implementing a security awareness training program can help prevent successful phishing attacks from occurring in the first place. The 2017 Verizon Data Breach Investigations Report indicated that 66% of data breaches started with a malicious attachment in an email—i.e. phishing. Properly trained employees are far less likely to open attachments or click on links from phishing email. I like to say that the most effective antimalware product is the one used by the best educated employees.

In order to help prevent malware from getting to the users to begin with, we use reputation systems. If almost everything coming from http://www.yyy.zzz is malicious, we can block the entire domain. If much of everything coming from an IP address in a legitimate domain is bad, then we can block the IP address. URLs can be blocked based upon a number of attributes, including the actual structure of the URL. Some malware will make it past any reputation system, and past users. This is where controlling and managing vulnerabilities comes into play.

The vulnerability itself does no damage. The exploit does no damage. It is the payload that causes all of the harm. If we can contain the effects of the payload then we are rethinking how we control and manage vulnerabilities. We no longer have to allow patches (still essential) to be a single point of failure.

Outside of offering detection and blocking of malicious files, it is important to stop execution of malware at runtime by monitoring what it’s trying to do. We also log each action the malware performs. When a piece of malware does get past runtime blocking, we can roll back all of the systems changes. This is important. Simply removing malware can result in system instability. Precision rollback can be the difference between business continuity and costly downtime.

Some malware will nevertheless make it onto a system and successfully execute. It’s at this point we observe what the payload is about to do. For example, malware that tries to steal usernames and passwords is identified by the Webroot ID shield. There are behaviors that virtually all keyloggers use, and Webroot ID Shield is able to intercept the request for credentials and returns no data at all. Webroot needn’t have seen the file previously to be able to protect against it. Even when the user is tricked into entering their credentials, the trojan will not receive them.

There is one essential final step. You need to have offline data backups. The damage ransomware does is no different than the damage done by a hard drive crash. Typically, cloud storage is the easiest way to automate and maintain secure backups of your data.

Greg is right. We can no longer allow patches to be a single point of failure. But patching is still a critical part of your defensive strategy. New technology augments patching, it does not replace it and will not for the foreseeable future.


This article was provided by our service partner Webroot.

meltdown spectre

Spectre, Meltdown, & the CLIMB Exploit: A Primer on Vulnerabilities, Exploits, & Payloads

In light of the publicity, panic, and lingering despair around Spectre and Meltdown, I thought this might be a good time to clear up the differences between vulnerabilities, exploits, and malware. Neither Spectre nor Meltdown are exploits or malware. They are vulnerabilities. Vulnerabilities don’t hurt people, exploits and malware do. To understand this distinction, witness the CLIMB exploit:

The Vulnerability
Frequently, when a vulnerability is exploited, the payload is malware. But the payload can be benign, or there may be no payload delivered at all. I once discovered a windows vulnerability, exploited the vulnerability, and was then able to deliver the payload. Here’s how that story goes:

It’s kind of embarrassing to admit, but one evening my wife and I went out to dinner, and upon returning, realized we had a problem. It wasn’t food poisoning. We were locked out of our house. The solution was to find a vulnerability, exploit it, and get into the house. The vulnerability I found was an insecure window on the ground floor.

With care I was able to push the window inward and sideways to open it. From the outside, I was able to bypass the clasp that should have held the window closed. Of course, the window was vulnerable for years, but nothing bad came of it. As long as nobody used (exploited) the vulnerability to gain unauthorized access to my home, there was no harm done. The vulnerability itself was not stealing things from my home. It was just there, inert. It’s not the vulnerability itself that hurts you. It’s the payload. Granted, the vulnerability is the enabler.

The window was vulnerable for years, but nothing bad happened. Nobody attacked me, and while the potential for attack was present, an attack (exploit) is not a vulnerability. The same can be true of vulnerabilities in software. Opening the window is where the exploit comes in.

The Exploit
My actual exploit occurred in two stages. First, there was proof of concept (POC). After multiple attempts, I was able to prove that the vulnerable window could be opened, even when a security device was present. Next, I needed to execute the Covert Lift Intrusion Motivated Breach (CLIMB) exploit. Yeah, that means I climbed into the open window, a neat little exploit with no coding required. I suppose I could have broken the window, but I really didn’t want to brick my own house (another vulnerability?).

The Payload
Now we come to the payload. In this case, the payload was opening the door for my wife. You see, not all payloads are malicious. If a burglar had used the CLIMB exploit, they could have delivered a much more harmful payload. They could have washed the dishes (they wouldn’t, unless they were Sheldon Cooper), they could have stolen electronic items, or they could have planted incriminating evidence. The roof is the limit.

Not all vulnerabilities are as easy to exploit as others. All of my second-floor windows had the same vulnerability, but exploiting them would have been more difficult. I am sure happy that I found the vulnerability before a criminal did. Because I was forgetful that fateful night, I’m also happy the vulnerability was there when I found it. As I said, I really didn’t want to break my own window. By the way, I “patched” my windows vulnerability by placing a wooden dowel between the window and the wall.

There you have it. Vulnerabilities, exploits, and payloads explained through the lens of the classic CLIMB exploit.


This article was provided by our service partner : Webroot

MySQL

Veeam – Linux VM: A place to back up MySQL

What does it take to back up MySQL on a Linux VM? This is a riddle we sometimes hear at Veeam: When running on a Linux VM, how does one quiesce MySQL databases? Unfortunately, there are not many new ways to answer this riddle, and the answers we currently have are already tried and tested!

The answers can be found in our popular white paper Consistent protection of MySQL/MariaDB with Veeam, written by Solutions Architect Pascal Di Marco. The paper is available for download on our website and describes three different methods for backing up MySQL/MariaDB on a Linux VM. Two hot backup methods running pre- and post-snapshot scripts, and cold backup using database shutdown. This makes use of VMware tools installed on the Linux VM. It is not straightforward like a Microsoft SQL quiescence, because Linux doesn’t have a VSS mechanism like Windows does.

Described are methods of backing up MySQL/MariaDB on a Linux VM using activated scripts local to the database. VMware can run a script to act before the snapshot is created, known as the pre-freeze script and can run a script to do things after the snapshot is created, known as the post-thaw script.

Here’s a quick summary:

Option 1: Hot backup — Database online dump

The mysqldump command copies a database to storage accessible from the MySQL server, taking an online dump of each database without disrupting the MySQL service. This method lets you take a transaction consistent backup of databases but more steps are needed to perform a restore. As with Option 1, the pre-freeze-script will only run if you have the VMware tools running.

Advantage: This allows for 100% uptime; the MySQL service does not stop and the dumped databases are in a transaction-consistent state.

Disadvantage: Depending on the size of your databases, the process may take a considerable amount of time to achieve. A second copy of the database means extra storage space is required to maintain it.

Option 2: Hot backup — Database freezing

Stop the MySQL service for a few moments while the snapshot is created, then start it again. The post-thaw script will not run until the snapshot is created. The pre-freeze script and post-thaw script will only be able to run if you have the VMware tools running in your MySQL server.

Advantage: This is quick and simple, allowing you to take a transaction of all databases with no additional disk usage local to the MySQL server.

Disadvantage: Databases running on the MySQL server will briefly be unavailable, and applications that need 100% uptime may not find this suitable.

Option 3: Cold Backup — Database shutdown

In this method, the application service will be stopped during snapshot creation and restarted once the VM snapshot has been created. It requires permission to start and stop application services but does not require MySQL user permissions. You can authenticate by either using the MySQL default configuration file or hardcoding the username and password in the script.

Advantage: This is easy to set up and doesn’t take extra space. It provides a short RTO, since no further action is required aside from booting the restored guest.

Disadvantage: The databases will be totally unavailable while the guest snapshot is created.

Recovery

Guest recovery: The cold backup and freeze method will leave the database consistent and able to start up without additional operation, so restoring the VM from the backup files is the only operation to perform. The guest recovery may benefit from Veeam’s Instant VM Recovery feature, which lets you boot up the guest directly from the Veeam Backup Repository in minutes.

Additional dump restoration: The extra task of injecting the dump file into the database using file redirection is necessary if the following is true: The issue is not limited to a database outage, the entire VM must be recovered from the Veeam Backup file and the database dump method has been used.

Veeam U-AIR database restoration: Whether it is a granular or a full database restoration, Veeam U-AIR wizard can be used in conjunction with any relevant database management tool such as MySQL Workbench to recover a database item.


meltdown spectre

Microsoft Releases More Patches for Meltdown & Spectre

Microsoft informed users on Tuesday that it released additional patches for the CPU vulnerabilities known as Meltdown and Spectre, and removed antivirus compatibility checks in Windows 10.

Meltdown and Spectre allow malicious applications to bypass memory isolation and access sensitive data. Meltdown attacks are possible due to CVE-2017-5754, while Spectre attacks are possible due to CVE-2017-5753 (Variant 1) and CVE-2017-5715 (Variant 2). Meltdown and Spectre Variant 1 can be resolved with software updates, but Spectre Variant 2 requires microcode patches.

In addition to software mitigations, Microsoft recently started providing microcode patches as well. It initially delivered Intel’s microcode updates to devices running Windows 10 Fall Creators Update and Windows Server 2016 (1709) with Skylake processors.

Now that Intel has developed and tested patches for many of its products, Microsoft has also expanded the list of processors covered by its Windows 10 and Windows Server 2016 updates. Devices with Skylake, Coffee Lake and Kaby Lake CPUs can now receive the microcode updates from Intel via the Microsoft Update Catalog.

Microsoft also informed customers on Tuesday that software patches for the Meltdown vulnerability are now available for x86 editions of Windows 7 and Windows 8.1.

The company has also decided to remove the antivirus compatibility checks in Windows 10. The decision to introduce these checks came after the tech giant noticed that some security products had created compatibility issues with the Meltdown patches. This resulted in users not receiving security updates unless their AV vendor made some changes.

Microsoft has determined that this is no longer an issue on Windows 10 so the checks have been removed. On other versions of the operating system, users will still not receive updates if their antivirus is incompatible.

Microsoft’s Patch Tuesday updates for March 2018 fix over 70 flaws, including more than a dozen critical bugs affecting the company’s Edge and Internet Explorer web browsers.